7. Releasing your package
Once you have implemented a bunch of functions, classes, and methods in your package and made sure your package can be installed in the standard way, once you have set up version control with git and you are using GitHub to develop your code online, once you have written documentation explaining how to install and use your code, you have created an API for all of the functionality in your package and you are hosting your package’s documentation online, once you have written a comprehensive test suite that checks that your code works as you expect, this test suite covers a large fraction of your package and you are using continuous integration to run your test suite automatically upon every change that you make to your code, you are ready to release a first version of your package to the world!
Many scientists still release their code by creating a source distribution (a “tarball”) and linking to it on their website, but this fails to take advantage of the large amount of support in the Python community (and beyond) to make releasing different versions of your code easy and allowing your code to be installed in standard ways on different platforms with minimal headaches for the users of your package. The primary venue for releasing Python packages is the Python Package Index (PyPI)
and it is releasing your package on PyPI that I focus on in this chapter. An additional popular method for releasing your code, especially if it contains compiled code and/or dependencies that are difficult to install, is to make your package installable by Anaconda’s conda install command. The most common way to do this for scientific packages is to use conda-forge, but describing how to get your package onto conda-forge is beyond the scope of these
notes.
7.1. Versioning your code
Before you release a first version of your code, you should decide on how you want to label different versions of your code, because once you release the first version, you’ll want to start work on the next version! When we first created the setup.py file, we included a version string, but I will now discuss versioning in a little more detail.
Your code’s version could be any unique string that states the version (e.g., “v1”), but to make your code’s version easy to interpret for a wide variety of users and compatible with standard Python functions to process version numbers, your code should follow the standard Python versioning scheme. Python version strings should follow the format
[N!]N(.N)*[{a|b|rc}N][.postN][.devN]
which I will briefly unpack here. We’ll ignore the [N!] part, the version epoch, which is only used when packages change the way they version and which the author of these notes has never seen in practice.
For released versions, you only have to pay attention to the
N(.N)*
part of the version string. This states that any released version string can be any string of integers separated by periods (e.g., “0.1.0”). While arbitrary lengths are in principle allowed, most packages use either two integers separated by a period (e.g., “1.0”) or three integers, (e.g., “2.1.3”). Upon a release, either the last integer is increased by 1 or one of the earlier integers in the sequence is increased and all following integers are set to 0. So, for example,
version “0.1” could be increased to either “0.2” or to “1.0” in the next release,
version “1.3.2” could be increased to either of “2.0.0”, “1.4.0”, or “1.3.3”.
Note that the version string does not contain “v”, that is, the version is “1.0.0”, not “v1.0.0” (that can be easy to forget!).
Standard Python usage of version numbers is not to use semantic versioning as advocated by semver, but to use a more loosely defined structure of “major.minor” or “major.minor.patch” where the “major” version is increased only when a package’s structure changes dramatically (causing much backwards incompatibility, e.g., Python 2 to Python 3) or when the package matures significantly to deserve a “1.x.x” version (having had “0.x.x” until then; e.g., scipy’s relatively recent version “1.0.0”, 16 years after the first release). Therefore, for most Python packages, major version changes are rare (but some packages update the major version more often, e.g., astropy). Typical releases will therefore increase the minor version number, e.g., going from version “1.1” to “1.2”. The third integer, called “patch” above, indicates small changes such as bug fixes or updates because of dependency changes. Such patch releases would typically be made from a branch of the code created at the latest minor version release to track bug fixes and other small changes, while development of the next minor version continues in the main development branch.
The remainder of the possible version string
[{a|b|rc}N][.postN][.devN]
deals with pre- and post-release updates to a package. The [{a|b|rc}N] part indicates pre-release versions, with a indicating an alpha release, b a beta release, and rc a “release candidate”. The N that can optionally follow each of these indicates the N-th version (e.g., “a2” would be the second alpha release). Unless you are developing a package with many users and/or that provides essential infrastructure where each release needs to be thoroughly tested, you will typically
not make use of these versions (but you could if you want). The [.postN] is reserved for changes to your code that happen “post release”. These are changes, not to the source of your code itself, but to the distribution of your code. You can for example create a .post1 release if you forgot to include the License file in your release; if you simply want to add the file, you should create a new release (because a release, once made, is final), but you are not changing any of the code.
Finally, the [.devN] is used to indicate development versions of your code. For example, “1.1.dev” is the development version that will lead to release “1.1” eventually. Note that there are a bunch of alternative syntaxes allowed by the standard (for example, you can use “alpha” instead of “a”), but for new versions it’s best to follow the actual standard discussed here.
One of the advantages of all packages using this standard versioning scheme is that this can be easily parsed by automated parsers, to check, for example, which version of a dependency users have installed on their systems. One way to do this is to use packaging package, which has version module with a function parse (documented here), that returns an object that represents the
version and that can be compared to other such objects. For example, we can check that the installed version of scipy is at least later than version “0.19” by doing
from packaging.version import parse as parse_version
import scipy
print(parse_version(scipy.__version__) >= parse_version('0.19'))
packaging.version.parse correctly deals with development, pre-release, and post-release versions.
You should include your package’s version in the setup.py file and define the __version__ attribute in your package’s top-level __init__.py file (exampy/__init__.py in the example package); you will likely also want to define it in the documentation’s source/conf.py. Because your package’s version then appears in multiple places in your code, you need to remember to update it everywhere when you increment the version number. One way to do this is to make it a part of your
release checklist (discussed below), you can also make use of automated tools like bumpversion, which can be configured to automatically update the version string in multiple files whenever you invoke bumpversion.
7.2. Preparing for your package’s release
In preparation for your package’s initial and each subsequent release, you’ll want to add or update some files in your repository. It’s useful to list files that need to be updated every release as part of a release checklist (which you can add as a RELEASE_CHECKLIST.md file in your repository as well) that explicitly lists all of the steps involved in releasing each version of your package, from preparing the release, over uploading your package to PyPI, to setting up the next development
version.
Some of the files that you will want to add or update for every release are:
A
HISTORY.txtorHISTORY.md(for formatted GitHub content) file that lists major changes and additions to your package since the previous release. For the first release, this file can simply state that this is the first release, but at each subsequent release you should update this file with all of the major changes since the previous release. It’s easiest to keep this file up to date by adding to it as you develop each version, rather than writing it at the end. If you find yourself having to write it at the end, go through all Issues and Pull Requests to find major changes, or look through thegitlog up to the last release (although if you are making the recommended frequent commits, this will be a long and detailed log). One way to help yourself keep track of major changes is to submit Pull Requests for all of these even if you are making the changes yourself and you could just merge them directly.If your documentation includes a page summarizing major changes, you’ll want to update that one as well.
Update the version number to that of the release you are going to make, typically at least in the
setup.pyfile and the top level__init__.pyfile. You should have been using a version “x.y.z.dev” while developing version “x.y.z” and in that case this is as simple as removing the “.dev” part of the version string.To obtain fine-grained control over which files are included in the source distribution, you need to use a
MANIFEST.infile. Many files are included by default, most importantly: all Python files included in your package (through thepackageskeyword of thesetuptools.setupcommand in yoursetup.pyfile), thesetup.pyfile itself, any files specified insetuptools.setup’spackage_datakeyword, scripts included in the setup, C source files for any C extensions specified insetuptools.setup, variousREADMEformats (without extension, or with.txt,.rst, or.mdextension), and theMANIFEST.infile itself. Test files followingtest/test*.pyare also included (nottests/test*.py). TheMANIFEST.infile then gives you the option to include extra files or to exclude files from the standard list. To include a file, add a lineinclude FILEinMANIFEST.inwhereFILEis the path to the file, which can include standard wildcards. To exclude a file, add a lineexclude FILE(e.g., to exclude the tests, addexclude test/test*.py). One file you’ll want to include is the LICENSE file. If you have other useful files in your repository, e.g.,INSTALL.mdwith installation instructions (typically given in the README file) orAUTHORS.mdwith contributors to your code, you can also include them in theMANIFEST.infile. If your package includes a C extension, you’ll have to include the header files, because they will not by default be copied to the source distribution.As an example, for the
exampyexample package, I created the followingMANIFEST.ininclude LICENSE README.md exclude tests/test*.py
to include the
LICENSEfile, to make sure to include theREADME.mdfile (it should be included anyway, but it does not hurt to make sure), and to exclude the tests.If you have added files to your package since the last release, you might have to add some of them to
MANIFEST.into make sure that they are included in the source distribution. You can get a list of all files added since your last release by runninggit diff --name-status PREV_RELEASE_HASH | grep ^A
where
PREV_RELEASE_HASHis thegithash corresponding to the previous release.
Once you’re happy with all of the necessary additions and changes, you should make sure to have commit all of the changes to your repository and push them to GitHub such that your automated tests can run one last time to check that all is well.
Provided that your tests pass, you can then move on to the next step, which is tagging the next release and creating it on GitHub. To create a tag, simply run
git tag x.y.z
where x.y.z is the version of the release. Push this to GitHub with
git push --tags
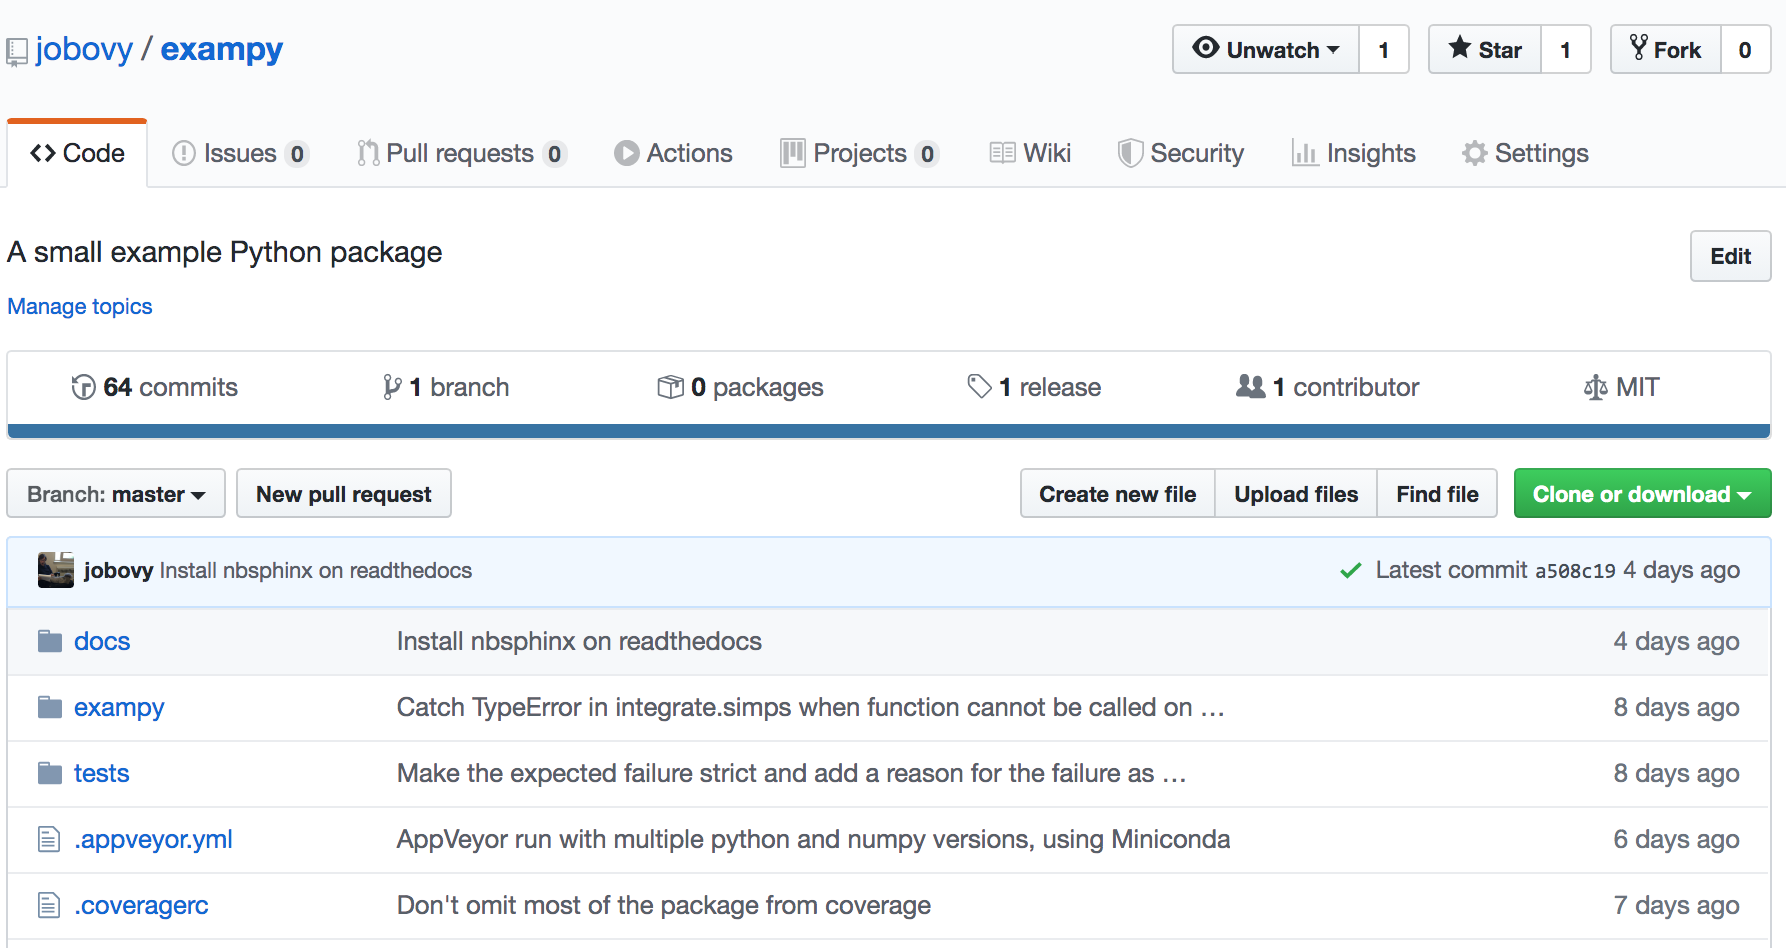
Then you can go to your package’s GitHub page and navigate to the “Releases” tab, in the row above the directory structure of your repository:
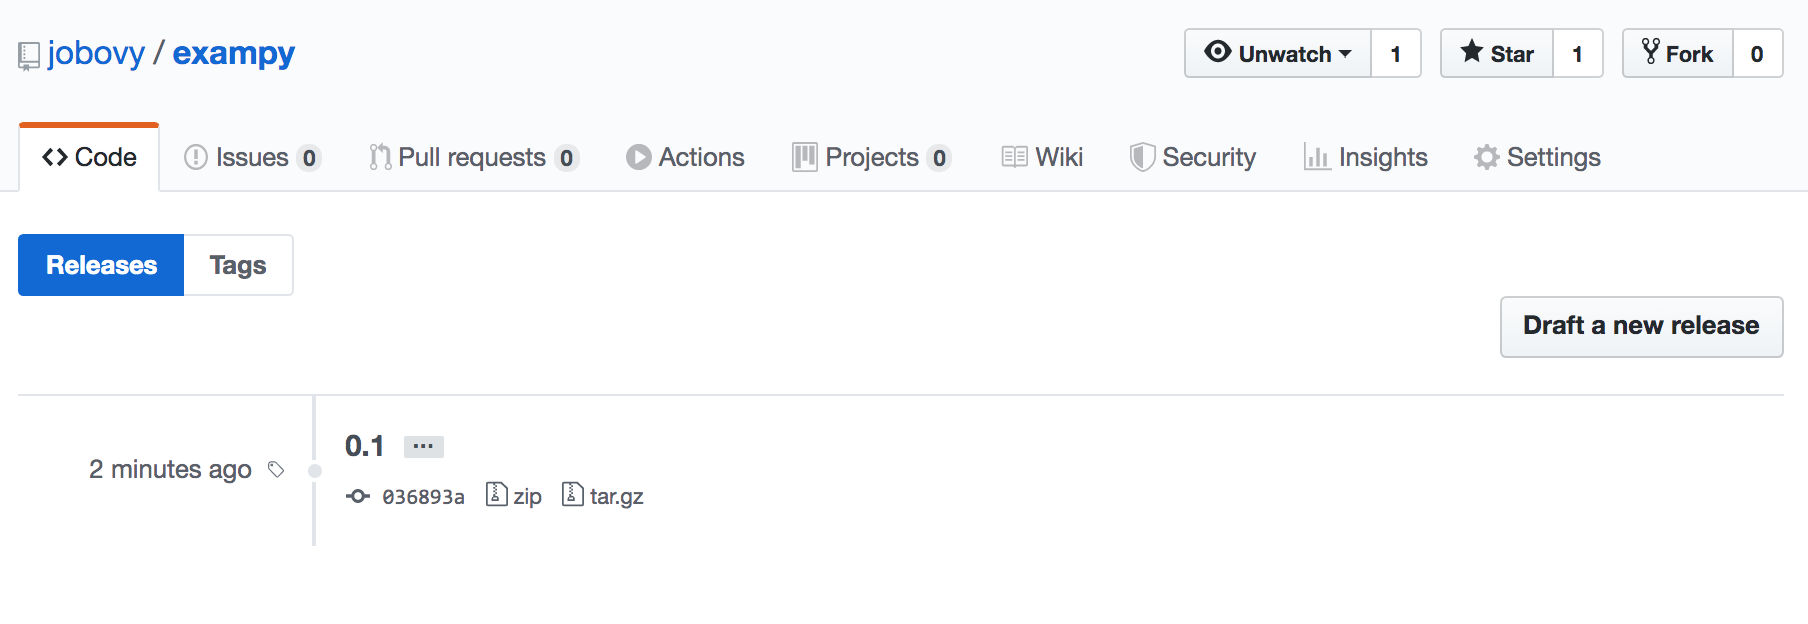
When you have pushed the tag, you will see that GitHub has created a release, that currently just looks like a stub:
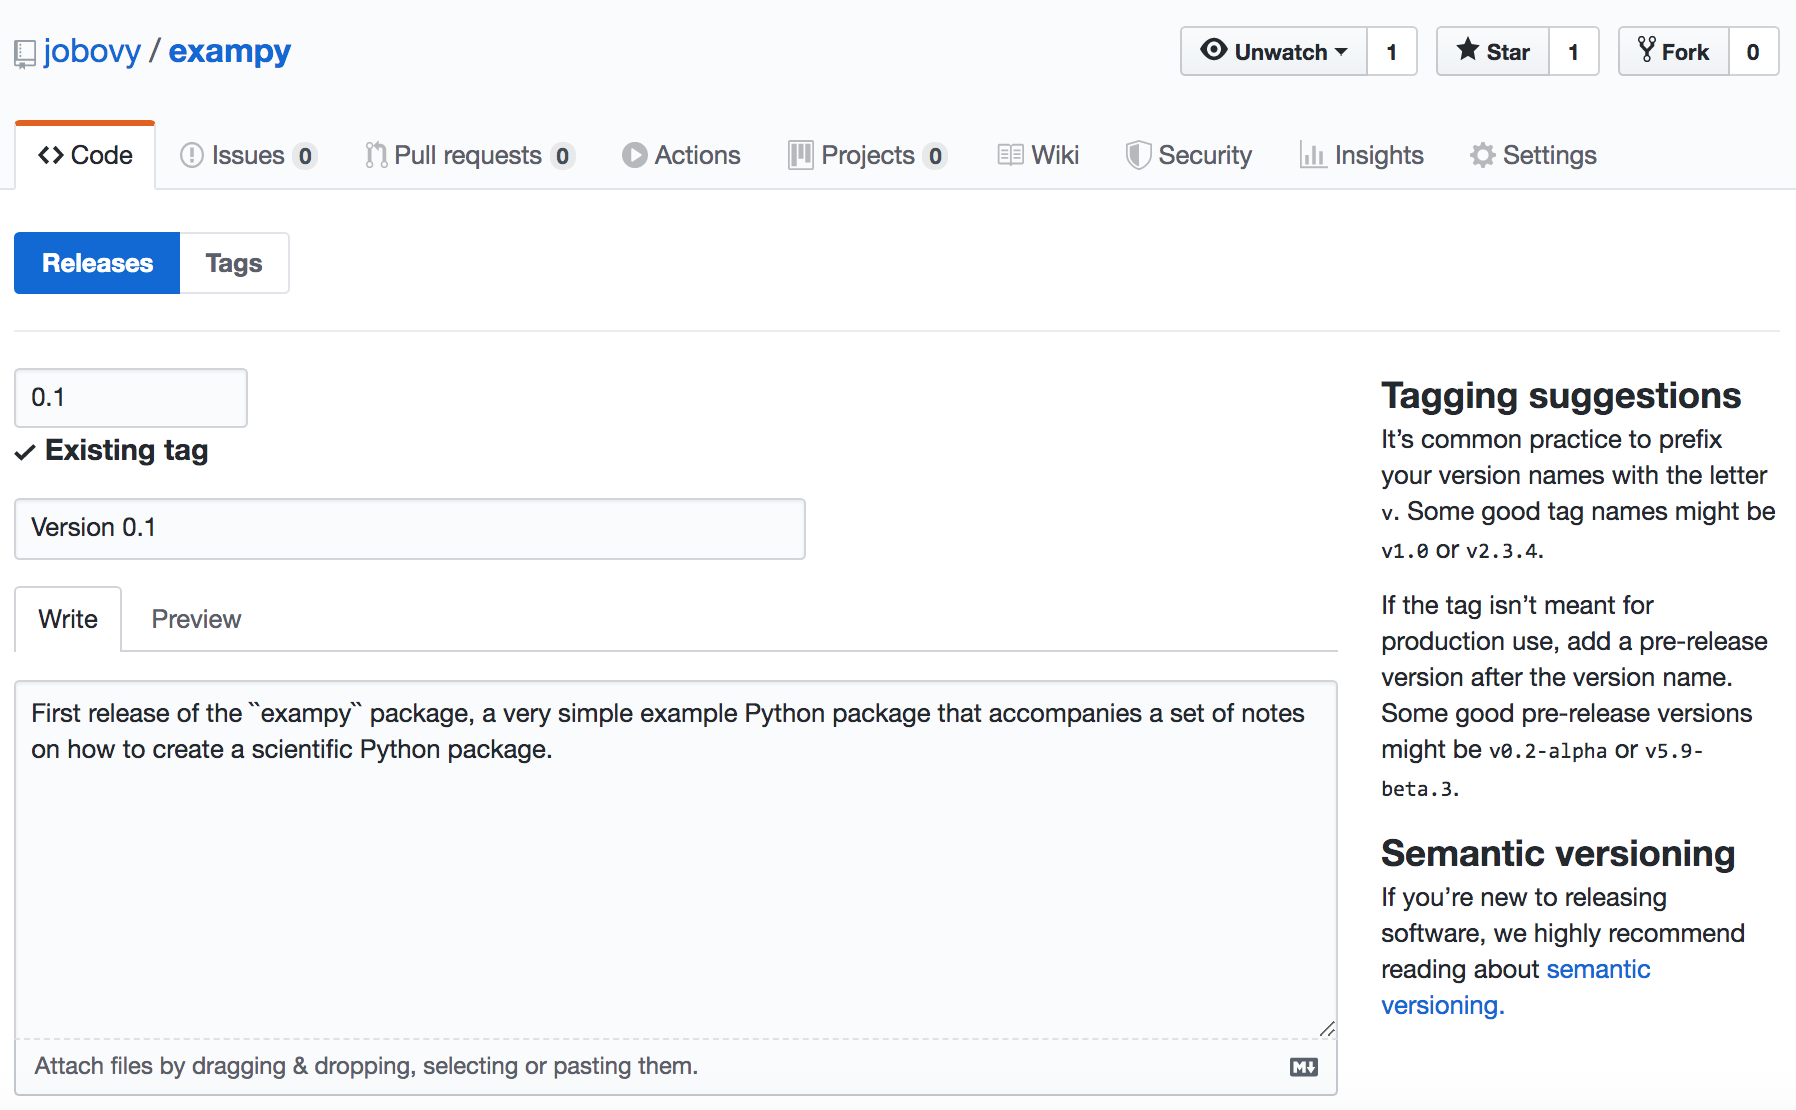
You can create the actual release by clicking on this, clicking on “Edit tag”, and giving the release a title and short description (as usual, using MarkDown formatting), and hitting “Publish release” on the page that looks like this:
Then you have created the release of your code on GitHub!
7.3. Uploading your package to the Python Package Index (PyPI)
Next, we will release our package to the Python Package Index PyPI. To get started, navigate to PyPI at https://pypi.org/ to register for an account; we’ll use TestPyPIat to test that our release looks okay and works as expected, so also navigate to TestPyPI at https://test.pypi.org/ to register for an account on TestPyPI (TestPyPI is entirely separate from PyPI, so your PyPI
account is separate from your TestPyPI account). Interacting with PyPI and TestPyPI is done, of course, using a Python package called twine, which you can install with
pip install twine
At first, we will simply package the source of our package and upload it to PyPI as a first release. To create a source distribution, do
python setup.py sdist
in your package’s top-level directory. To make sure you aren’t accidentally including files in your development version that are not part of the package, it is useful to do this from a fresh clone of your repository, checking out the tag with
git checkout x.y.z
where x.y.z is the version of the tag that you created above. Running the python setup.py sdist command creates a source distribution for the current released version in a dist/ directory, with a filename of something like dist/PACKAGENAME-VERSION.tar.gz, e.g., dist/exampy-0.1.tar.gz for the first release of the example exampy package. If this is not your first release, you’ll want to remove old releases from the dist/ directory before continuing (but you should be
working with a fresh clone, so an empty dist/ directory).
The first thing you want to check is that the long_description that you have specified in your setup.py’s setuptools.setup command can be correctly displayed by PyPI; to check this, run
twine check dist/*
which performs this check for all source distributions in the dist/ directory (you can also manually specify the latest one as the filename). It’s useful to run this check before creating the final release, so you can fix any issues before tagging the release. Add it to your release checklist for the next release!
Next, upload the source distribution to TestPyPI. TestPyPI is a clone of PyPI and you can therefore check that your package release upload and the way it appears on the website look okay before publishing the final release. Once you upload a version to PyPI you can no longer easily change it, so for every release you should check with TestPyPI to make sure you are not making any mistakes (e.g., formatting errors in the long_description that will form the webpage for your
package on PyPI. You can upload your source distribution by doing
twine upload --repository-url https://test.pypi.org/legacy/ dist/*
which uploads every release file in the dist/ directory; currently this is only the source distribution, but when you build binary distributions (as I will discuss below), those would also be uploaded. You’ll be prompted for your username and password and if all goes well you should see the following output (for the example package’s first release)
Enter your username: USERNAME
Enter your password:
Uploading distributions to https://test.pypi.org/legacy/
Uploading exampy-0.1.tar.gz
100%|██████████████████████████████████████| 5.46k/5.46k [00:01<00:00, 2.85kB/s]
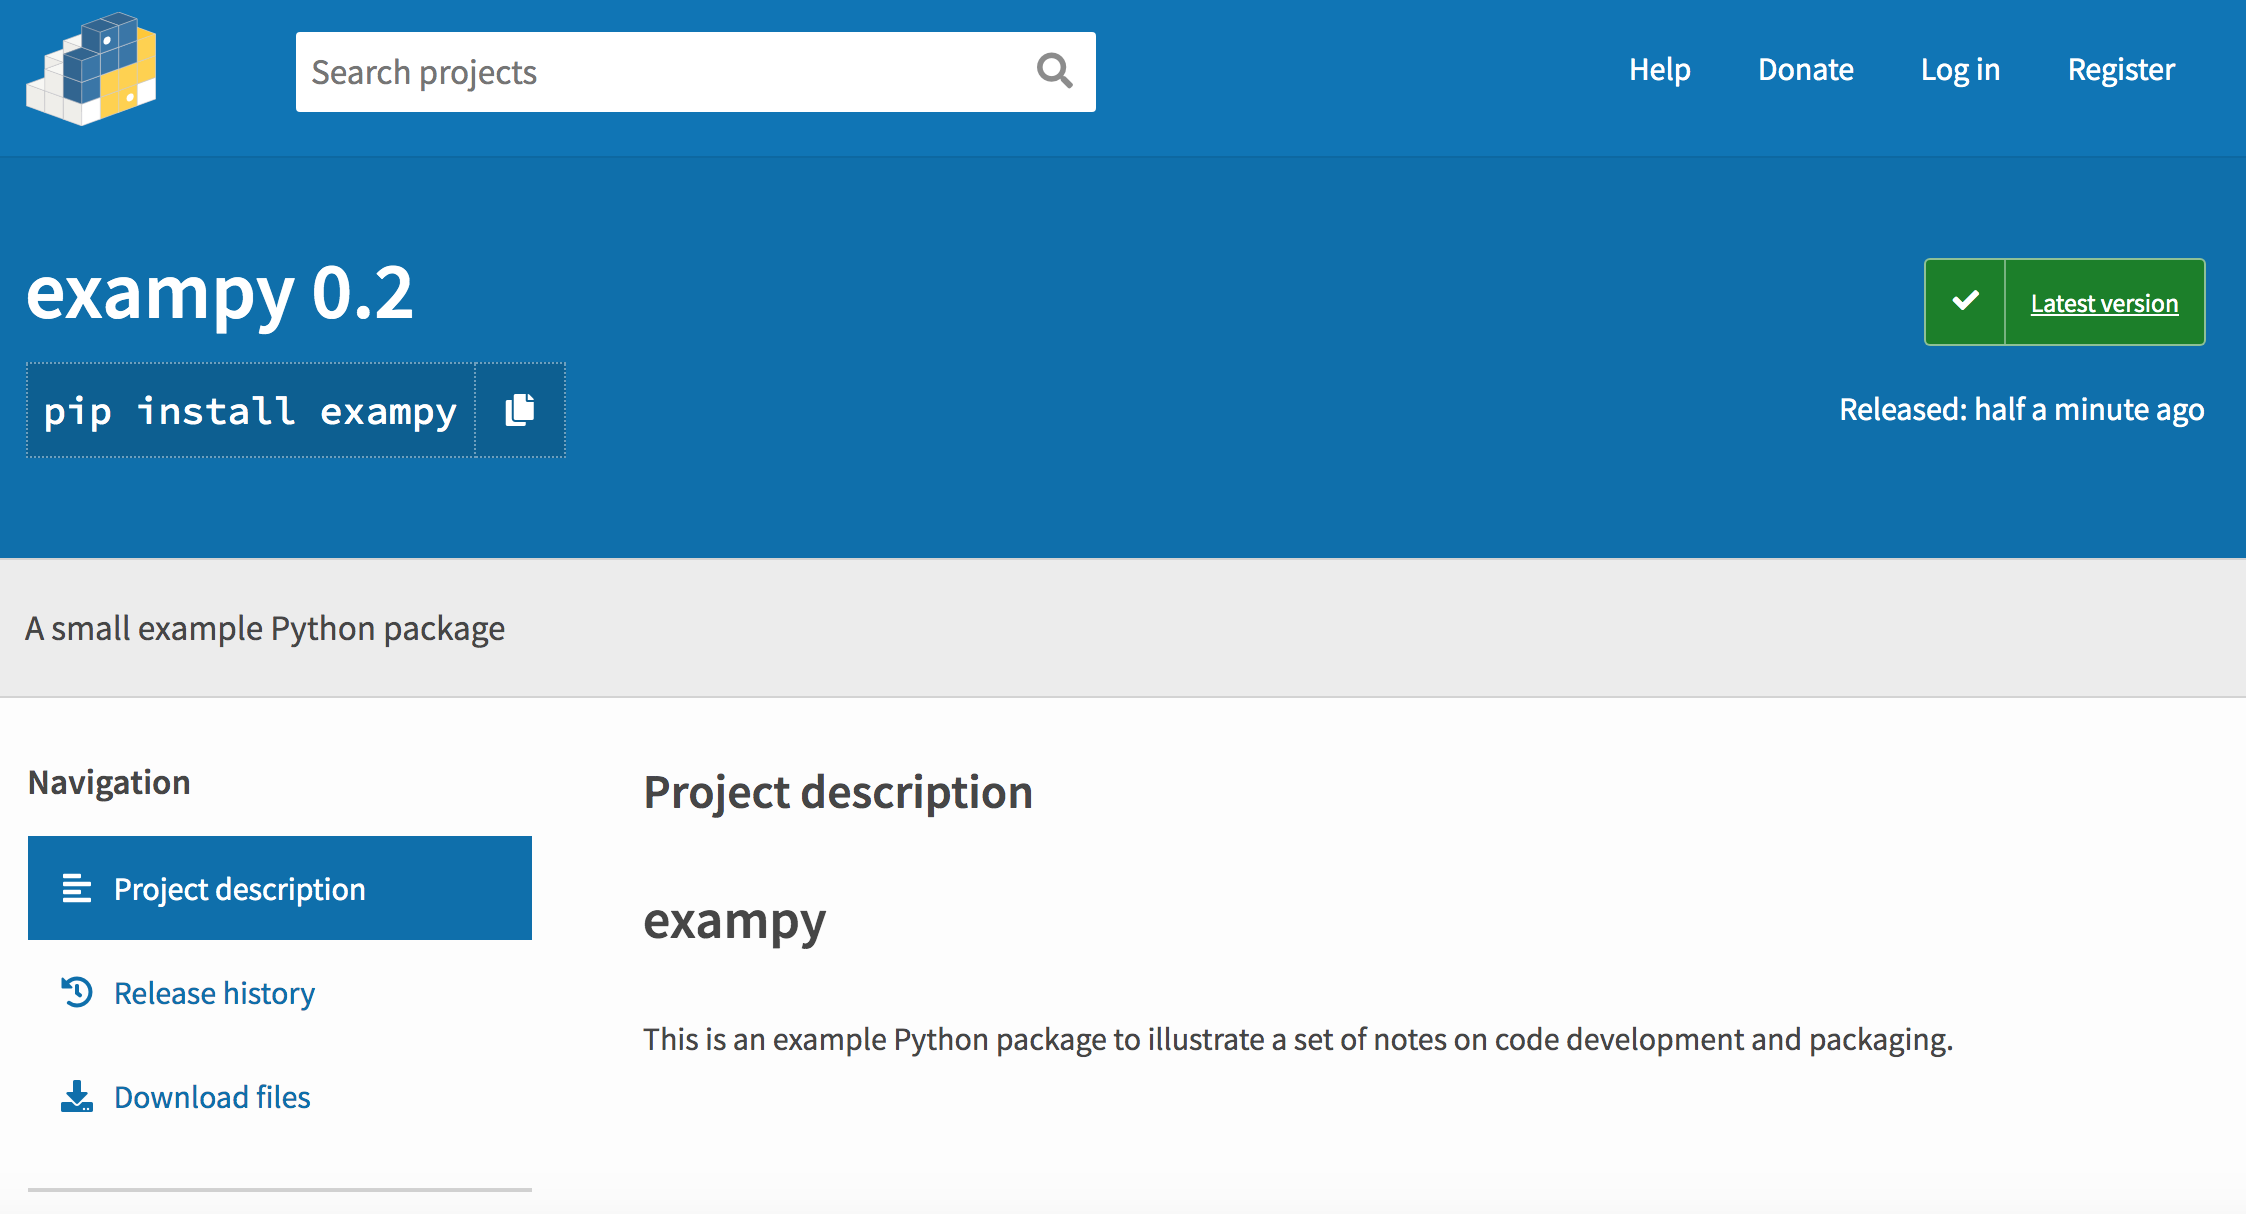
Then navigate to your project’s page on TestPyPI (e.g., https://test.pypi.org/project/exampy/) and check that all looks well. You’ll want to check that (a) your long_description, which is typically the README.md or README.rst that you have on GitHub as I discussed in Chapter 2, is rendered correctly as the webpage of your release, and (b) that the source distribution was properly uploaded by checking the “Download files” tab. For
the first release of the exampy package, this test page looks like

which immediately shows a problem with this release: I had not provided a long_description, so there is no web page! The twine check dist/* command above would have already told us that, but now it can no longer be ignored! To fix this, I create a new release of exampy that includes the long_description keyword in its setup (this requires a full new release, because it changes a file, setup.py, that is part of the source and its installation). After (a) removing the previous
release from dist/, (b) creating the new source release using python setup.py sdist, and (c) running twine check dist/* to check that it now passes, we run the upload command again
twine upload --repository-url https://test.pypi.org/legacy/ dist/*
and now the TestPyPI page looks like
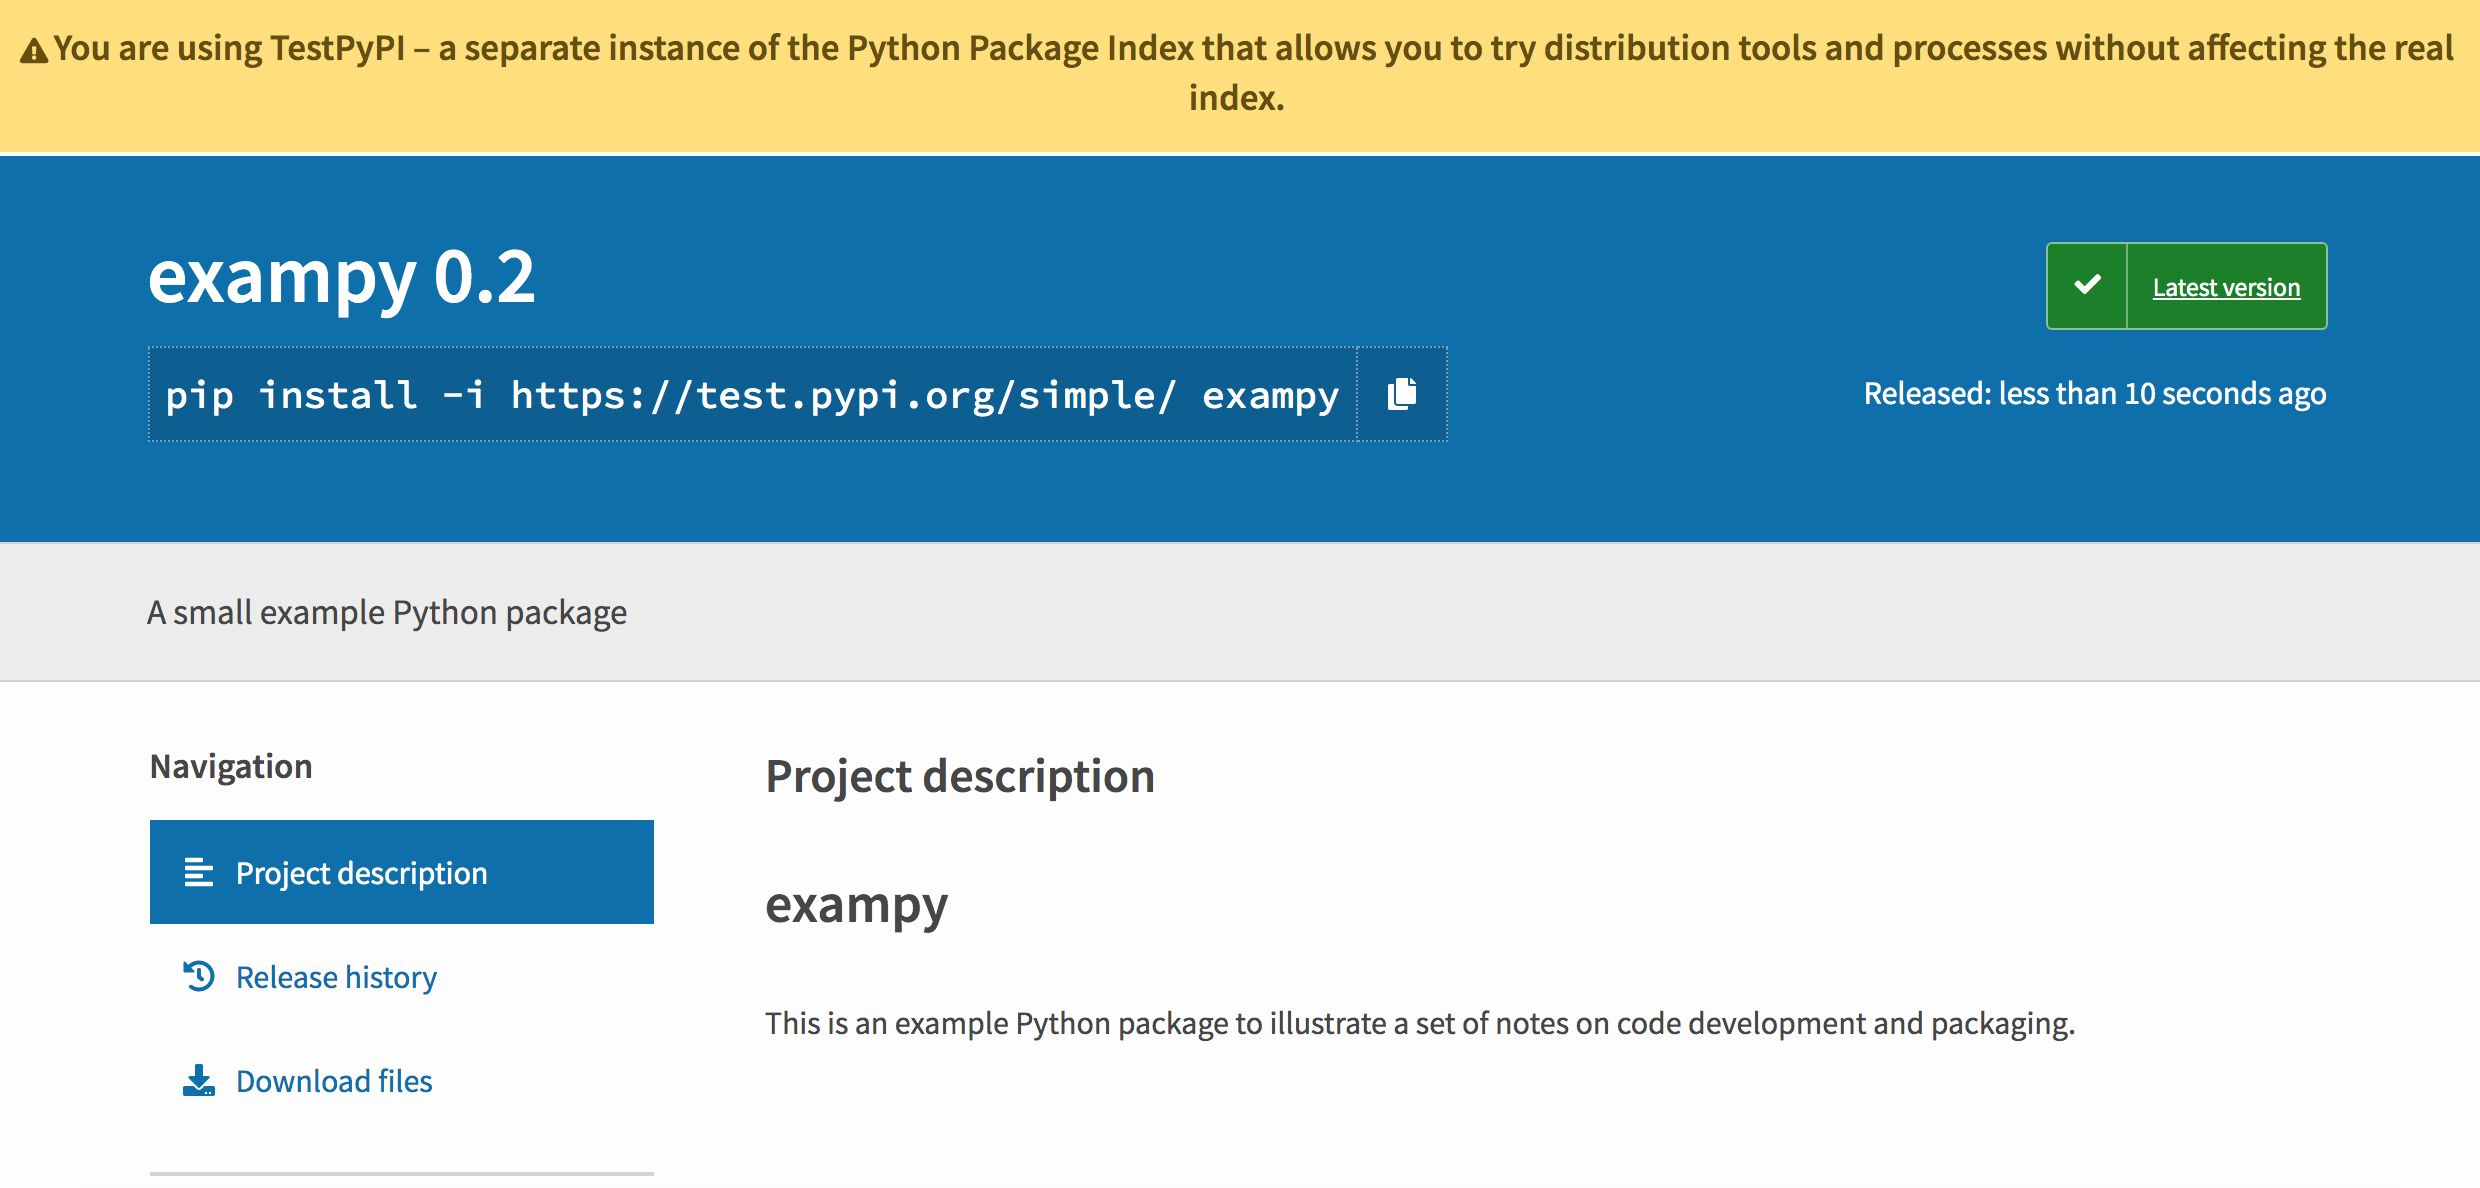
This now looks as we expect it to look, similar to the GitHub page. TestPyPI is a fully functional Python package index, so you can install with pip from TestPyPI using, e.g.,
pip install -i https://test.pypi.org/simple/ exampy
which is useful to check your package installs without a hitch using pip.
Once you’re happy with the way your package release looks on TestPyPI, it’s time to upload your release to PyPI itself. This you do with
twine upload dist/*
This works the same way as uploading to TestPyPI. Once the upload is finished, you can navigate to your package’s PyPI site, e.g., https://pypi.org/project/exampy/, which looks something like
Once your package is on PyPI, you may want to add a badge to your package’s README on GitHub that shows the latest PyPI release and links to it. This can be done with the snippet:
[](https://pypi.python.org/pypi/exampy/)
which gives  .
.
7.4. Building and adding binary distributions (“wheels”) to your PyPI release
So far I have only discussed how to release your package’s source code, which means that users who install your package have to build the code themselves from the source. While this is relatively straightforward for pure Python packages, if your package is large or if it contains compiled C extensions, the build process can be complex, prone to errors, and long. For example, in Chapter 6 we
saw that having to build numpy from source as part of the Travis CI continuous-integration procedure for the exampy example package made the run take substantially longer. To make the installation of your code easier, you should create binary distributions called “wheels” of your package and upload these to PyPI. When a user then asks to install your package using pip and a wheel is available for their Python version and platform, the wheel will be installed instead of
building the package from source. If your code contains extensions that need to be compiled and you want to support Windows natively, creating pre-built binary releases of your package is essential, because many Windows users will not have a compiler installed.
The type and number of binary wheels that you can create for your package depends on the code that is included in your package. If your package is a pure Python package (that is, it does not contain compiled extensions, just *.py files), then you can create a single wheel that can be used on any platform (e.g., Windows, Mac OS X, or Linux). If your package contains compiled extensions, you have to create wheels for each platform and for each minor Python version that you want to support
separately (because the Python C code is specific to each minor version); you therefore have a lot more work then!
To build wheels, first you need to install the (wait for it) wheel package with
pip install wheel
Then you can create a binary wheel by running
python setup.py bdist_wheel
This command will automatically determine whether to build a platform-agnostic wheel if your package is pure Python or to build a platform/Python-version specific wheel if your package contains compiled code. Build wheels are added to the dist/ directory, which is the reason why the twine upload commands above specified dist/*; this way both the source distribution and any built wheels are uploaded simultaneously. The example exampy package is pure Python, so when you run the
command a wheel
exampy-0.2-py3-none-any.whl
is created. The name of the wheel has the format PACKAGENAME-PACKAGEVERSION-PYTHONVERSION-PYTHONCVERSION-PLATFORM.whl. Because the package is pure Python, the Python C version that you are using is irrelevant and is therefore set to none and the platform is arbitrary, thus, any. Because the only major Python version that is currently supported is Python 3, you only need to build a wheel for Python 3; this can be created using any minor Python 3.x version (note that if
your package requires features only available in a later 3.x version, the wheel will build and be installable for earlier versions, but the code will likely fail at runtime). When Python 2 was still supported (only a few months ago at the time of writing), you could also create a separate wheel with Python 2 or, if your package directly supported both Python 2 and 3, you could build a universal wheel with python setup.py bdist_wheel --universal, which would work for both major Python
versions and would have the name exampy-0.2-py2.py3-none-any.whl for the example package. However, with Python 2 no longer being supported, there is no need for new packages to create Python 2 wheels (unless they really think users who cannot upgrade want to use it).
If your package includes compiled code, then that code will be compiled as part of the python setup.py bdist_wheel execution and a compiled, built wheel specific to the minor Python version that you use to run the command and the platform will be created. For example, suppose the exampy package contained a compiled C extension and we ran python setup.py bdist_wheel using Python 3.7 on a Mac, we would create a wheel with the name
exampy-0.2-cp37-cp37m-macosx_10_9_x86_64.whl
where now the PYTHONVERSION in PACKAGENAME-PACKAGEVERSION-PYTHONVERSION-PYTHONCVERSION-PLATFORM.whl is cp37, indicating “CPython 3.7”, since there are other implementations of Python such as PyPy (not to be confused with PyPI!). The Python C API version is also CPython 3.7, hence the second cp37, and the platform is the specific Mac version that you ran the command on, in this case Mac OS X 10.9, 64 bit (the x86_64 part). You
can create multiple wheels for different Python versions by running python setup.py bdist_wheel with different versions of Python (e.g., using different conda environments or different virtualenv environments). Each of these would be added to the dist/ directory and all would be uploaded to PyPI using twine upload dist/*.
When you create a wheel on a Linux operating system, the wheel’s platform will be something like linux_x86_64, which does not specify the Linux distribution that you are using. For this reason, PyPI does not accept such Linux wheels, it only accepts manylinux1 wheels built on Linux. These are wheels that are defined in Python Enhancement Proposal 513 that are only allowed to link to a small subset of C libraries, such that they can be
easily installed on many different Linux distributions. Unless you really care about making your code easy to install on Linux, I would recommend not bothering creating such manylinux1 wheels (Linux users are typically quite sophisticated and should therefore be able to work with a compiler and install dependencies; the only reason to create a binary wheel would be to speed up continuous integration run for packages that have to install your package if building your package from source is
slow).
If you need to create multiple compiled wheels for different Python versions and for both Mac OS X and Windows platforms, you can either use a Mac or Windows computer that you have access to, create all different wheels, and upload them all to PyPI (you can just run
twine upload dist/* --skip-existing
on multiple machines, and files will just be added), or you can use external services to build all of the wheels for you, collect them, and upload them to PyPI. Using external services is good, because it makes sure that the build environment is clean and it means that you don’t have to use multiple machines. Because the most important compiled wheel to create is the Windows one, I will describe how to use AppVeyor to do this, but you could use Travis CI to do the same for Mac OS X
wheels.
The way you can create wheels using AppVeyor is to create them at the end of your AppVeyor integration runs and add them as an “Artifact”, which can be downloaded from the AppVeyor page for your run. Thus, if you haven’t already set up continuous integration using AppVeyor, you need to do that first. There are multiple ways to create artifacts on AppVeyor, but one flexible way is to use the
command-line command Push-AppveyorArtifact. Typically, you would only create a wheel if your integrations tests pass and to do this, you should add the following section to your .appveyor.yml file
after_test:
  - ps: |
      pip install wheel
      python setup.py bdist_wheel
      Get-ChildItem dist\*.whl | % { Push-AppveyorArtifact $_.FullName -FileName $_.Name }
This simply installs the wheel package, builds the wheel, and then finds the wheel in dist\ (the Windows path!) and pushes it as an artifact. To find this artifact, navigate to your package’s AppVeyor web page, go to the build and the job that creates the artifact (each job will by default create an artifact), and click on the “Artifacts” tab. For the example package, the page that you get to looks like
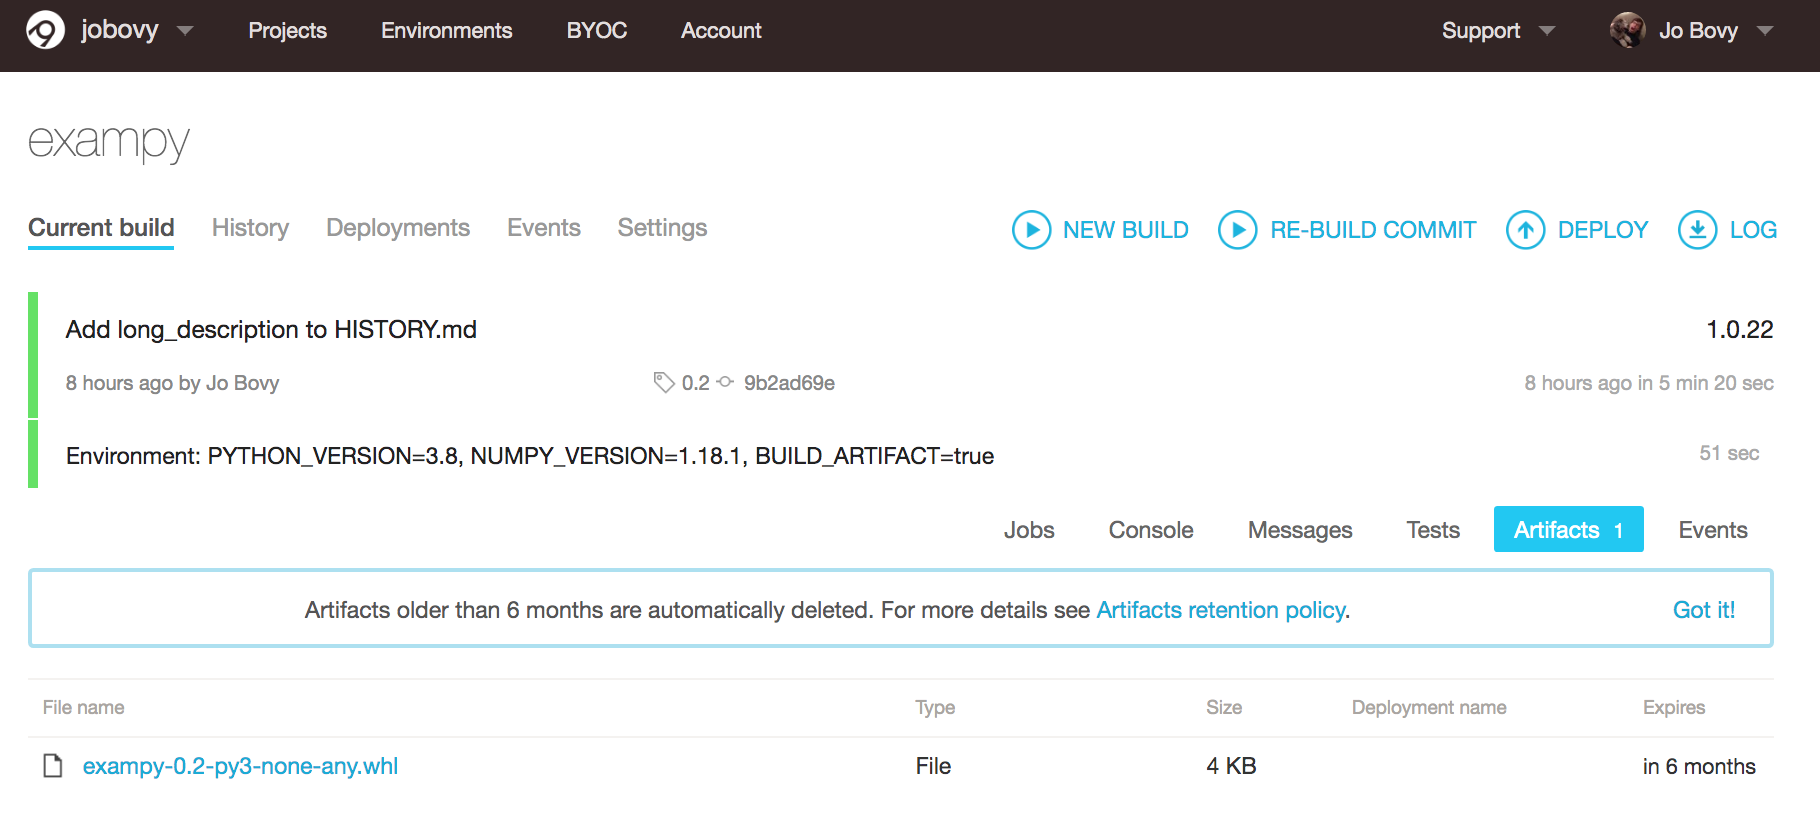
You see that the wheel is available as an artifact and you can download it there. Because exampy is pure Python, this is the simple pure-Python wheel that we discussed above, but if the package contains compiled code, the wheel would be specific to the Python version that it was built with and to the Windows operating system.
To create Windows wheels for different Python minor versions, you can use a matrix AppVeyor build with multiple Python versions as discussed in Chapter 6. If you run multiple jobs for the same Python version (e.g., like in the example in Chapter 6, where I run jobs with three different numpy versions for each Python version), you may only want to create artifacts for one of the jobs for each Python version
(not that you couldn’t create them for each job, since they are specific to a job, but it would be somewhat wasteful). To do this, you could add an environment variable BUILD_ARTIFACT that is either "true" or "false", depending on whether you want the job to create the artifact, and then use
after_test:
  - ps: |
      if ($env:BUILD_ARTIFACT -eq "true") {
        pip install wheel
        python setup.py bdist_wheel
        Get-ChildItem dist\*.whl | % { Push-AppveyorArtifact $_.FullName -FileName $_.Name }
      }
To add these AppVeyor built artifacts to your release, you can just download the one(s) created for the AppVeyor run corresponding to the git tag of your release into your local dist/ folder and then upload them from your machine using twine upload when you upload the source distribution as well. You can set things up such that wheels are automatically uploaded to PyPI from AppVeyor itself, but you probably want to finely control exactly what gets uploaded to your
official release on PyPI, which is difficult when the upload happens automatically. Unless you release so often that you need the automation, it’s easiest to just download the wheels and upload them to PyPI yourself.
7.5. Starting the development of your next version
Once you have created your release and uploaded all files to PyPI, you will want to set up your package for the development of your next version. The following is a list of some thing you may want to do now to make this easier:
Update the version number everywhere in your package to the next version (including the
.devend to indicate that this version is currently in development). Remember, the version string likely appears at least in yoursetup.pyfile, the top-level__init__.py, and your documentationssource/conf.pyfile.If you want to keep open the possibility to patch small bugs in the currently-released version, while developing larger changes in the main development branch of your repository (typically
main), you should create a maintenance branch, called something likemaintenance/a.b.x, wherea.bis the minor version you just released; typically, you’ll only want to do this for every increase inbin this version, so then you create a maintenance branchmaintenance/a.b.x(e.g.,maintenance/1.3.x) to be able to fix bugs in that branch and use it to make patch releases in thea.b.xseries (e.g.,1.3.1would fix minor bugs in1.3.0).Add a new section at the top of your history file (e.g.,
HISTORY.md) for the next version where you can start recording major updates to the code for the next release.
And now you are ready to keep developing your package for many happy releases to come!