6. Automatically building and testing your code: continuous integration
Once you have a test suite for your Python package (even if it is not complete yet), you will want to run it often to check that all tests continue to pass as your package evolves. Doing this automatically is the domain of continuous integration and for scientific projects it is most easily done using the free, online services that I discuss in this chapter. Like complete documentation and a comprehensive test suite before, continuous integration is an essential component of a modern software package that is used by more than a few people and/or receives contributions from outside users (e.g., through pull requests). Setting up continuous integration for your software package will end up saving you lots of time by finding issues with your code quickly and making it less likely that you merge a change that has unexpected, bad consequences.
6.1. Why continuous integration?
Continuous integration (CI) is the practice of integrating all changes into the “main” copy of a code base (here, a Python package) on a frequent basis (“continuously”). The “main” copy in our case is the GitHub repository of the package, which is the basis of all clones and forks of the code (I assume throughout these notes that the only way the development version of the code is shared is through the GitHub site, even for versions used by the same developer). The main reason to perform continuous integration is to catch any unmergeable changes to the code made in different copies of the code quickly when they can typically be more easily resolved. Continuous integration checks both that the package builds successfully and that it passes the tests in the test suite and this is considered to be a successful integration.
To perform continuous integration efficiently, both the build and test system need to be automated, that is, they should be able to be run without any human intervention. We have seen how to build a test suite that can be run with a simple pytest command in the previous chapter; I will discuss how to automate the build with specific examples below. Automating the building and testing of the code is important for taking any human decisions and mistakes out of the loop
and for being able to perform the continuous-integration procedure very often.
What do we in practice mean by “continuous”, because obviously we aren’t running the build-and-test procedure all the time? “Continuous” qualitatively means that we run the build-and-test procedure every time the code or any of its dependencies change. In practice, it is easier to know when one’s own code changes than when the code’s dependencies change and we typically run the continuous-integration procedure upon every push of changes to GitHub. That is, we can make multiple commits and run
the integration tests each time we push a set of commits to GitHub. Ideally, we would run the integration tests in conjunction with each commit, but since integration tests can take a long time to run, a compromise of running whenever we think the code is ready for a push to GitHub is good and it is easy to set up with automation services. This does mean that one should push changes to GitHub often, typically at least once a day, to make sure that the continuous integration procedure is run
often. The code will also change in response to patches or new features submitted through a pull request and it is good practice to run the continuous-integration procedure before merging changes from a pull request. It is easy to set this up to be done automatically and, indeed, having continuous integration set up is essential to being able to merge pull requests for your package, because otherwise it is difficult to know that the proposed changes do not break some unexpected part of your
code. One typically runs the continuous-integration procedure for changes to any branch, not just main.
The way your code runs also changes when its dependencies change. While one could in principle set up a “continuous” check for whether dependencies have changed, in practice this is easiest to spot by running the continuous integration procedure on a fixed schedule in addition to any runs in response to pushes or pull requests. That way, you can ensure that the integration tests are run even when the code is going through a stretch of minor development. These fixed-schedule tests could be run daily or weekly, depending on how often you think dependencies might change and/or how quickly you think you need to catch this. One way in which the automated build-and-test of your code is useful is that it shows that there is a working version of your code and how to get it to work, which you can point people to who have issues with installing and running your code.
The advantages of continuous integration are many: you will find issues quickly, keep your development version in a working state and, thus, always have a fully-functional version of your code during development (that is, not just at releases), and by making use of automated tools to run your integration tests on different types of machines you are able to easily make sure that your code runs on all systems that you support, not just your own. But there are disadvantages as well, the main one being that setting up and maintaining the continuous-integration system takes quite a bit of time and quite often issues that pop up during the integration procedure are due to the way the build-and-test procedure is set up (which can be quite complex for a larger Python package), rather than being due to a real bug in the package itself. For example, the way you install dependencies in the integration step might break and you then have to fix that to keep the continuous-integration procedure working, even though there is likely nothing wrong with your code. Overall, I think even this type of time is well spent, because it is important to know at all times that your code can be built (including its dependencies).
There are many services available to perform continuous integration of code, because continuous integration is a crucial aspect of all modern software and software-backed services, allowing bug fixes and updates to be rolled out quickly and often. Continuous integration of course goes far beyond Python packages and is used in the entire range of software, apps, and online services, where it is often combined with continuous deployment (CD, leading to the abbreviation CI/CD), the practice of
rolling out bug fixes and updates as soon as they are made and pass the integration tests. The most popular CI/CD services are Travis CI, Circle CI, Jenkins, AppVeyor, and since recently GitHub Actions. I will only discuss Travis CI, AppVeyor, and GitHub Actions below, but to a large degree they all work in the same way.
6.2. Continuous integration with Travis CI
Travis CI is a continuous-integration service that is seamlessly integrated with GitHub and is free for open-source projects, generously providing you with multiple runners for your build-and-test integrations. The way Travis CI works is that you connect it to your GiHub account, give it access to your repository, and once configured it will automatically run your build and test suites every time you push to any branch and every time somebody opens a pull request. It will notify you when
things go wrong (or when things go right! But that’s not typically as interesting…) and can send the results from tests on to other services (e.g., those that parse and display your test coverage statistics).
To get started, go to https://travis-ci.com/ and sign up with your GitHub account. You then need to give Travis CI permission to access your account’s information. Once you’re back at travis-ci.com, you can click on your profile picture to bring up a big green Activate button, press this to activate the GitHub Apps integration which Travis CI uses to start testing and deploying on Travis CI. Once you have clicked this, you will see a list of your repositories, if you click on
the repository that you want to add to Travis CI, you will be brought to its page, which looks like this for the example package exampy at first
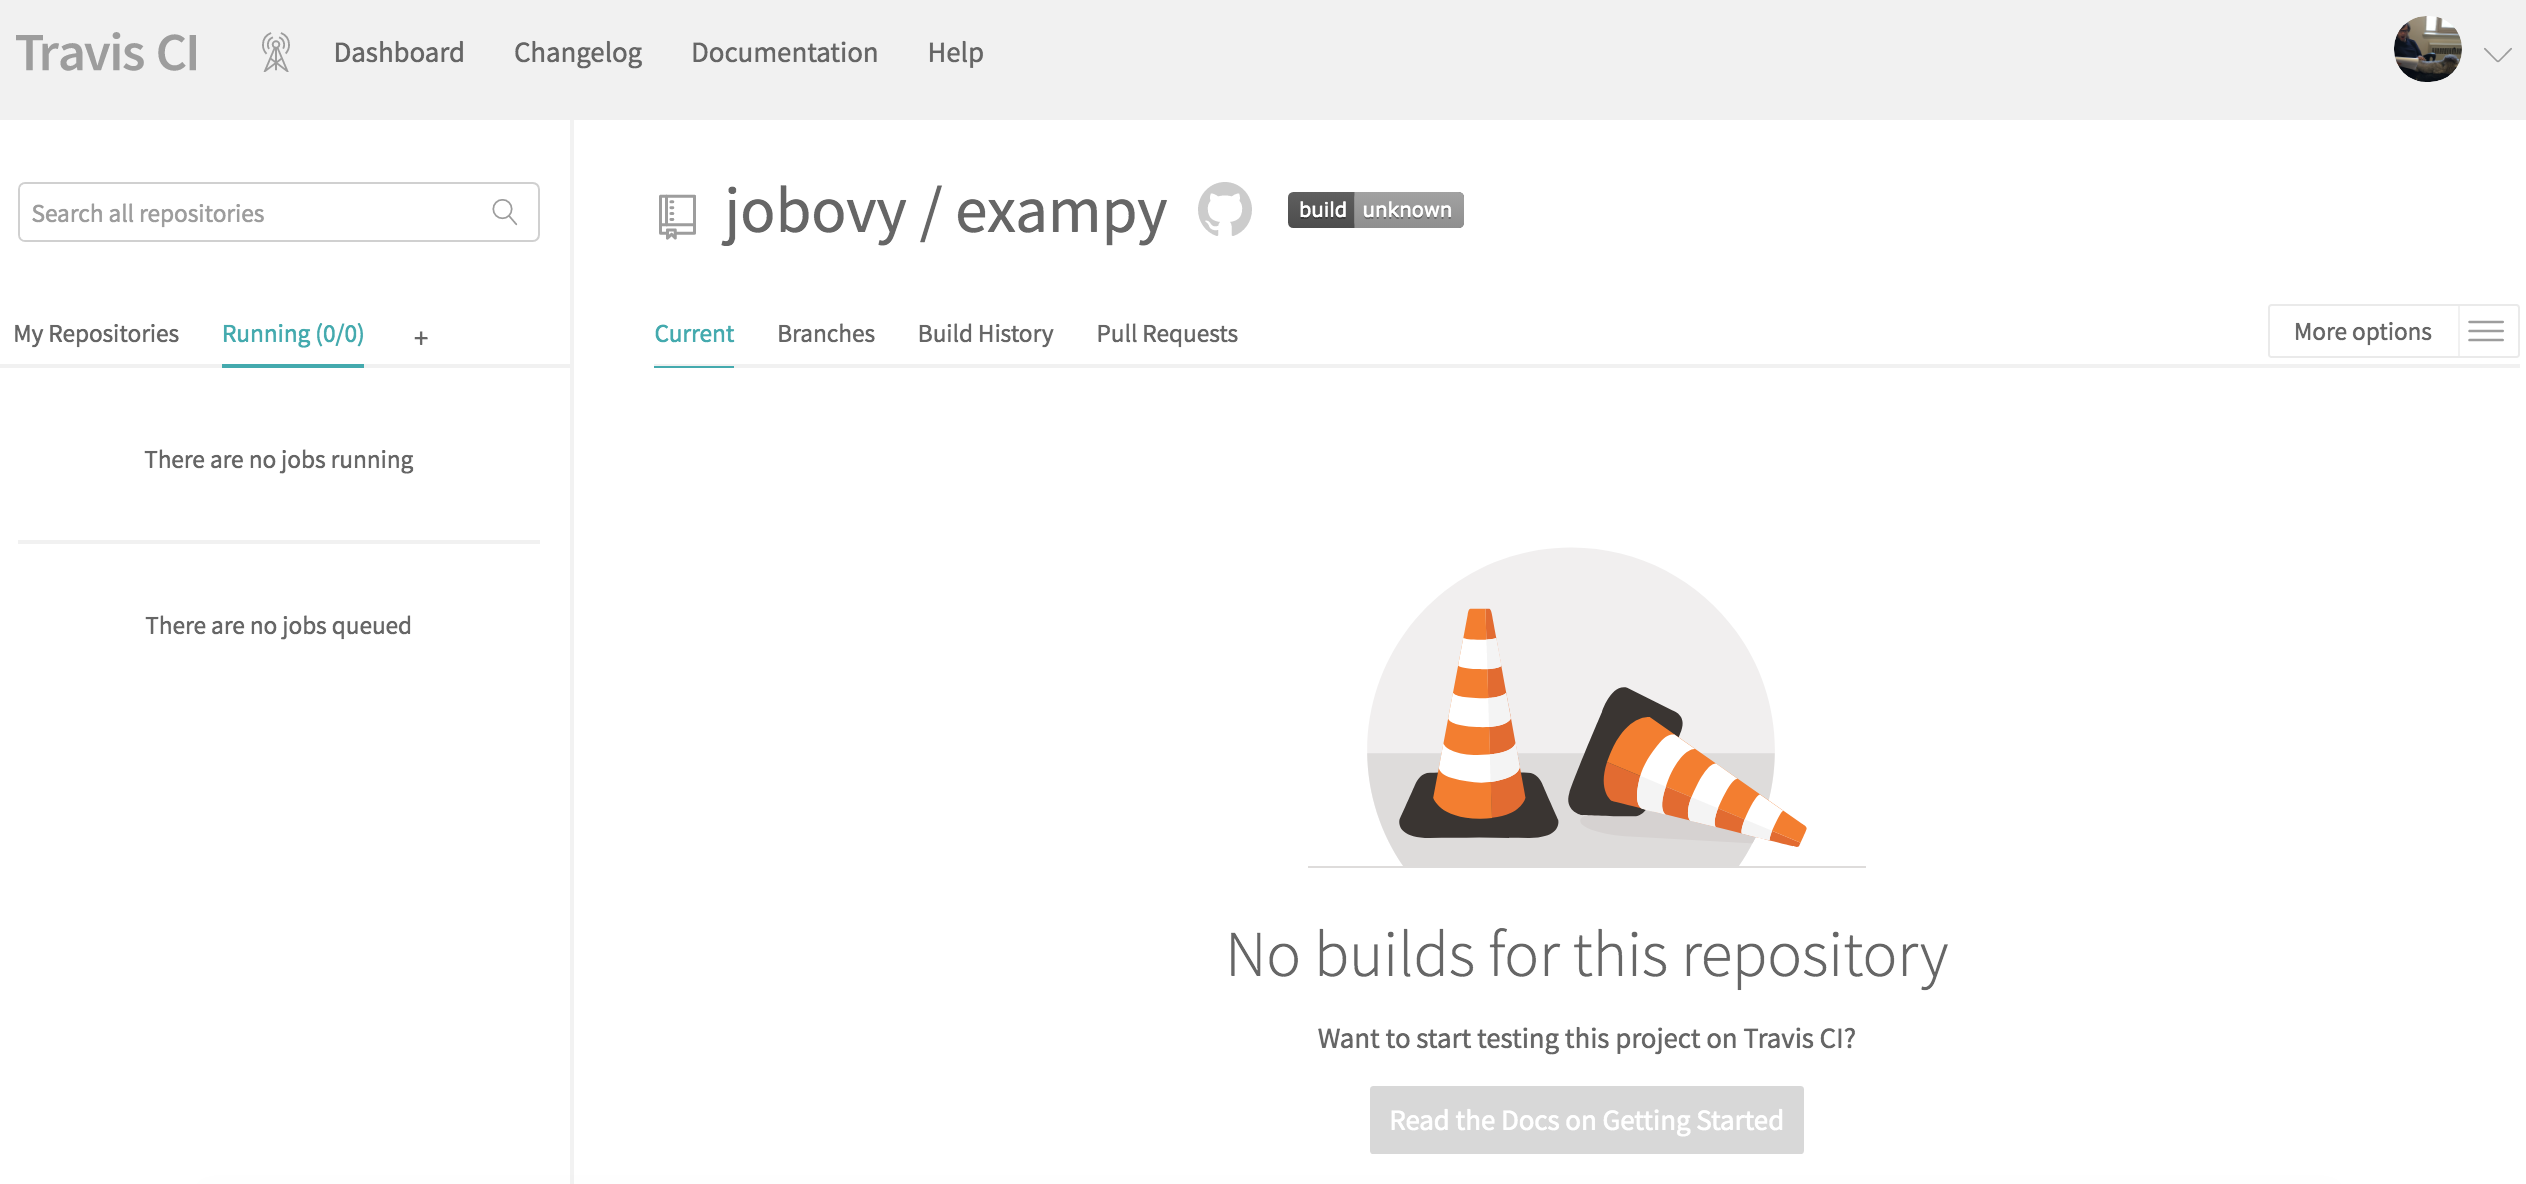
To start building and testing our package with Travis CI, we have to add a .travis.yml configuration file to the top-level directory of our repository and push this to GitHub. This .travis.yml file will contain all of the information to configure the build-and-test procedure on Travis CI. I will go over all of the parts in due course, so let’s start with the simplest possible configuration for our exampy project, which looks like
language: python

python:
  - "3.7"

install:
  - python setup.py develop

script:
  - echo 0
This configuration file does only the most basic things: (i) it states what the language of the code is (Python) and what version to use, (ii) it installs the code in the install: section, and (iii) it has a trivial statement in the script: section, which will later contain the running of the test suite. The reason that we need to add the trivial statement in the script: section is that without this section, Travis CI will label the run as failed. If you add this file to the
GitHub repository and push it to GitHub, Travis CI is notified by GitHub that a change occurred in the repository, and Travis CI starts running the continuous integration procedure; the page on Travis CI will change to something like
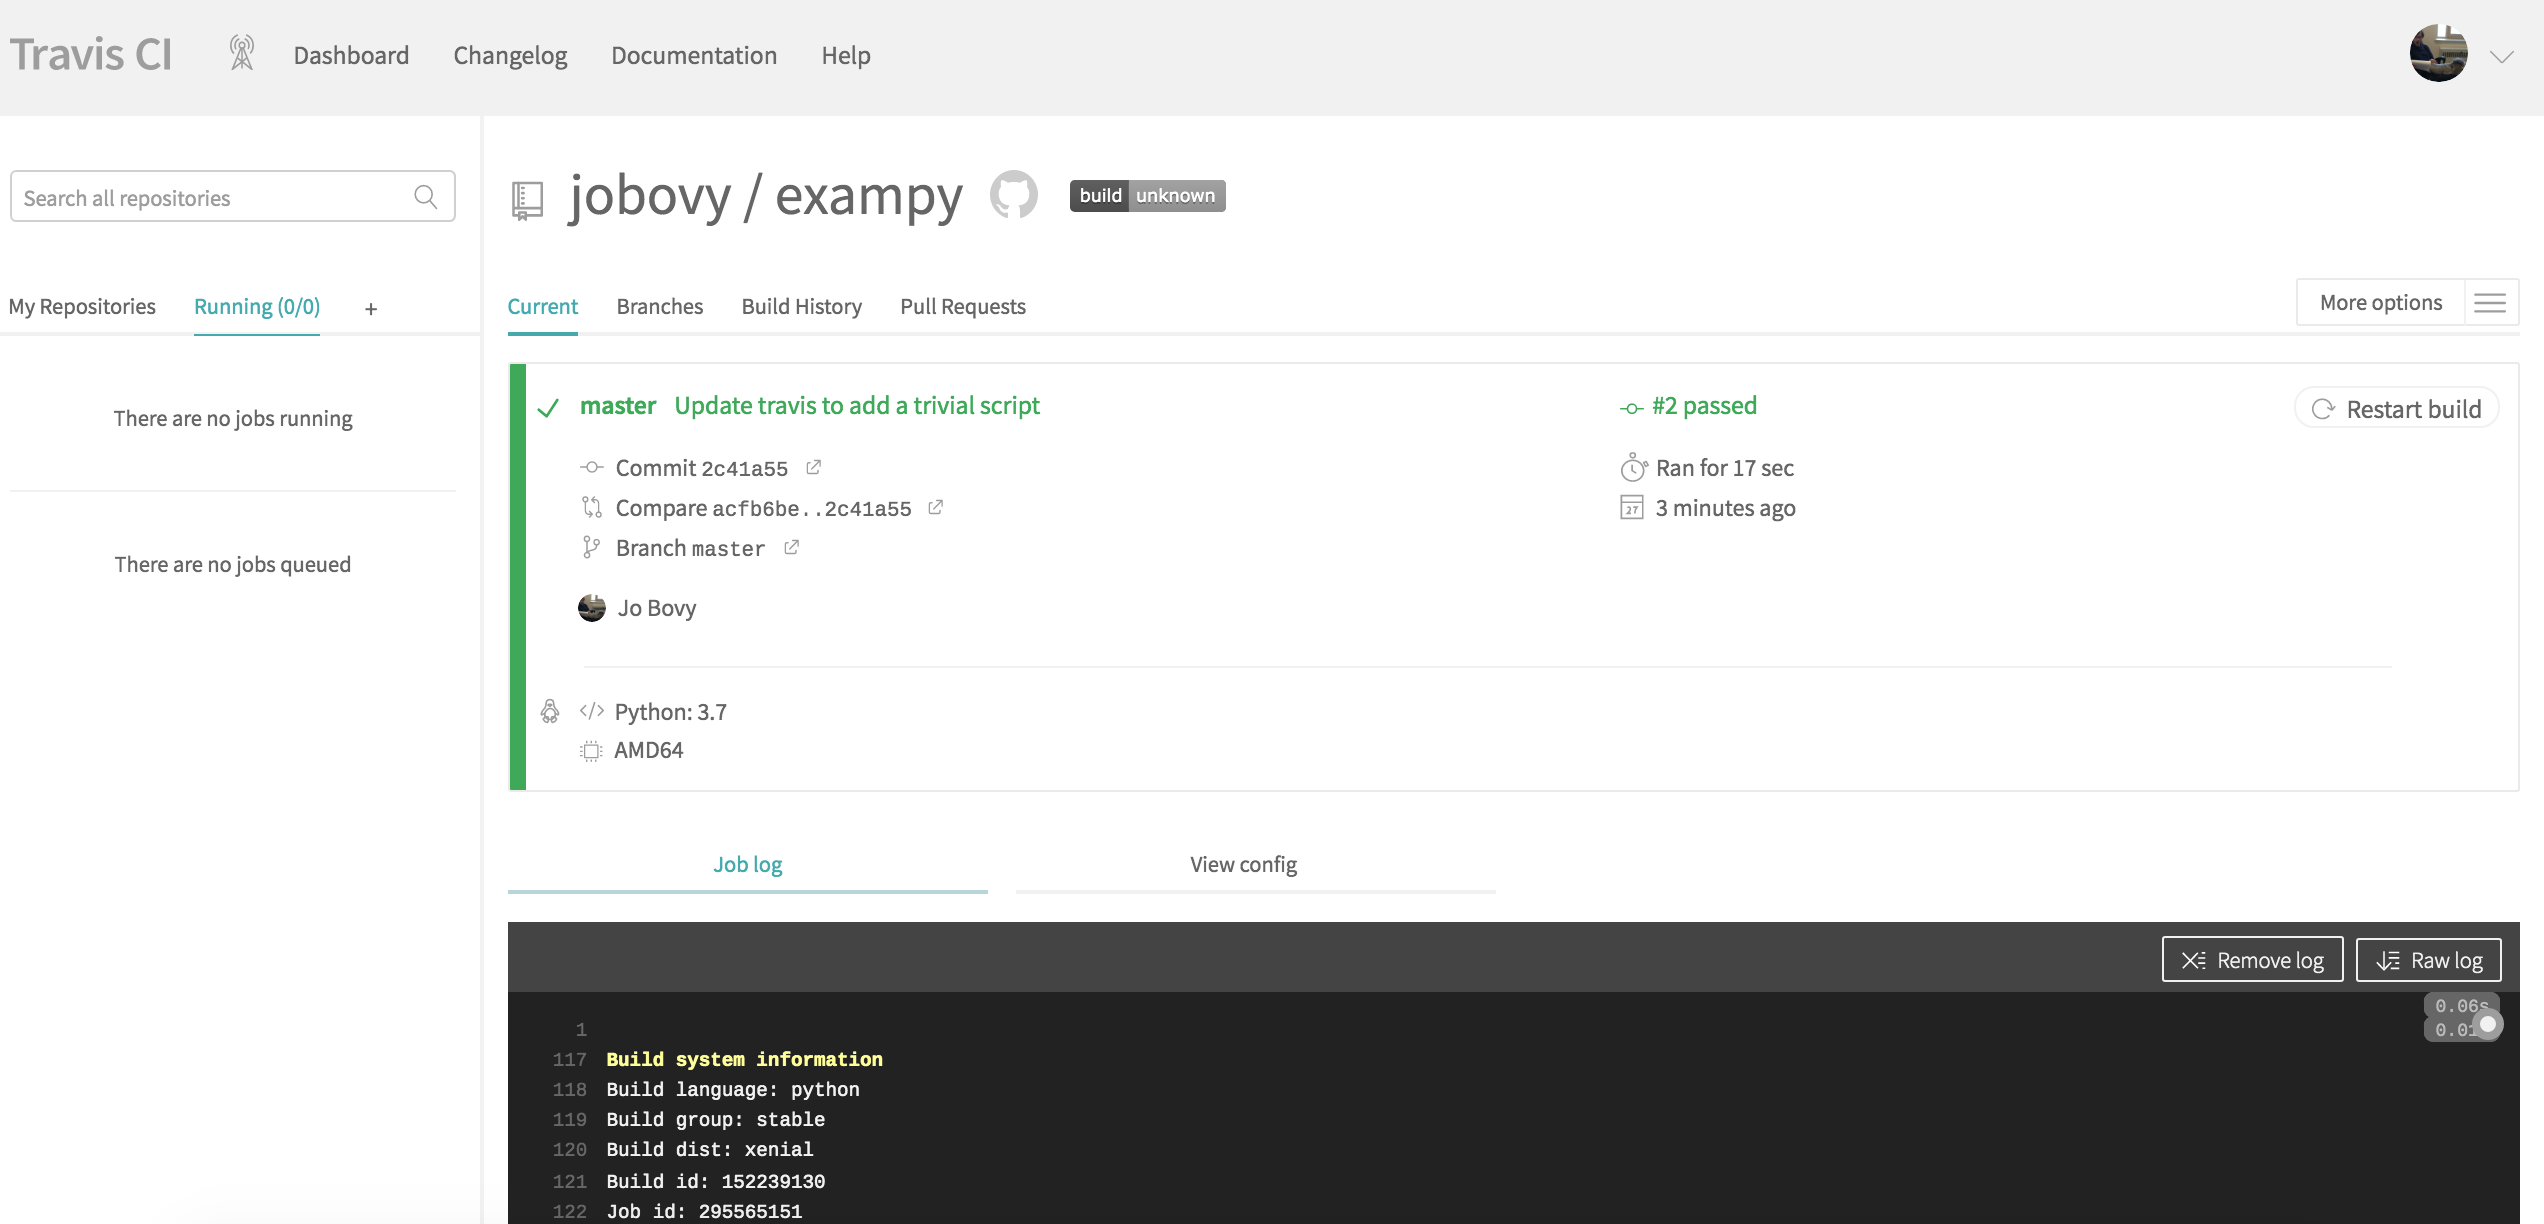
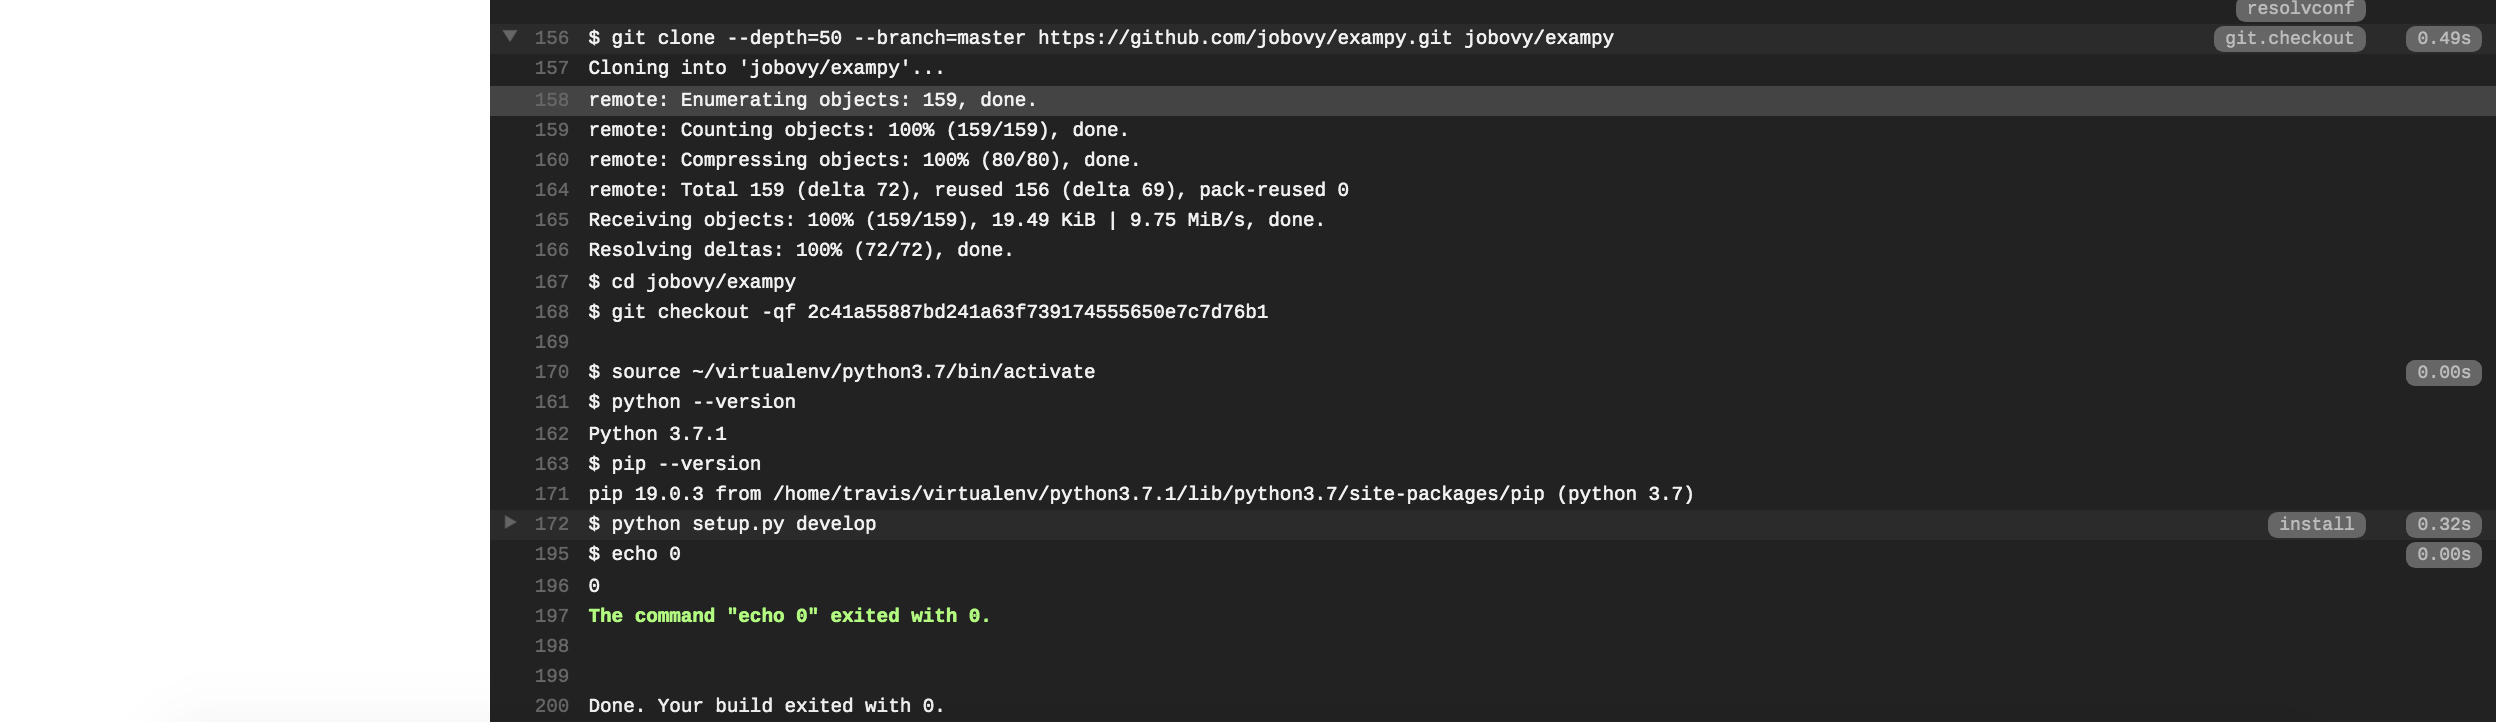
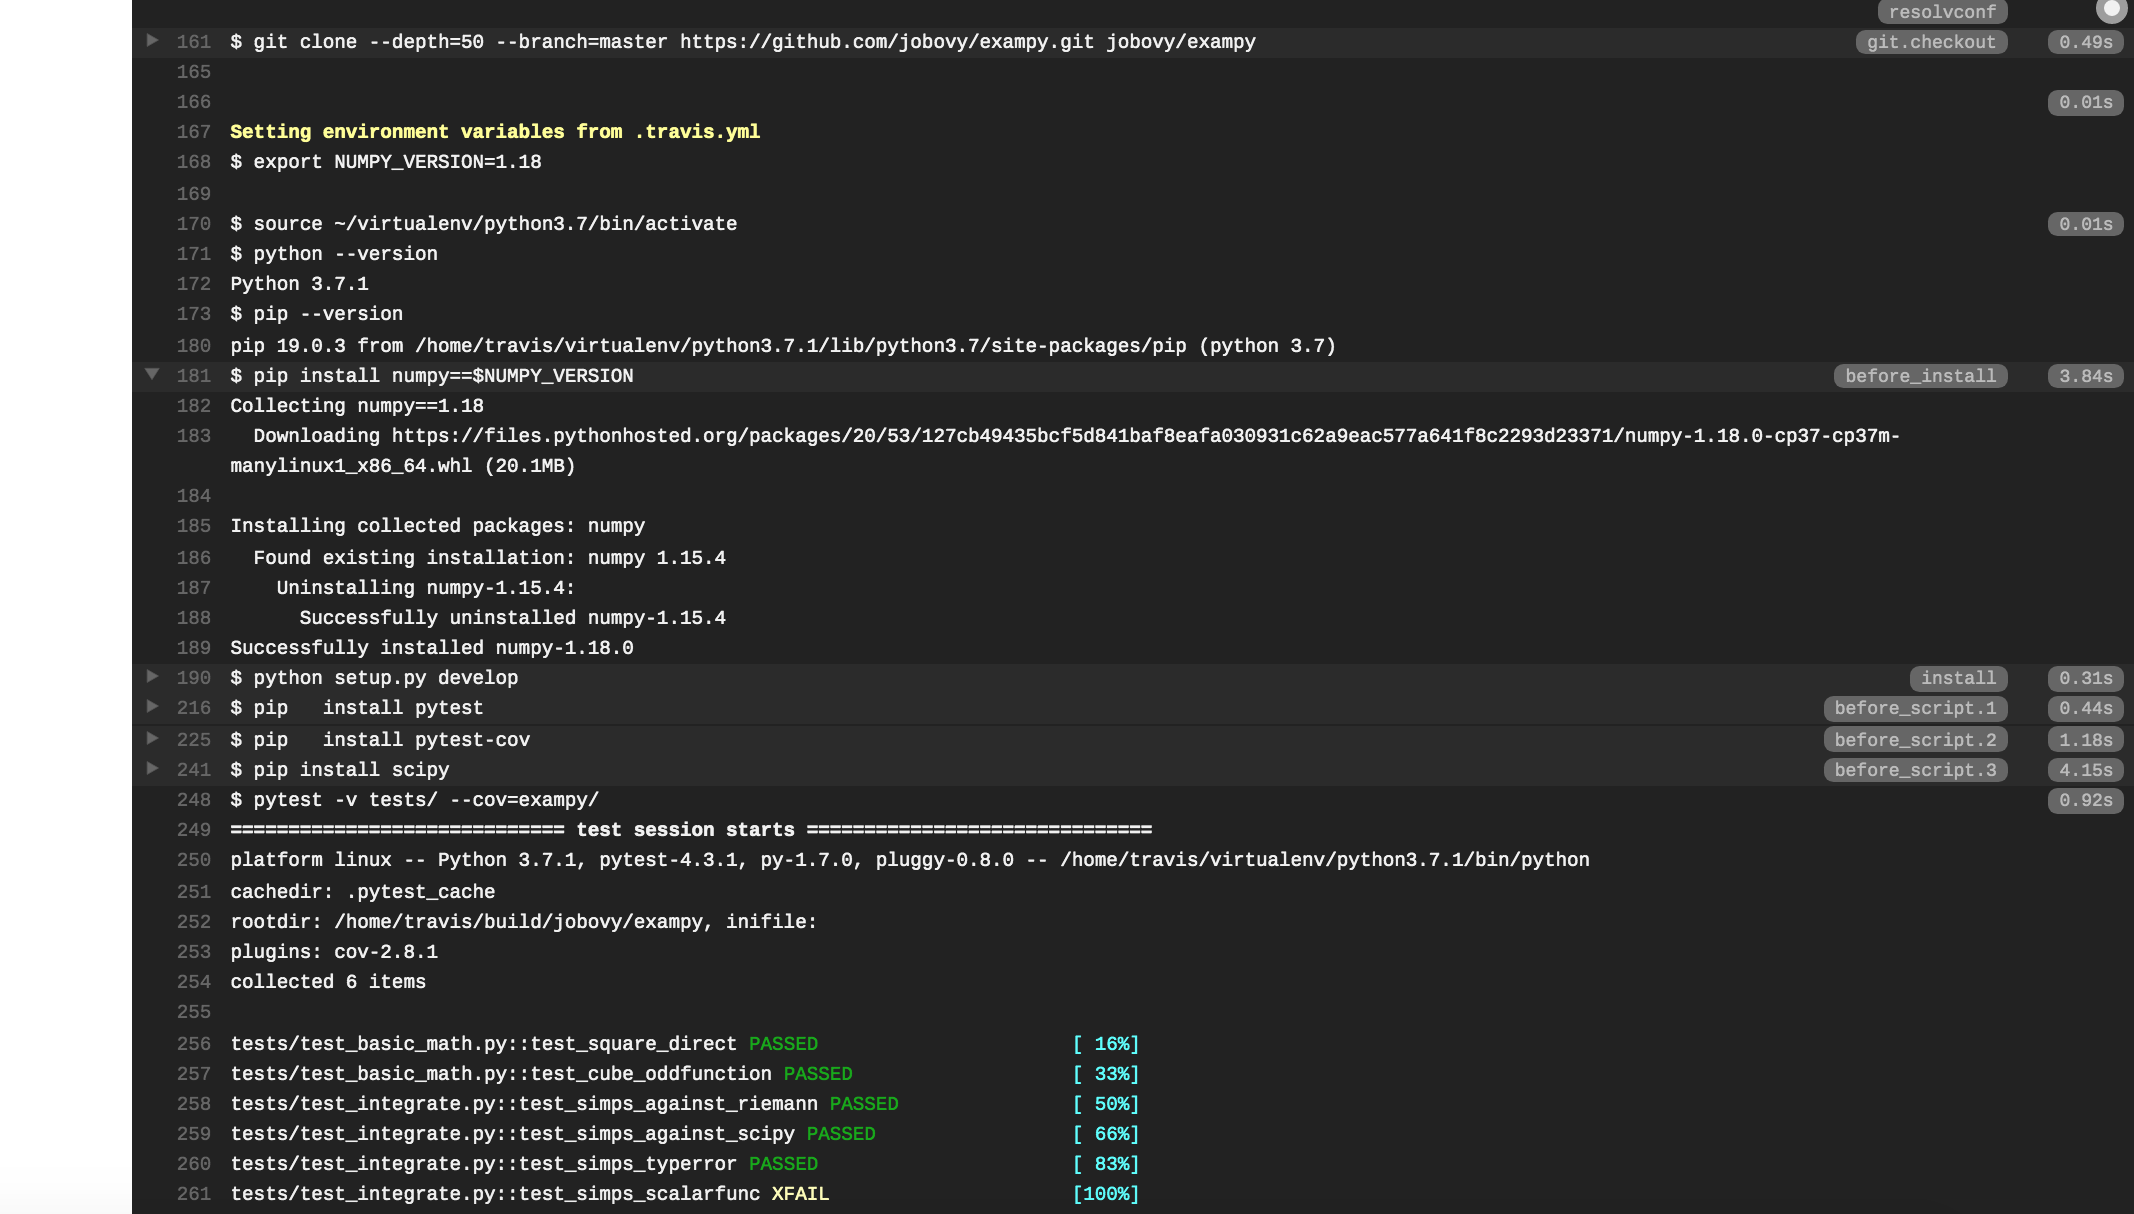
(where the run should be #1 for you, I messed up my own first run…). If you scroll down, you see the full log of what happened and you will see that Travis CI clones your repository, sets up Python, runs the install: section, followed by the script: section:
Next, we want to run our test suite with pytest and print the test coverage information using the pytest-cov plugin. To do this, we need to install pytest and the pytest-cov plugin in the install: section as well, and then run our test suite in the script: section, such that .travis.yml file now looks as follows
language: python

python:
  - "3.7"

install:
  - pip install pytest
  - pip install pytest-cov
  - python setup.py develop

script:
  - pytest -v tests/ --cov=exampy/
Pushing this change to GitHub, Travis CI automatically clones the updated repository and runs the build-and-test procedure. However, the tests fail, with the pertinent part of the log being
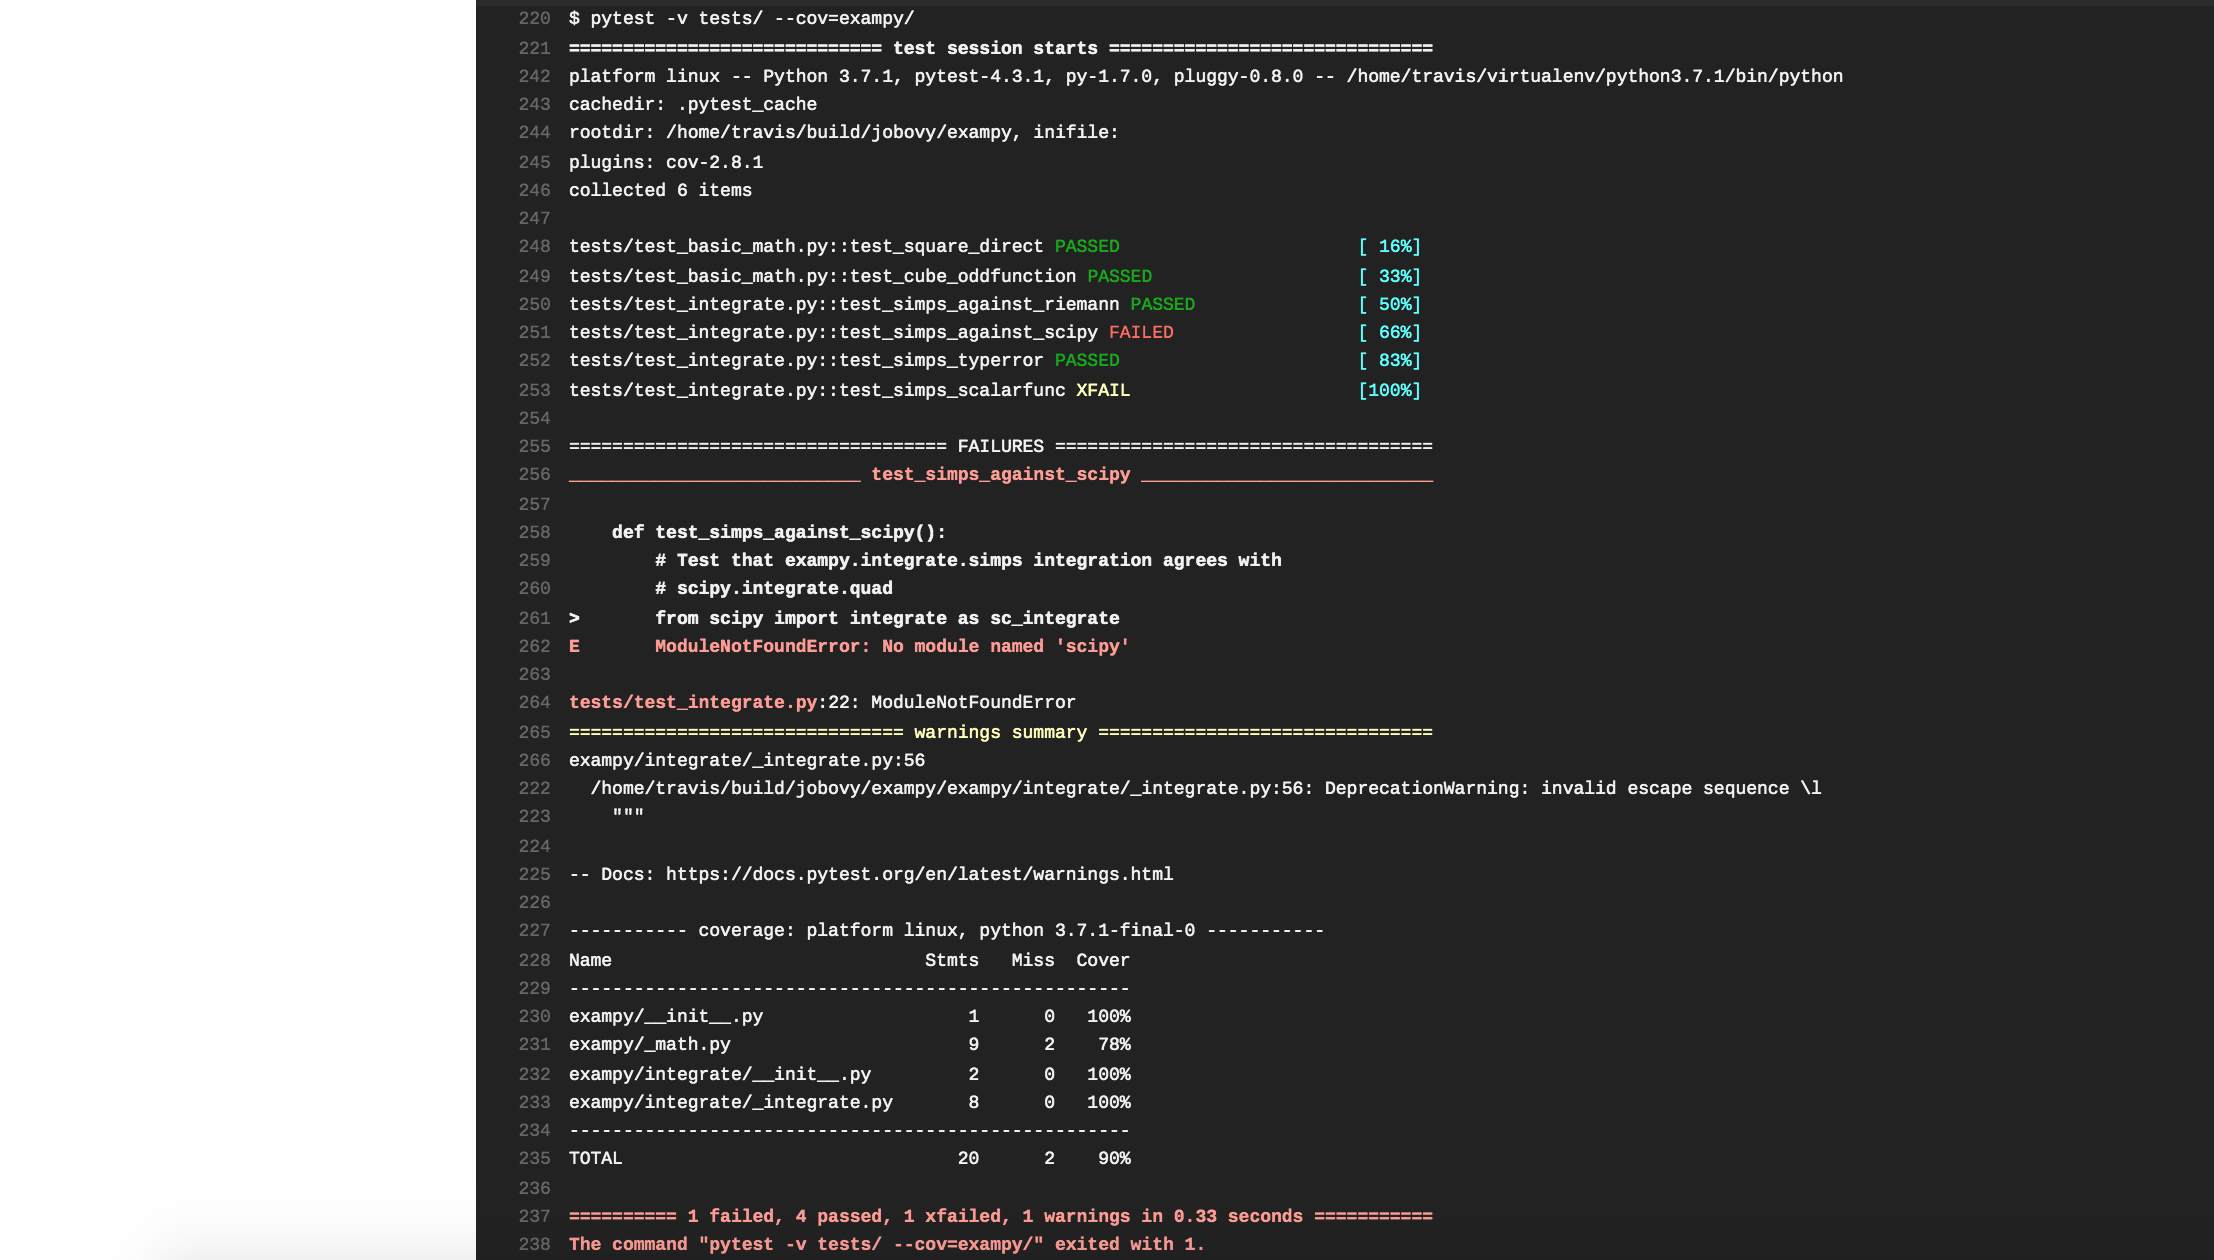
The tests failed, because we forgot to install scipy, which is not a dependency of the exampy package itself (and, thus, we didn’t list it in the install_requires section of the setup.py file), but it is a dependency of the test suite, because in one test we compare the exampy.integrate.simps procedure to numerical integration in scipy. Thus, we need to also install scipy, using the following .travis.yml
language: python

python:
  - "3.7"

install:
  - pip install pytest
  - pip install pytest-cov
  - pip install scipy
  - python setup.py develop

script:
  - pytest -v tests/ --cov=exampy/
This time the tests pass without a hitch!

The .travis.yml configuration file has lots of possible sections to customize your build and test runs in any way that you want, which are documented in full here. When you are using the linux operating system (the default), you have access to a full Ubuntu distribution and you can run arbitrary commands in the sections install:, before_install: (which contains commands to run before the installation of your code; technically it would have been
better to install the test dependencies in the before_install: section, or in the before_script: section [see below] because they are not necessary for the code’s installation itself), script:, before_script:, etc. There are also many other sections that allow you to install some dependencies more easily, to define environment variables, to run your build-and-test integrations with different versions of dependencies (and Python itself), and there are sections after_success:
and after_failure: to customize what Travis CI does upon successful or unsuccessful execution of your build-and-test run. In the remainder of this section, I will cover some of the most commonly-used customizations.
As a first example of a customization, let’s say we want to explicitly specify the numpy version used by our code. To do this, we add an env: section that contains an environment variable NUMPY_VERSION that we set to the desired version. Then we can use this environment variable in the rest of the configuration file, e.g., as
language: python

python:
  - "3.7"

env:
  - NUMPY_VERSION=1.18

before_install:
  - pip install numpy==$NUMPY_VERSION

install:
  - python setup.py develop

before_script:
  - pip install pytest
  - pip install pytest-cov
  - pip install scipy

script:
  - pytest -v tests/ --cov=exampy/
where we have now explicitly included the numpy dependency install in the before_install: section (previously, we used the default numpy version available for this Travis CI disk image) and we have moved the installations that are only necessary for the test suite to the before_script: section. Pushing this change to GitHub, the log on Travis CI now shows that the requested version of numpy is installed, with the relevant part of the log being:
You can set multiple environment variables in the env: section, but note that all definitions should be part of a single dash. E.g., to also specify the scipy version, do
language: python

python:
  - "3.7"

env:
  - NUMPY_VERSION=1.18
    SCIPY_VERSION=1.4

before_install:
  - pip install numpy==$NUMPY_VERSION

install:
  - python setup.py develop

before_script:
  - pip install pytest
  - pip install pytest-cov
  - pip install scipy==$SCIPY_VERSION

script:
  - pytest -v tests/ --cov=exampy/
rather than
...
env:
  - NUMPY_VERSION=1.18
  - SCIPY_VERSION=1.4
...
because the latter would create two jobs, one with the numpy version set, the other with the scipy version set (see below). Another use of environment variables is to split your tests into sets to be executed in parallel, by explicitly setting the test files fed to pytest as an environment variable.
One of the great advantages of using a cloud-based continuous-integration system is that you can easily test your code with different versions of Python and your code’s dependencies. Travis CI allows you to easily build matrices of jobs, by taking multiple values listed in some of the configuration sections. For example, if you list two major Python versions in the python: section and three minor numpy versions in the env: section as above, naively following the recommendations
from a recent proposal for which Python and numpy versions packages should support (the recommendation isn’t actually to support all of these combinations), Travis CI will run 6 different jobs, one for each combination of Python and numpy version. In the example that we have been considering, this gives the following .travis.yml:
language: python

python:
  - "3.8"
  - "3.7"

env:
  - NUMPY_VERSION=1.18
  - NUMPY_VERSION=1.17
  - NUMPY_VERSION=1.16

before_install:
  - pip install numpy==$NUMPY_VERSION

install:
  - python setup.py develop

before_script:
  - pip install pytest
  - pip install pytest-cov
  - pip install scipy

script:
  - pytest -v tests/ --cov=exampy/
Pushing this to GitHub, we see that the Travis CI page for the current build-and-test integration looks as follows when the integration test is in progress:
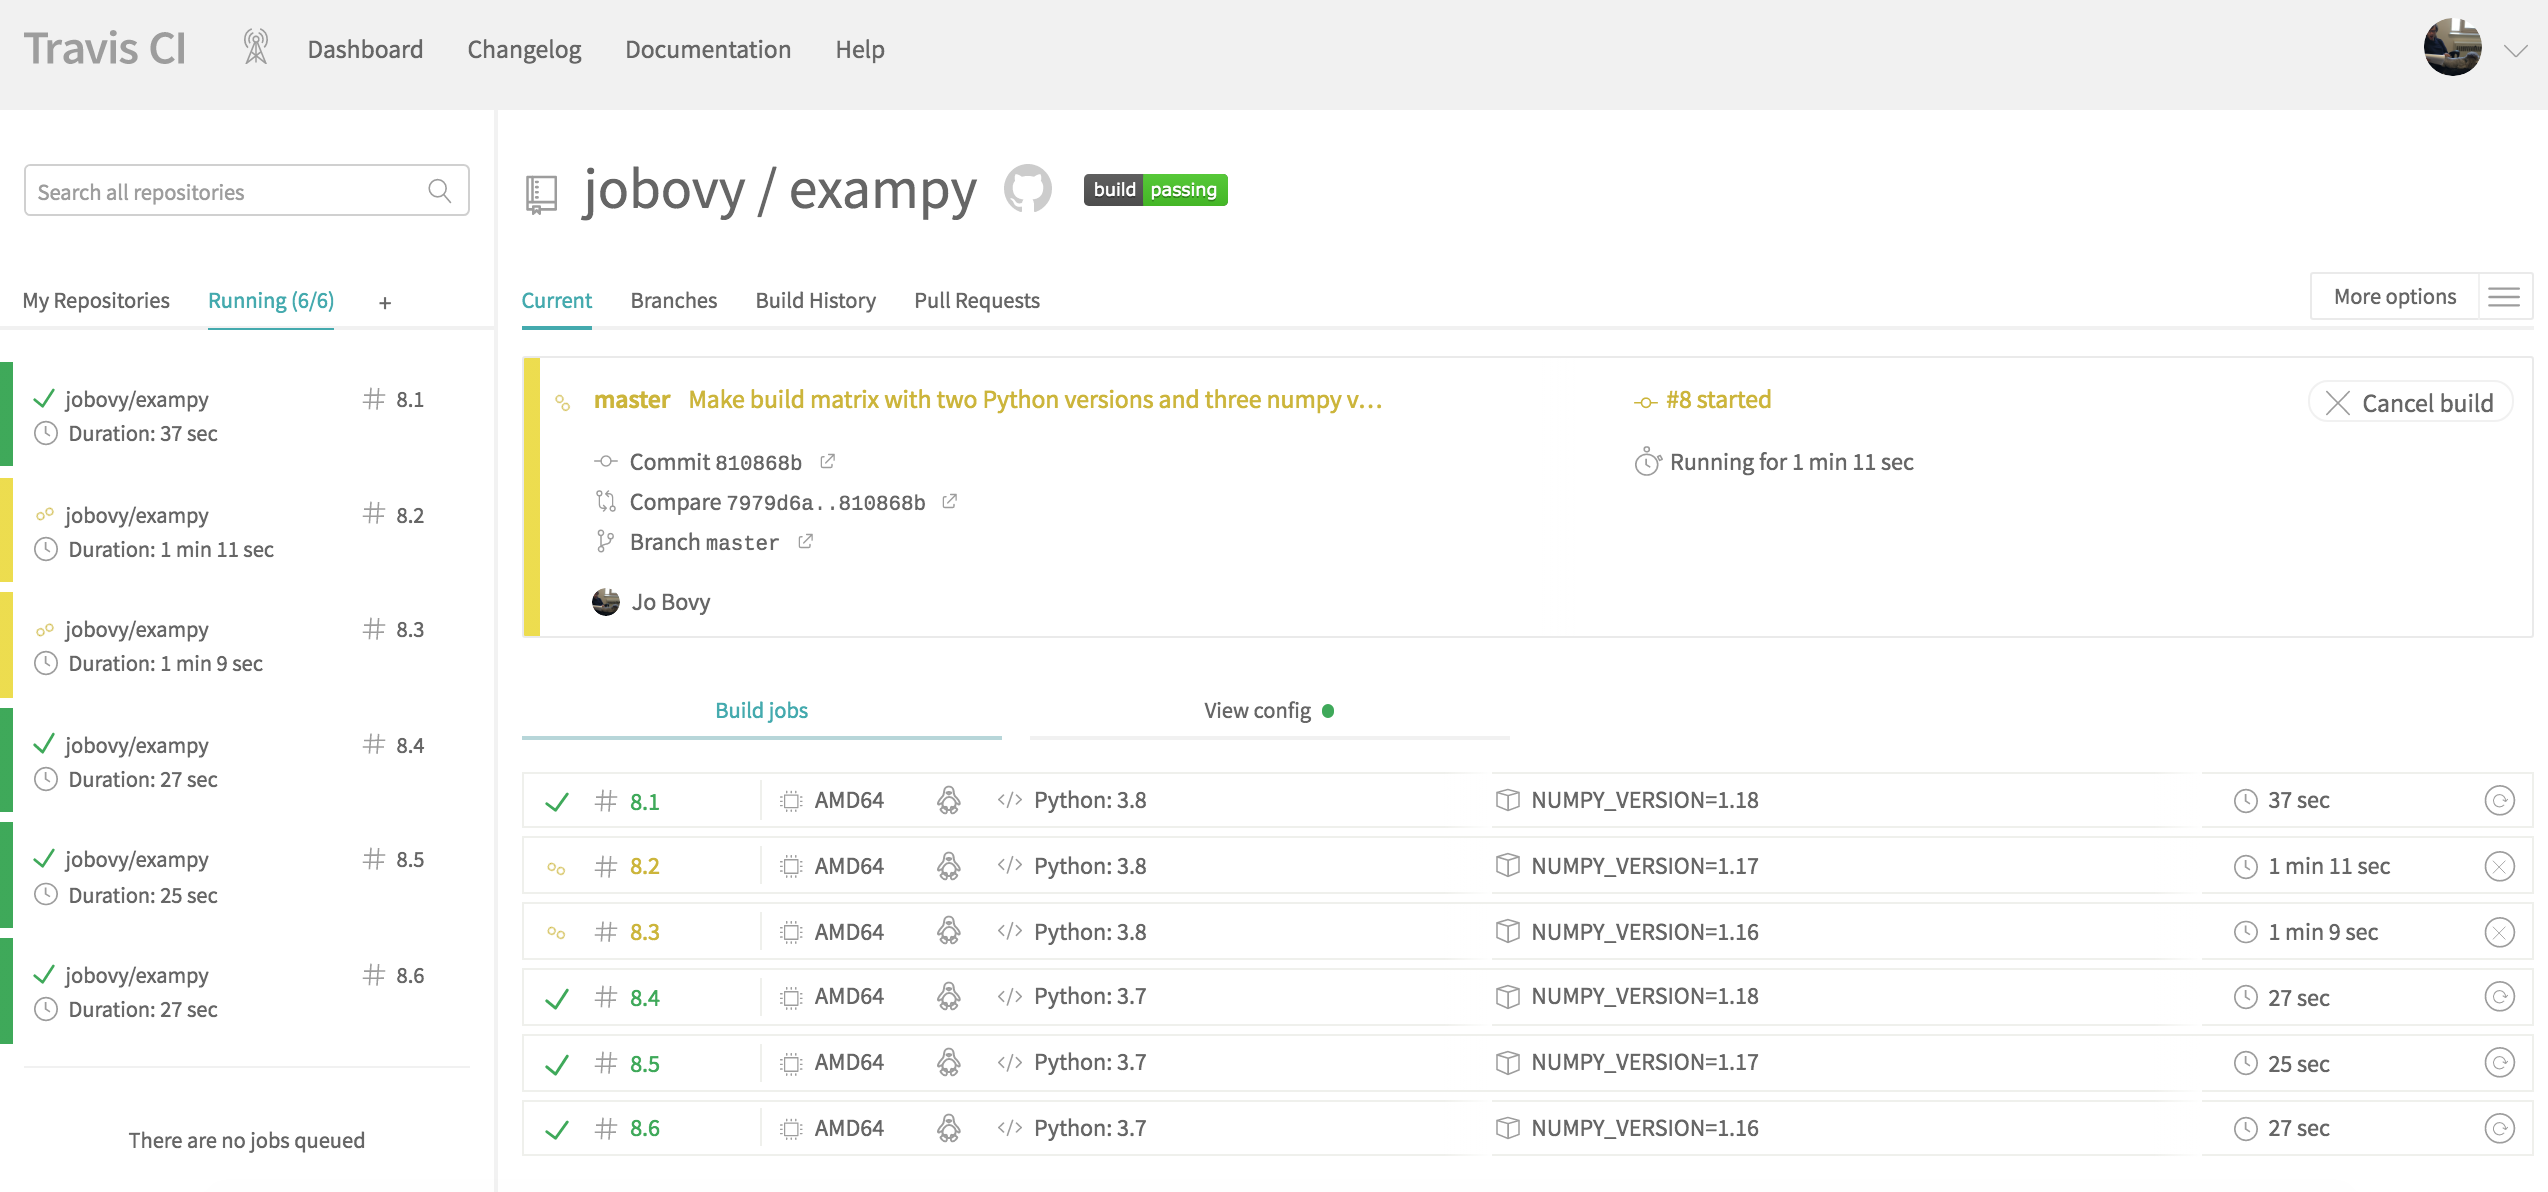
Rather than seeing the log for a single job, we now see an overview of the six created jobs for the six combinations of Python and numpy versions. Some of these run in parallel. Clicking on one of the jobs will bring up the log for that particular job and Travis CI will report the status of each job as either a success or a failure; the entire combination only succeeds if all component jobs succeed (unless you allow
failures). Once all jobs finish running, the final status looks as follows:
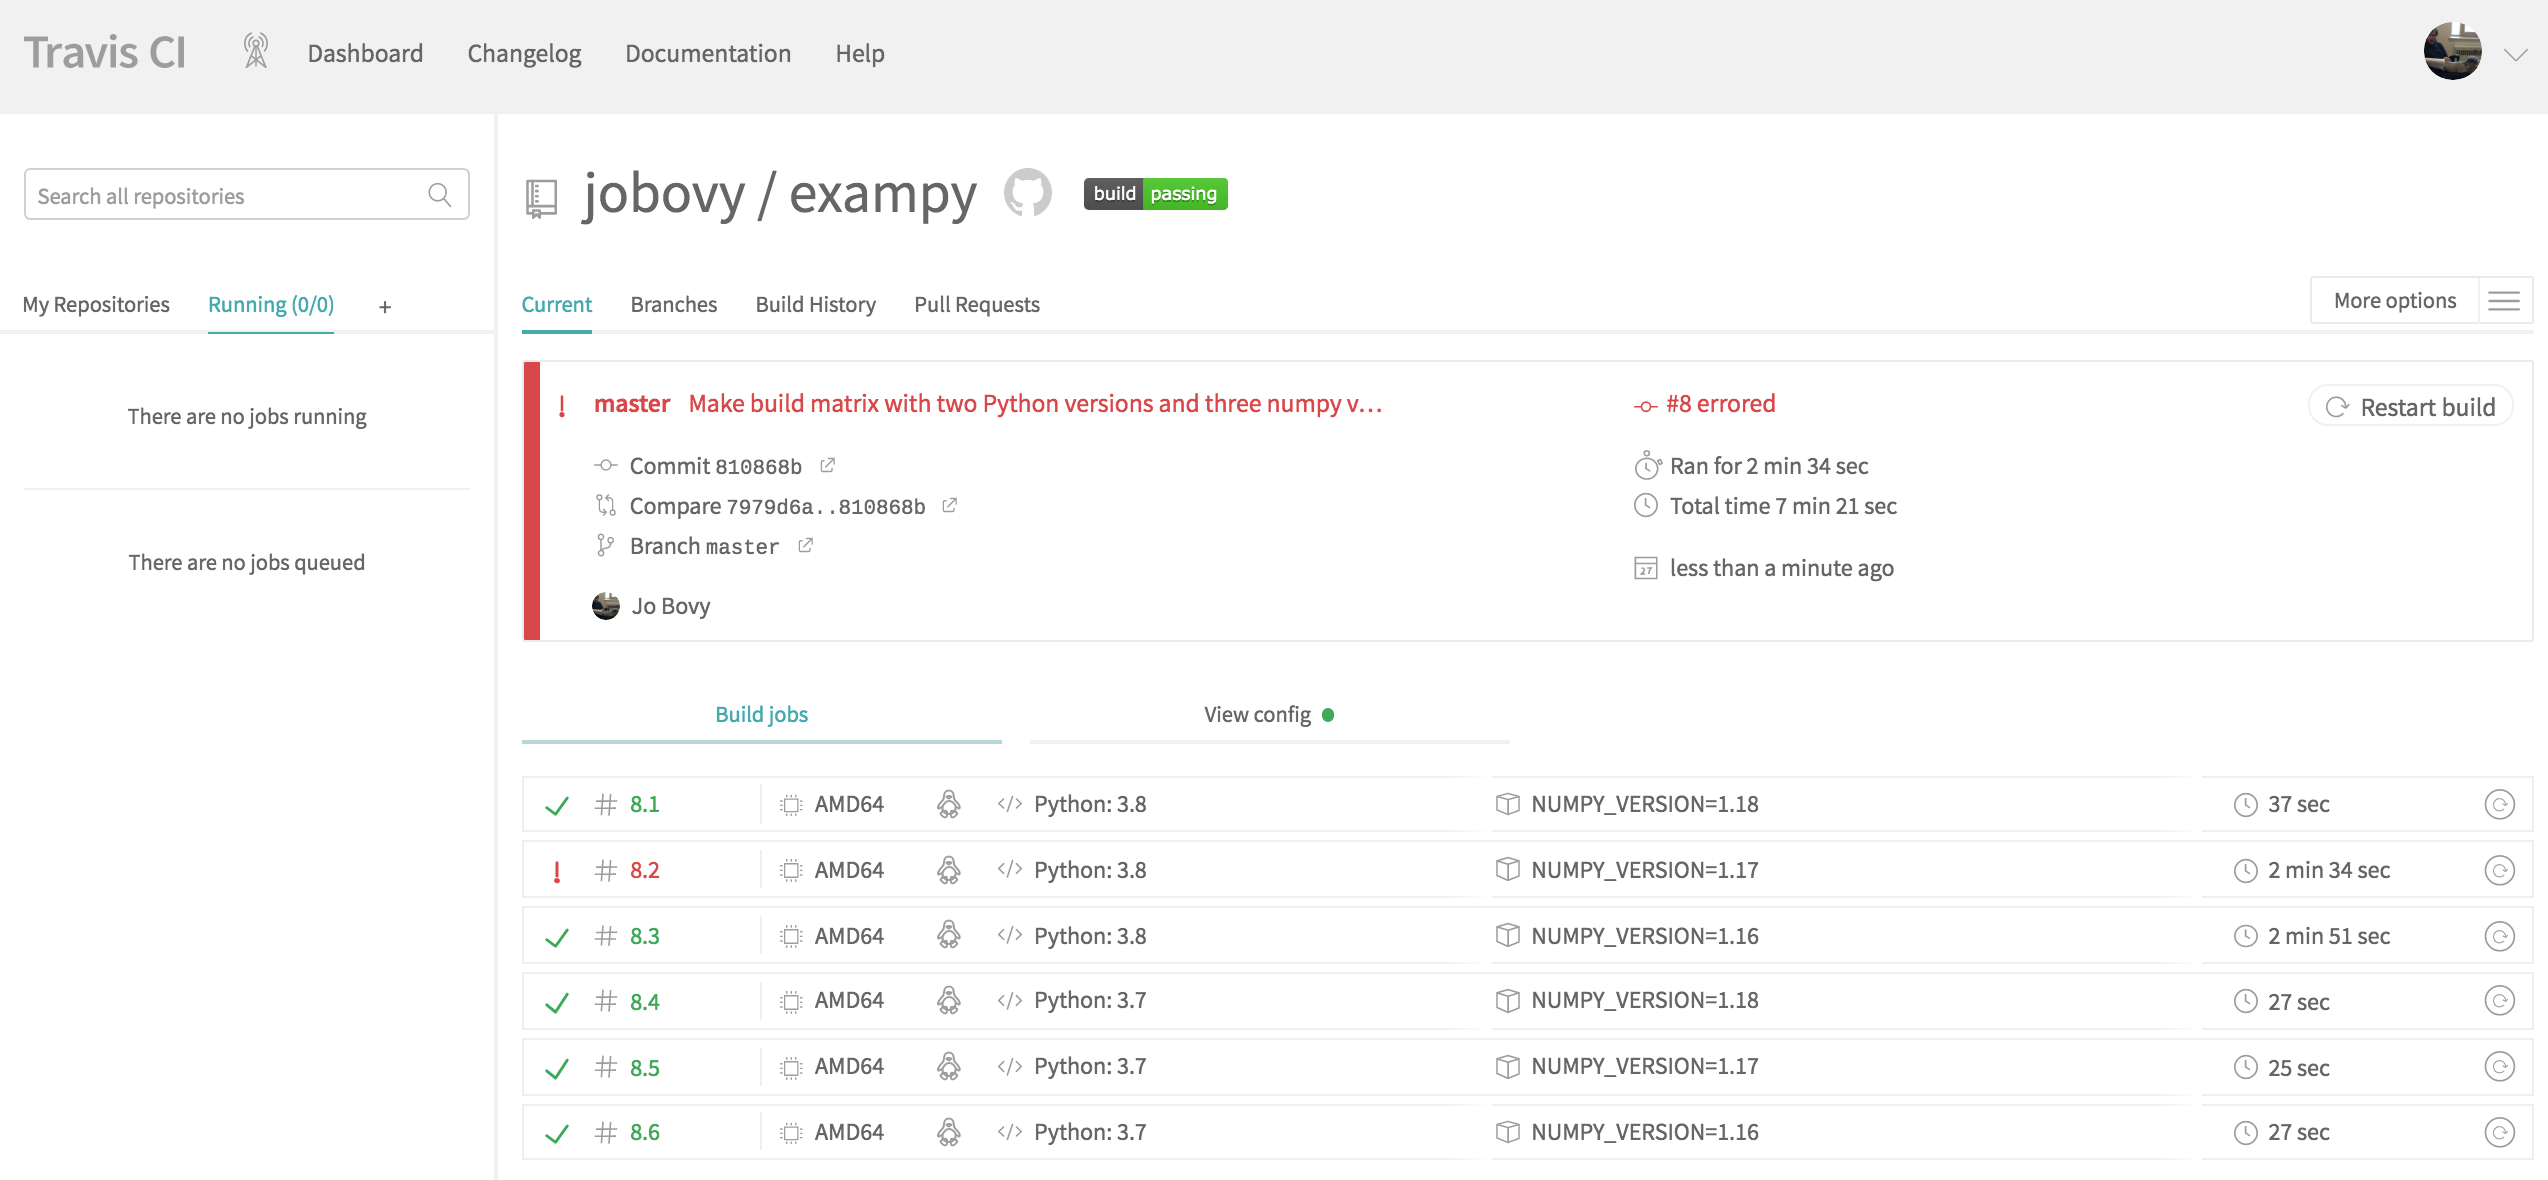
We see that one job failed! Another thing you notice when looking at the duration of each job is that the Python v3.8 / numpy v1.18 and all of the Python v3.7 finish in about 30 seconds, the other two Python v3.8 jobs run for about three minutes. Upon inspection of the logs, it becomes clear that the reason for this is that for these two jobs, no binary wheels for numpy are available; I will discuss binary wheels more in Chapter 7, but for now the important
thing to know about them is that they allow you to install a package with pip without building it on your computer (which is what pip normally does). Thus, for these two versions, pip install numpy builds numpy from source and this takes a while. These wheels aren’t available, because the correct reading of the NEP 29 proposal is that Python 3.8 only needs to support numpy version 1.18 and numpy therefore did
not build binary distributions for earlier numpy versions with Python 3.8. For the Python v3.8 / numpy v1.17 combination, the build from source actually fails on Travis CI, which is the cause of this job’s failure.
When your code includes a few dependencies that take a long (more than a dozen or so seconds) time to build from source (e.g., numpy and scipy), it is beneficial to use the Anaconda Python distribution, which includes built versions of many packages that you might use. Because the entire Anaconda distribution is large and your Travis CI runs would have to download it every time, it is good to use the
Miniconda version of Anaconda instead, which is a bare-bones version of Anaconda that comes with very few packages pre-installed to create a light-weight distribution. Using Miniconda requires us to add a few lines to the before_install: section to download Miniconda, set it up, and use it to install the dependencies. Note that we need to make sure that Miniconda gets set up for the same Python version that we requested in the python:
section, by using the $TRAVIS_PYTHON_VERSION environment variable that Travis CI automatically defines (but note that the Miniconda Python version does not have to be the same as the one specified in the python: section; keeping them the same using the $TRAVIS_PYTHON_VERSION environment variable is useful to avoid confusion though).
Re-writing the example above using Miniconda looks like
language: python

python:
  - "3.8"
  - "3.7"

env:
  - NUMPY_VERSION=1.18.1
  - NUMPY_VERSION=1.17,4
  - NUMPY_VERSION=1.16.6

before_install:
  - wget https://repo.anaconda.com/miniconda/Miniconda3-latest-Linux-x86_64.sh -O miniconda.sh
  - bash miniconda.sh -b -p $HOME/miniconda
  - export PATH="$HOME/miniconda/bin:$PATH"
  - hash -r
  - conda config --set always_yes yes --set changeps1 no
  - conda update conda
  - conda config --add channels conda-forge
  - conda create -n test-environment python=$TRAVIS_PYTHON_VERSION "numpy==$NUMPY_VERSION" scipy pip
  - source activate test-environment

install:
  - python setup.py develop

before_script:
  - pip install pytest
  - pip install pytest-cov

script:
  - pytest -v tests/ --cov=exampy/
Note that I have taken advantage of the fact that scipy can also be more easily installed using conda to simply include it in the main conda create command in the before_install: section. I also specified the exact version of numpy to use, because otherwise for, e.g., v1.17 conda tries to install v1.17.0 (which in this case fails, because it does not exist in Anaconda for Python 3.8).
This run now was successful, with the overview at the end looking like
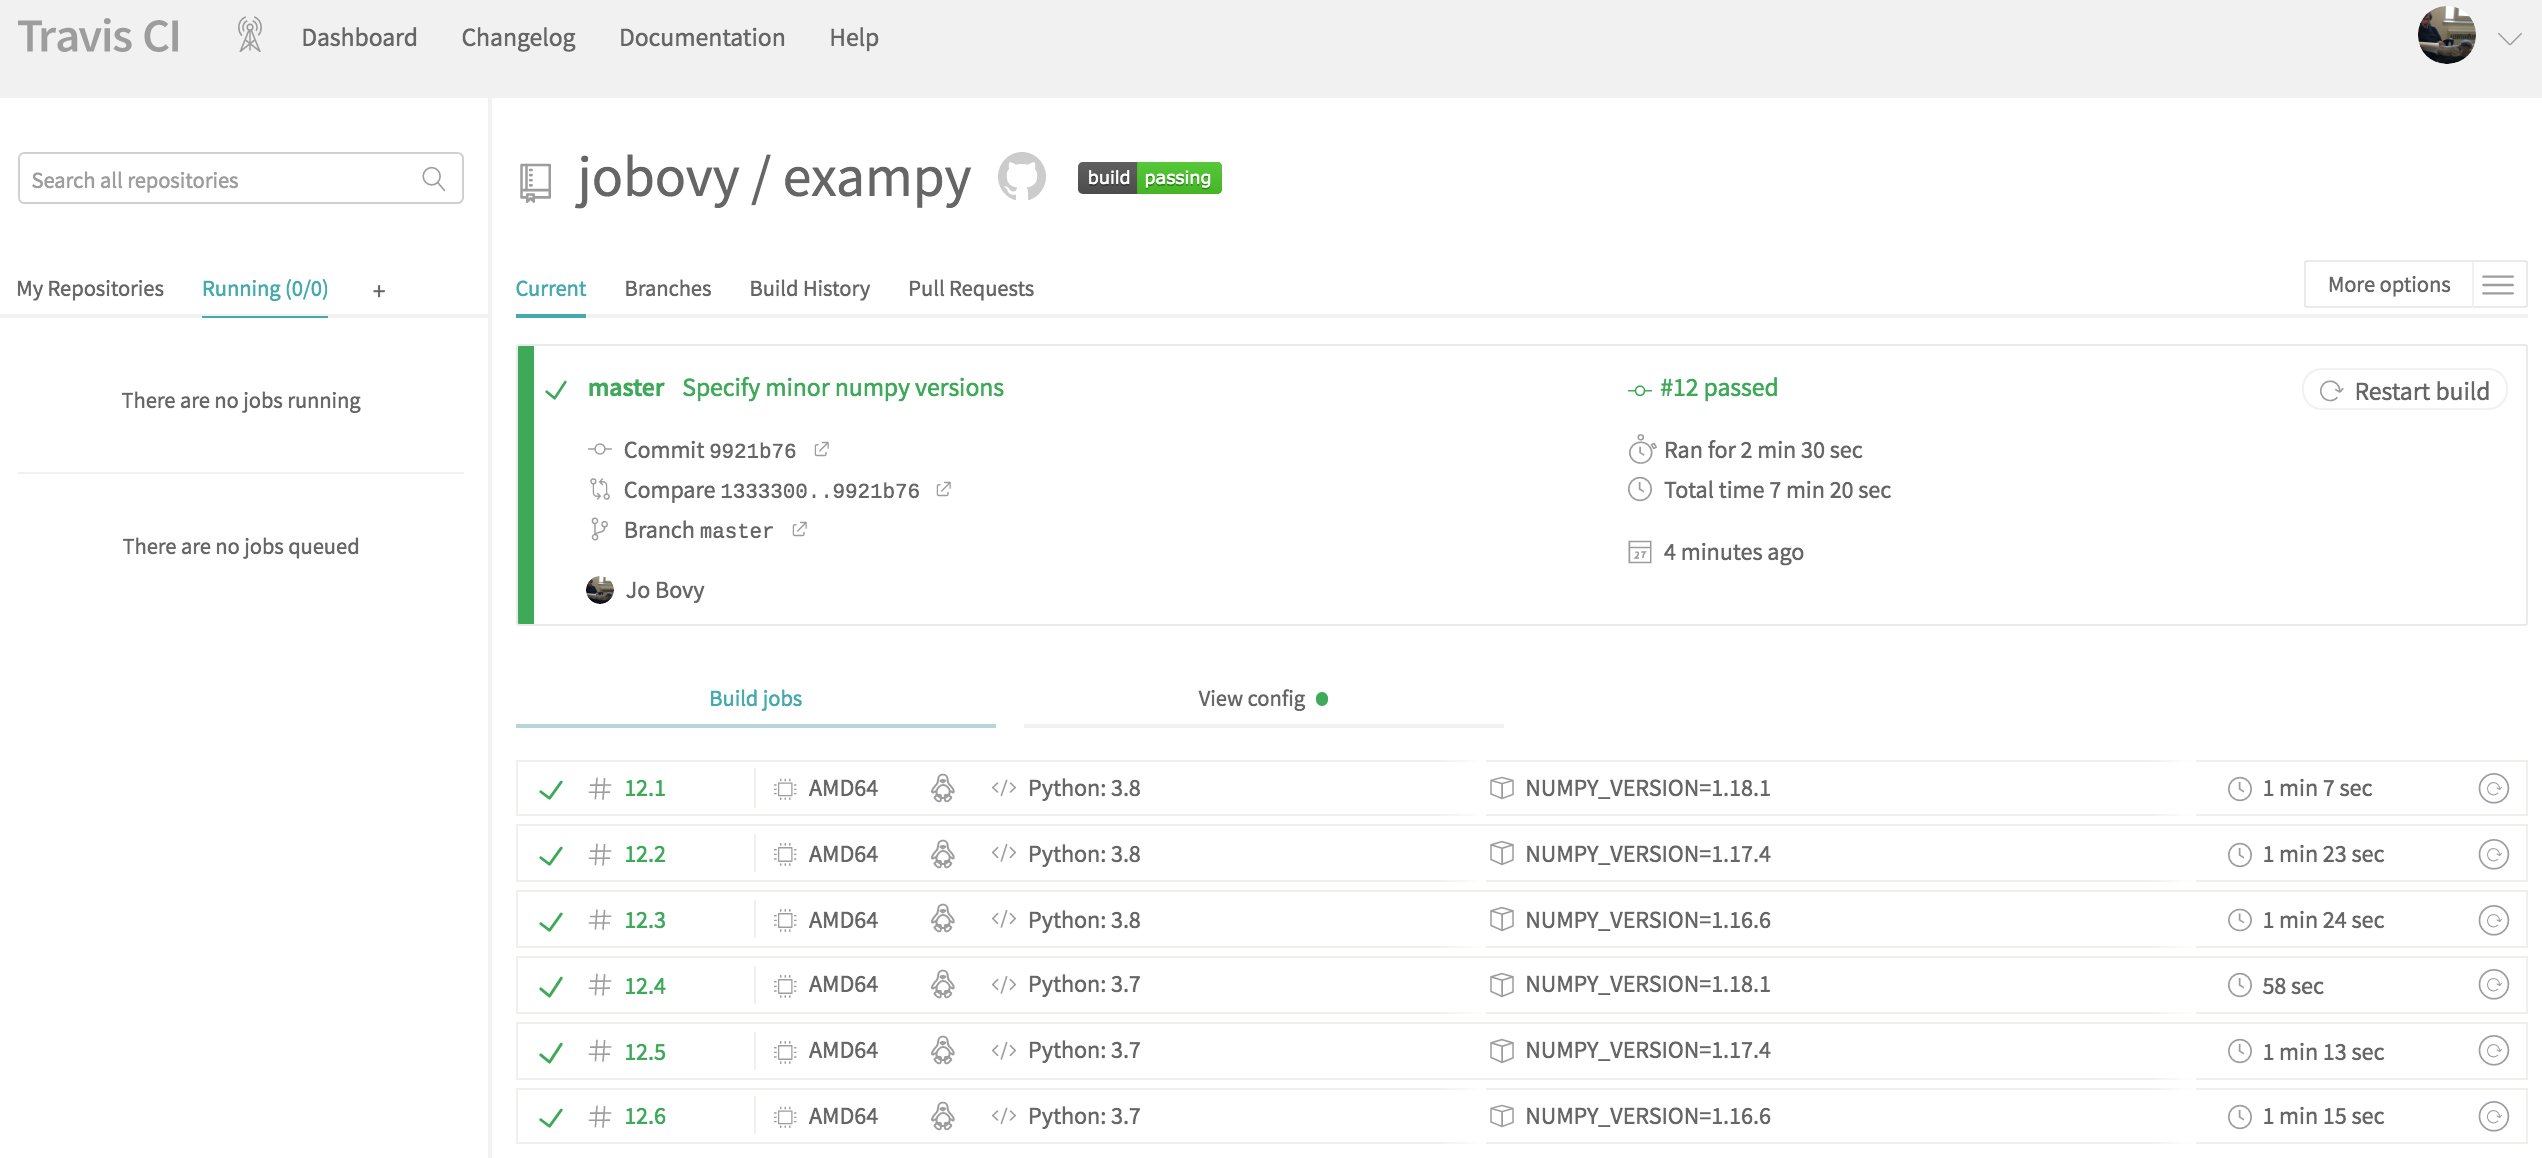
Each job now takes about a minute to run, showing that using Miniconda significantly speeds up the run compared to building numpy from source (which above led to a > 2 minute job time; building scipy from source would more than double that).
At this point, your email inbox will be filled with emails from Travis CI telling you about the status of each integration run. You typically do not want to be updated about the status of every run, but simply when the status changes. For example, if a set of runs all end successfully, it’s not that useful to get an email about this every time, but if a run suddenly fails, you will want to know that. Similarly, if your runs have been failing, it’s useful to know when they start passing again
(although that you will more likely be checking on the website directly). To only get notified upon a change in status from success to failure or failure to success, add a section to your .travis.yml file at the end that looks like
notifications:
  email:
    recipients:
      - YOUR_EMAIL
    on_success: change
    on_failure: change
Other useful parts of the .travis.yml file that I will not discuss in detail are:
addons:allows you to specify dependencies that can be installed using, e.g., standard linux tools likeapt-get. For example, to use the GNU scientific library, useaddons: apt: packages: - libgsl0-devIf your tests make plots, you will run into errors, because the plots cannot be displayed. To avoid those, include the
xvfbservice that allows you to run graphical applications without a display:services: - xvfb
Building a matrix of jobs by multiplying options set in sections such as
python:andenv:quickly leads to large build matrices. If you just want to include an additional job with different parameters, you can include individual jobs in thematrix:section, e.g., include a single job that uses Python v3.6 andnumpyv1.18.1 withmatrix: include: - python: "3.6" env: NUMPY_VERSION=1.18.1You can also exclude jobs from the matrix, for example, to actually follow the NEP 29 support proposal, you can exclude the unnecessary jobs for Python 3.8 in the
Travis CIconfiguration that I discussed just before theMinicondadiscussion, asmatrix: exclude: - python: "3.8" env: NUMPY_VERSION=1.17 - python: "3.8" env: NUMPY_VERSION=1.16Full documentation on the build matrix is given here.
Finally, by default, Travis CI will run when you push a new commit or set of commits to GitHub (for any branch) or when someone opens or updates a pull request (in that case, Travis CI will automatically add status updates on whether the integration tests pass to the pull request’s page). If in addition to this, you want the build of, say, your main branch to happen at least weekly whether or not a change occurred, you can do this with a “cron job” by going to your package’s
Travis CI page and navigating to the “Settings” under the “More Options” menu. There, there is a “Cron Jobs” part where you can choose a branch, how often to run (daily, weekly, or monthly currently), and whether to always run or run only if there hasn’t been a commit in the last 24 hours. This page looks as follows if you add the main branch on a weekly schedule, only running when there hasn’t been a change in the last day:

I will discuss how you can process test coverage with Travis CI below.
A final note: getting the installation of your dependencies, the build of your own package, and the test suite to run on Travis CI can be difficult and you will often end up with frustrating failed builds that are difficult to diagnose. In writing this section, I ran into syntax errors and unexpected behavior multiple times. Unfortunately, there is nothing much you can do about this, because as far as I am aware one cannot replicate the Travis CI builds locally to test them before
running them on Travis CI. But there is lots of info in the online documentation and on the web to help you out and in the end it’s worth the effort to know that your package is working as you expect at all times.
6.3. Continuous integration for Windows: AppVeyor
Travis CI is great for testing your integration suite on a Linux operating system and it also has support for Mac OS X, although in practice running Python packages on Macs is so similar to running on Linux that there is little reason to test Mac OS X separately. But if you want to support Windows users, you will want to build and test your code on Windows, because there are subtle ways in which pure Python programs that you think are universal will fail on Windows (e.g., if you explicitly
write paths as /path/to/file rather than using os.path.join, which would properly put in the backslashes for Windows) and any compiled code will require significant modifications to run under Windows. While Travis CI has some support for Windows, only a limited set of features is available. However, AppVeyor is a continuous-integration system that is built around supporting Windows and it, like Travis CI, allows free use for open-source projects (although under somewhat less
generous terms: only a single runner is available at any time).
Overall AppVeyor works similar to Travis CI. To start using it, sign in with your GitHub account, add your project by choosing among your GitHub repositories that will be displayed when you log in, and configure your build with a .appveyor.yml file (there is also a user interface, but it’s easier to configure AppVeyor similar to Travis CI with a .yml file and you cannot both use the .appveyor.yml file and the user interface). The structure
of the .appveyor.yml file is broadly similar to the .travis.yml file, with sections to set up the environment, the matrix of builds, the installation of dependencies and of the package itself, and a section to run the tests. AppVeyor builds run in the CMD shell or the Windows PowerShell, a shell that is similar in spirit to Unix-type shells, but quite different in many
ways; I will mainly use the CMD shell, because it is more similar to Unix-style shells (but you can mix CMD and Powershell within a single .appveyor.yml file). You can write arbitrary commands just as in the .travis.yml file. This is a good time to point out that if you want to make your code work on Windows and set up the AppVeyor integration tests, it’s helpful to have a Windows machine around to test things locally. If you don’t have a Windows computer at hand, you can use a
virtual machine, such as VirtualBox.
To illustrate the structure of the .appveyor.yml file, let’s write the equivalent of the simple single-Python-and-numpy that we got working in the previous section. This looks as follows
build: off

environment:
  PYTHON: "C:\\Python37"

install:
  - "set PATH=%PATH%;%PYTHON%\\Scripts"
  - "%PYTHON%\\python.exe -m pip install pytest"
  - "%PYTHON%\\python.exe -m pip install pytest-cov"
  - "%PYTHON%\\python.exe -m pip install scipy"
  - "%PYTHON%\\python.exe setup.py develop"

test_script:
  - pytest -v tests/ --cov=exampy/
Provided that we have added our package to our AppVeyor account, pushing this .appveyor.yml file to the package’s GitHub repository will trigger a run of the AppVeyor integration test and we see the log in a similar way under the “Current build” as in Travis CI:
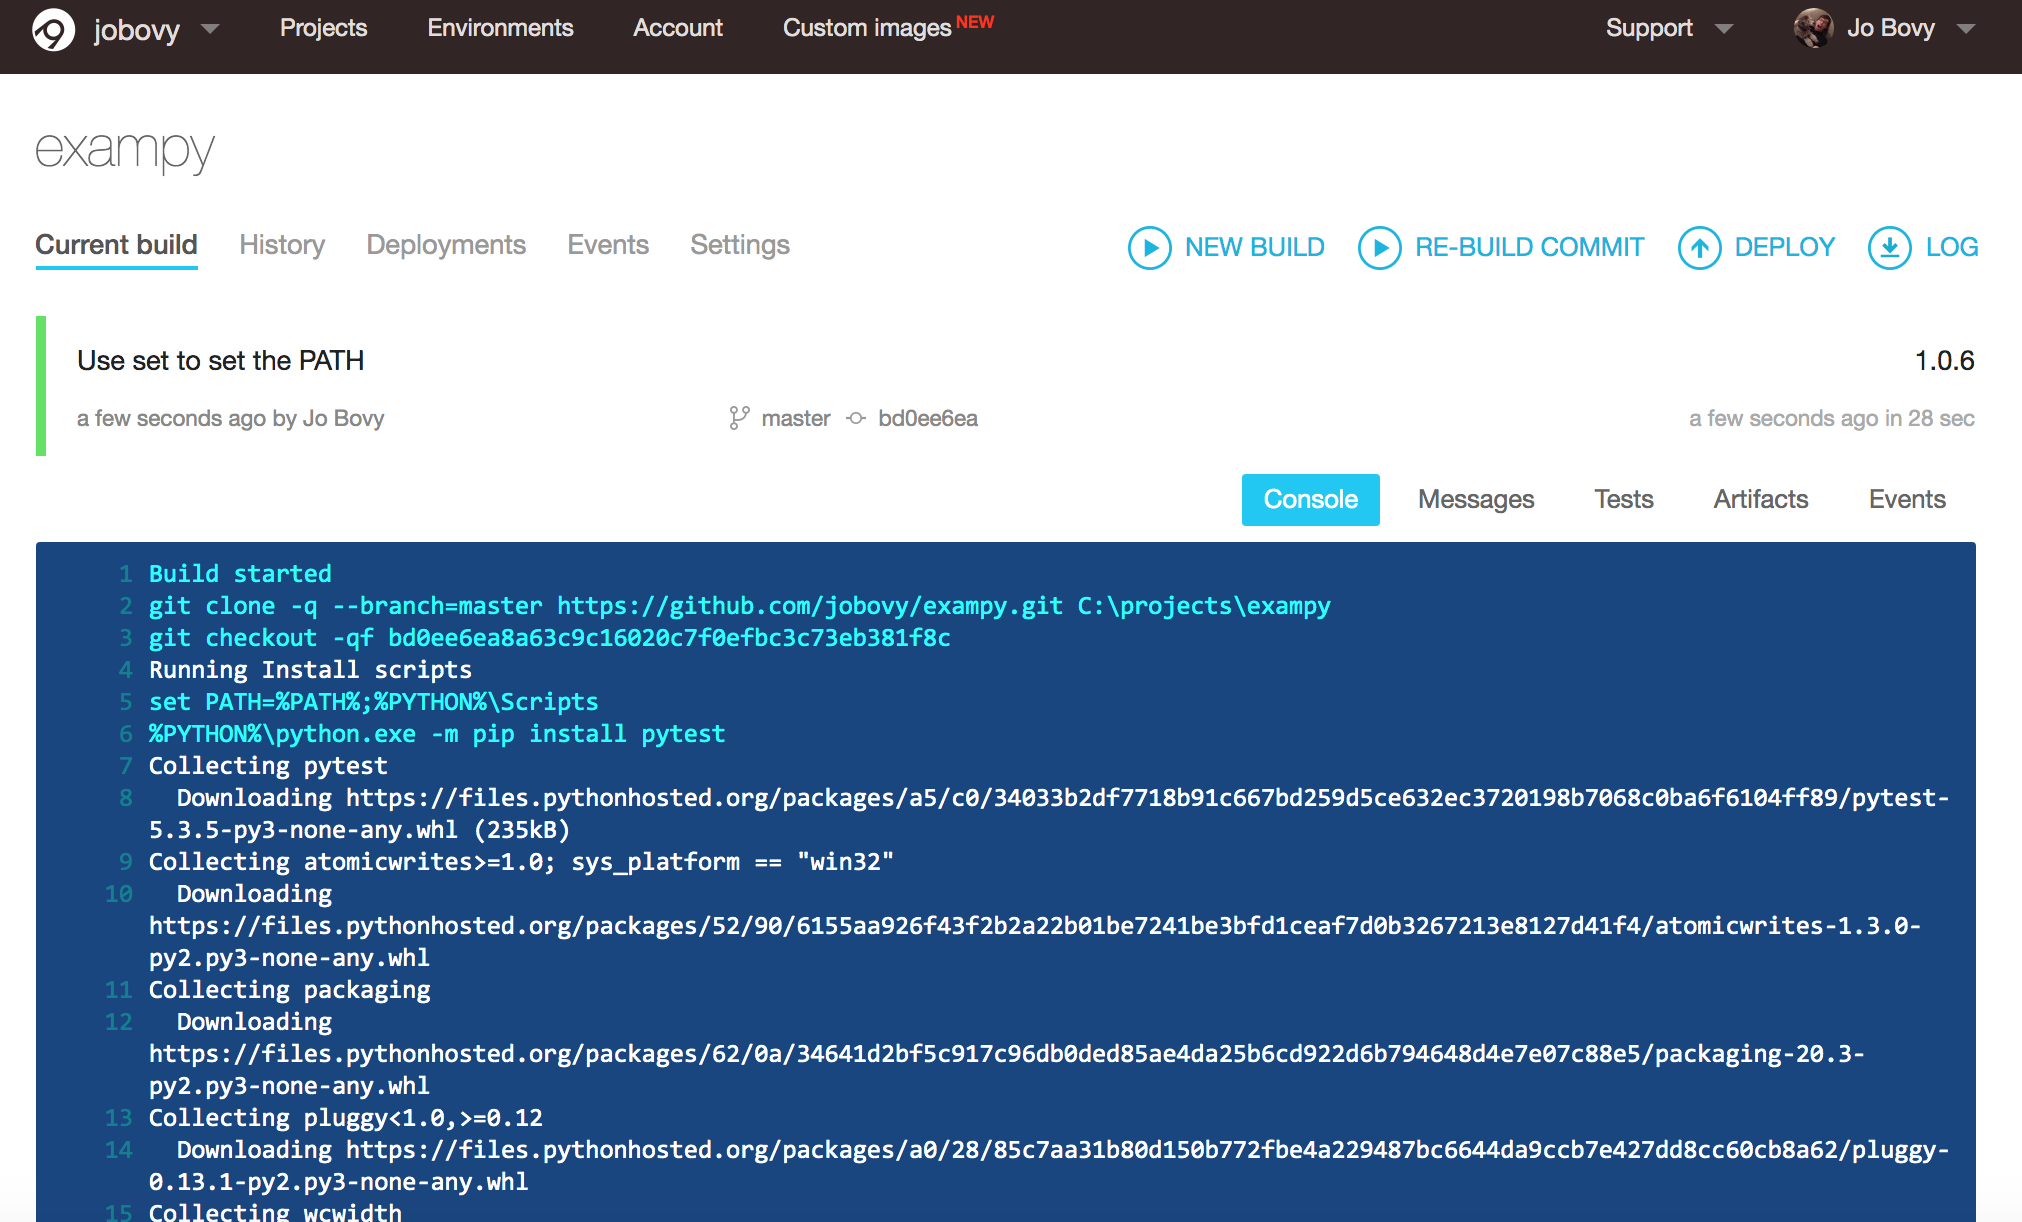
What happens in this .appveyor.yml file is the following: (i) we turn build: off, because build: is a MS-specific build process that we don’t use for Python packages, (ii) we choose one of the pre-installed Python versions, (iii) we install dependencies and the package in a similar way as in .travis.yml, with some Windows-specific tweaks, and (iv) we run the test script. Note that we need to add the
C:\\Python37\\Scripts directory to the PATH, because otherwise the pytest script is not found. Similar to Travis CI above, getting the AppVeyor integration runs to work can be a bit of trial and error and as you can see above, it took me six tries to get this simple example to work properly!
Note that you can use both CMD and PowerShell syntax in the same .appveyor.yml, you simply need to prefix any PowerShell statements with ps:, for example, you can do the path assignment in the PowerShell in the example above:
build: off

environment:
  PYTHON: "C:\\Python37"

install:
  - ps: $env:PATH="$env:PATH;$env:PYTHON\\Scripts"
  - "%PYTHON%\\python.exe -m pip install pytest"
  - "%PYTHON%\\python.exe -m pip install pytest-cov"
  - "%PYTHON%\\python.exe -m pip install scipy"
  - "%PYTHON%\\python.exe setup.py develop"

test_script:
  - pytest -v tests/ --cov=exampy/
Like with Travis CI above, you can define matrices of jobs to run and you can also use Miniconda to run Python, which is natively installed, so you don’t have to download Miniconda like on Travis CI. One limitation of the build matrices on AppVeyor is that you cannot automatically multiply different environment variables, but you have to write out all combinations by hand. So to follow the recommendations from the
NEP 29 proposal about which Python/numpy versions to support (see discussion above), we simply write out all four combinations. Using Miniconda for dependencies, this can be achieved with the following .appveyor.yml
build: off

environment:
  MINICONDA: C:\\Miniconda37-x64

  matrix:
    - PYTHON_VERSION: 3.8
      NUMPY_VERSION: 1.18.1

    - PYTHON_VERSION: 3.7
      NUMPY_VERSION: 1.18.1

    - PYTHON_VERSION: 3.7
      NUMPY_VERSION: 1.17.4

    - PYTHON_VERSION: 3.7
      NUMPY_VERSION: 1.16.6

install:
  - cmd: call %MINICONDA%\Scripts\activate.bat
  - cmd: conda.exe update --yes --quiet conda
  - "set PATH=%MINICONDA%;%MINICONDA%\\Scripts;%PATH%"
  - conda config --set always_yes yes --set changeps1 no
  - conda info -a
  - "conda create -n test-environment python=%PYTHON_VERSION% numpy==%NUMPY_VERSION% scipy"
  - activate test-environment
  - python setup.py develop"

before_test:
  - pip install pytest
  - pip install pytest-cov

test_script:
  - pytest -v tests/ --cov=exampy/
Note that here I use the Miniconda for Python v3.7, even for the tests that use Python v3.8, because at the time of writing there is no direct support for Python v3.8 on AppVeyor. As you can see, the .appveyor file is quite similar to the .travis.yml file for this setup, except that we need to manually write out this job matrix.
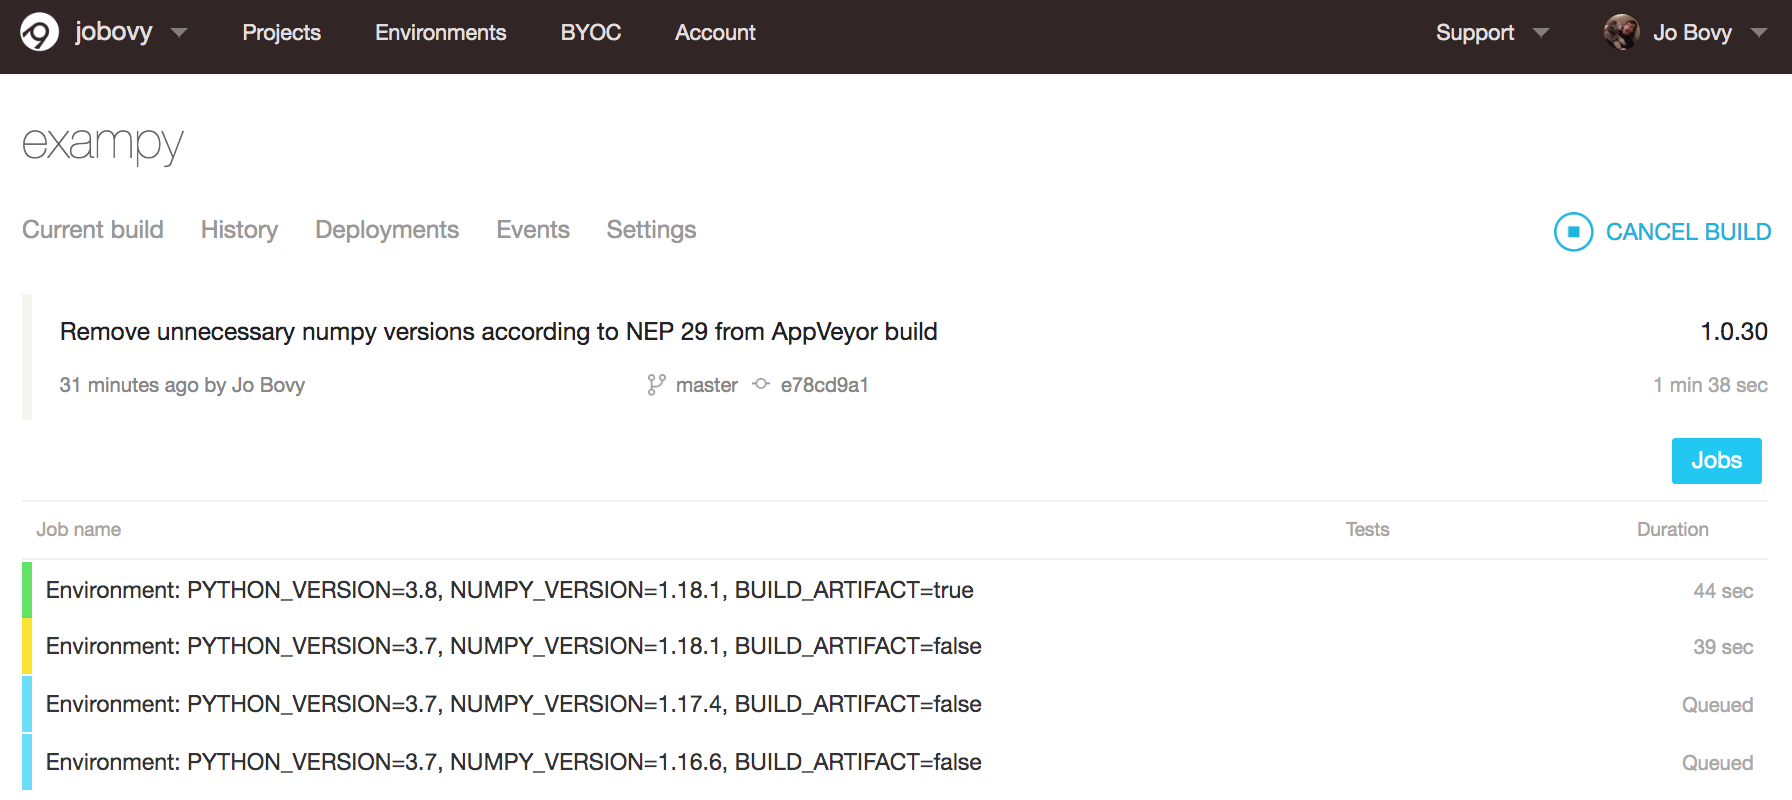
Once we push this new .appveyor.yml file to GitHub, the various jobs start running and the “Current build” page changes to an overview of the different jobs:
Soon all of the individual jobs finish successfully and we can inspect their individual logs by clicking on them. For example, the final part of the Python v3.8 / numpy v1.18.1 looks like
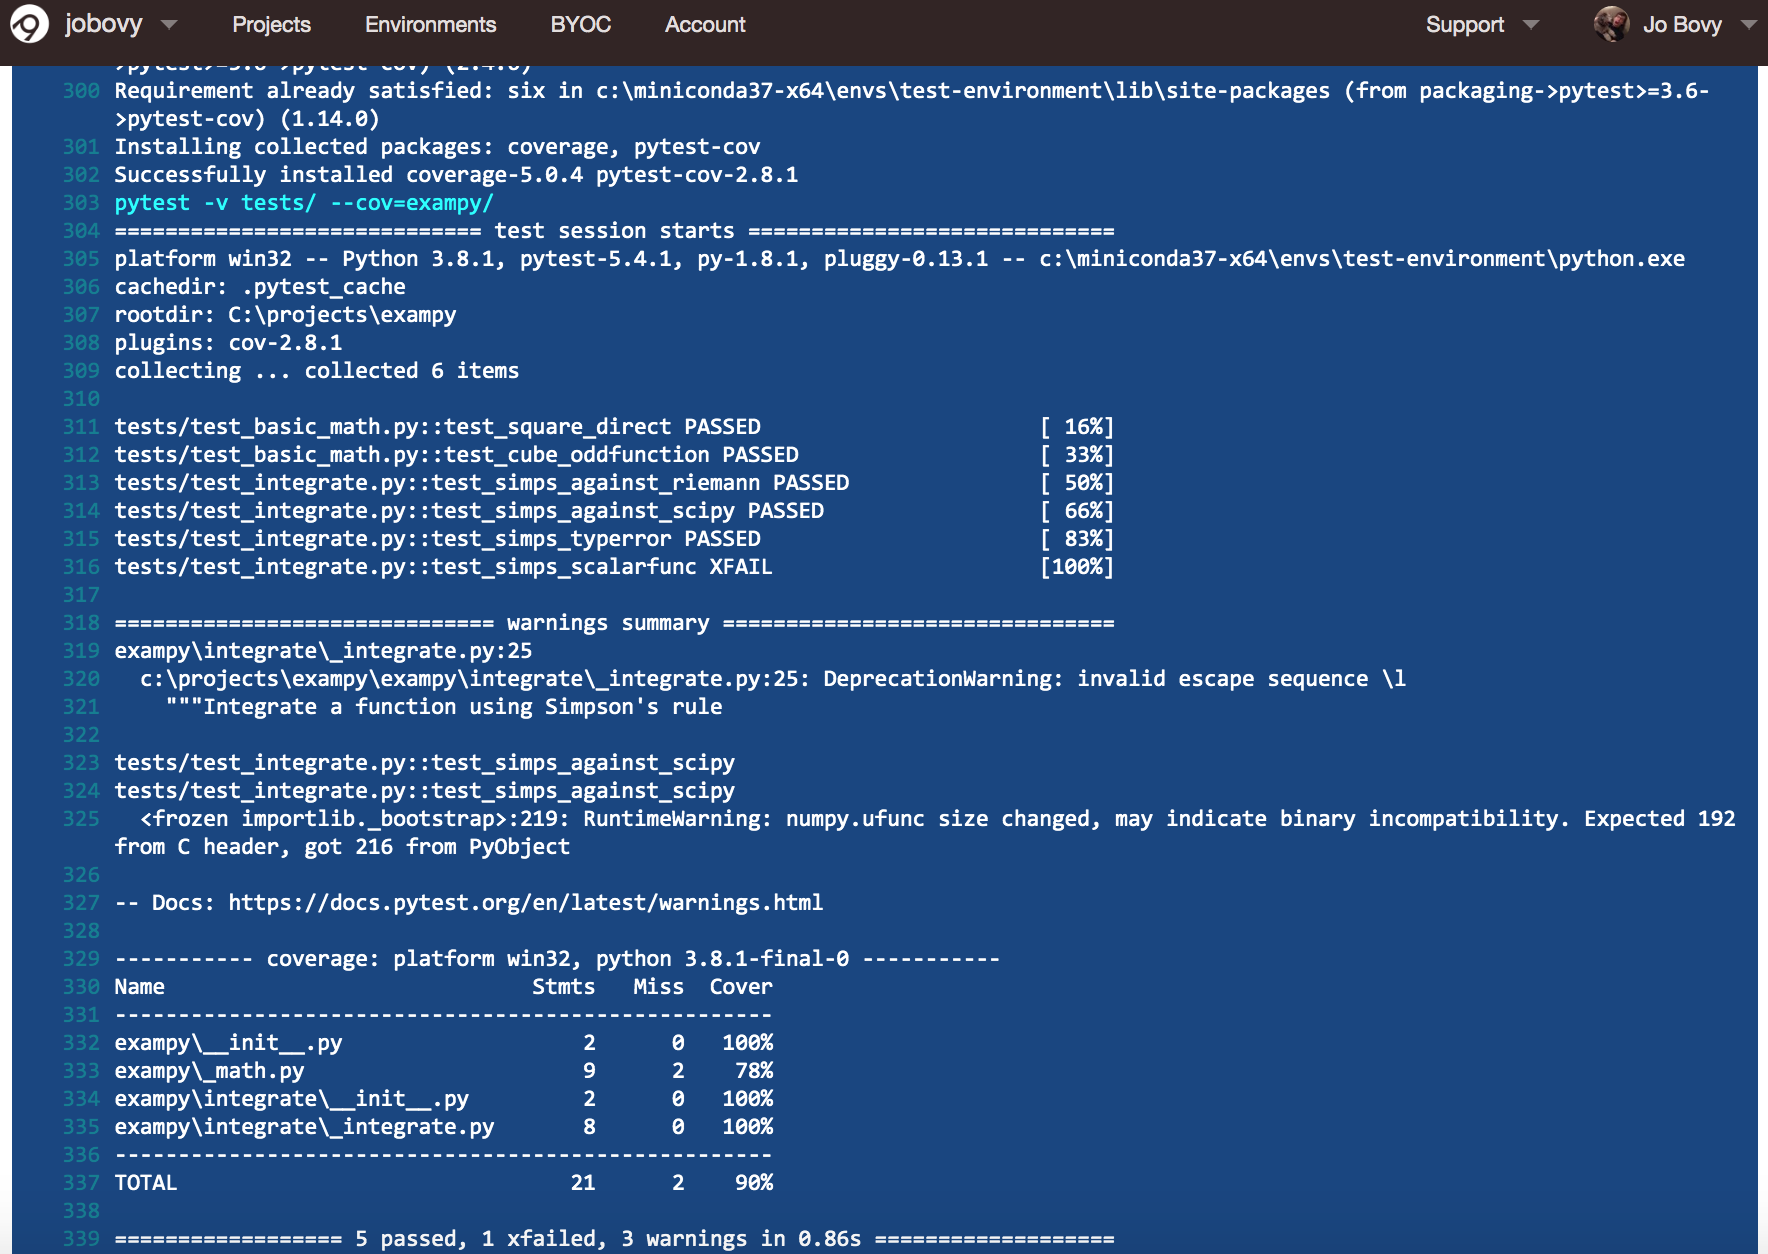
As you can see, the tests pass and we are indeed using Python v3.8.
AppVeyor by default will only email you upon a change in the status, so there is no need to configure that directly. Like Travis CI, AppVeyor will run for any change to any branch and for any opened or updated pull request.
6.4. GitHub Actions, the new kid on the block
GitHub itself has recently unveiled a continuous-integration service called GitHub Actions. In many ways GitHub Actions gives similar functionality to Travis CI and AppVeyor, but it has (at least) two main advantages: (1) you can perform a variety of different tasks by defining multiple “workflows” in their own .yml files, rather than having to configure the entire integration process in one .yml file, and (2) you can easily use
tasks, or “actions”, written by others to perform steps in your own workflow and you can write and share your own. The first advantage means that you can do things like run the integration tests upon each push or pull request, create binary distributions for your code, automatically respond to Issues and Pull requests, automatically publish your package to a package distribution, publish your documentation (e.g., if you host it yourself), by defining multiple different workflows. The second
advantage means that you can significantly simplify the way you write your own workflows by making use of actions that perform atomic operations. These atomic actions are things like checking out the source repository, installing python, installing Miniconda and setting up a conda environment, but also things like installing LaTeX, spinning up an SSH agent for authentication, uploading files to AWS S3 buckets, etc. This way of using and sharing code is truly following the GitHub spirit.
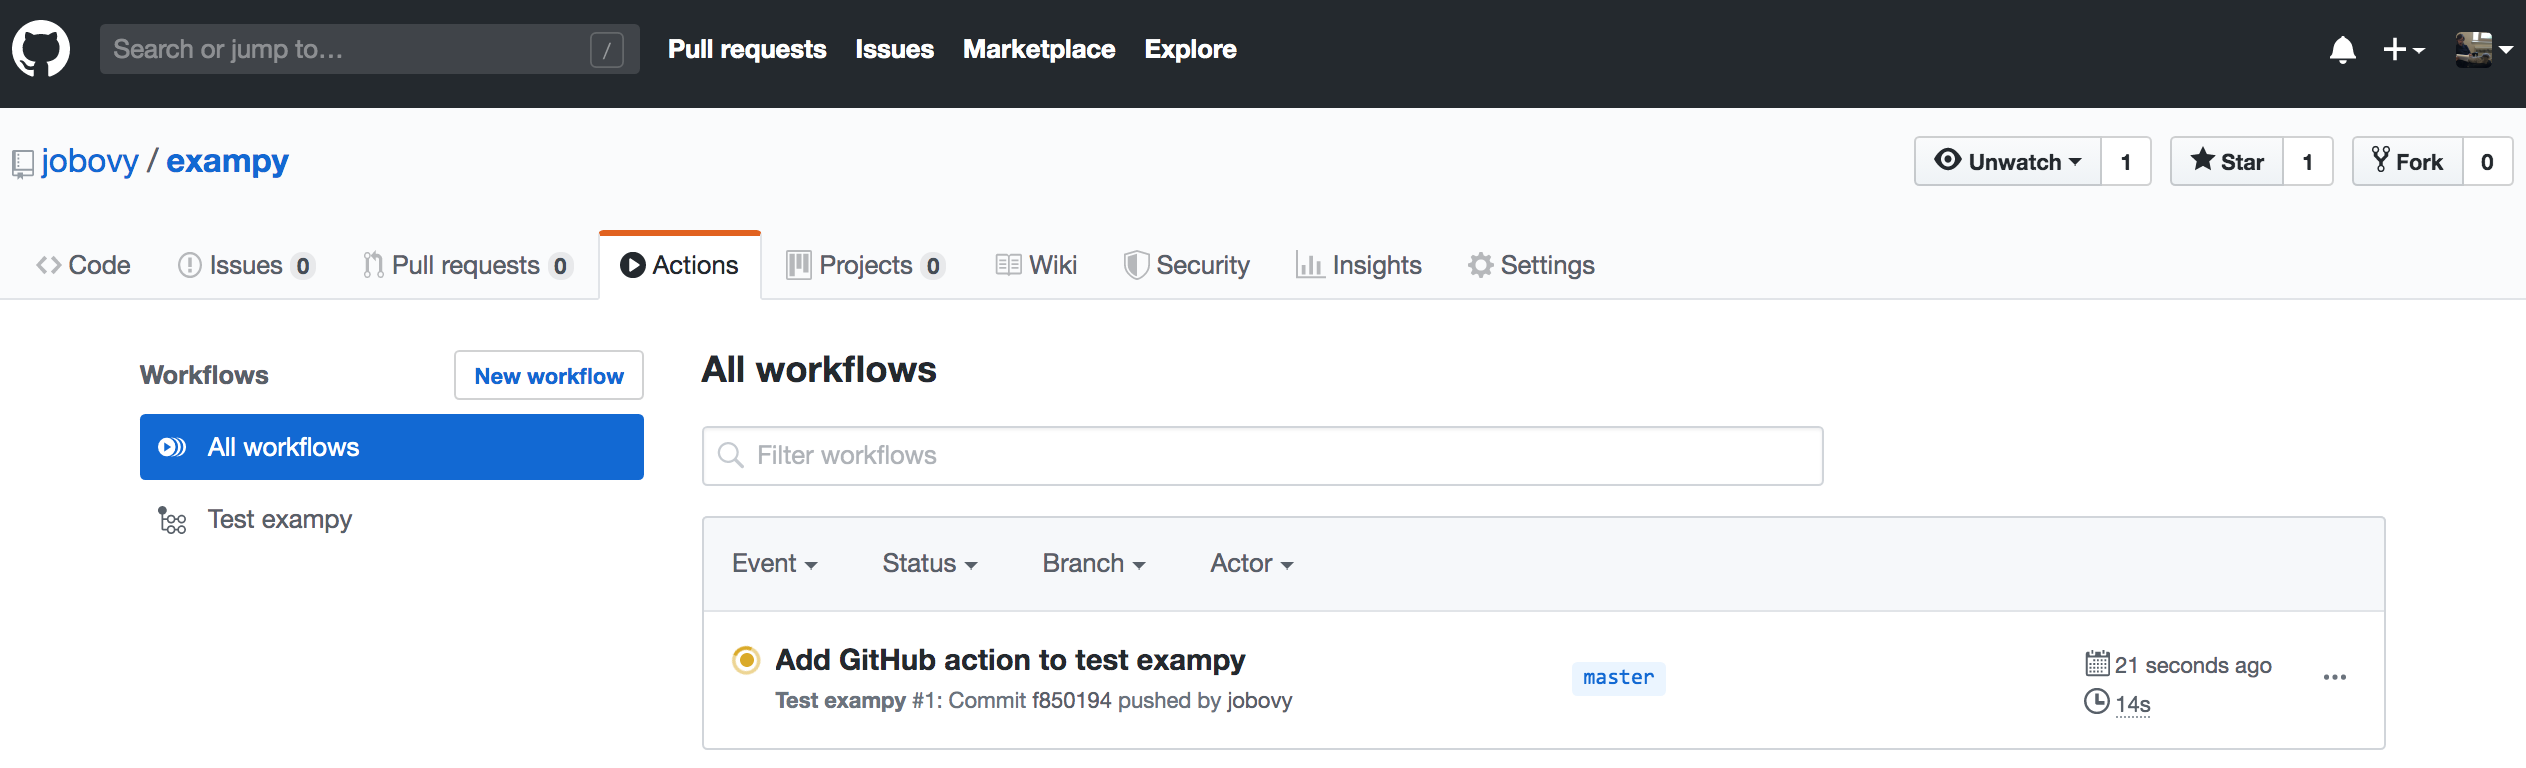
GitHub Actions are, obviously, seamlessly integrated with GitHub. Similar to Travis CI and AppVeyor above, they are defined using .yml configuration file, but now you can have multiple ones. These files live in the .github/workflows/ directory of your repository. Adding one of these files to your repository will automatically set up GitHub Actions to run for your repository, so there is nothing to do beyond writing the file. You may have noticed that your package’s GitHub
page has an “Actions” tab and if you navigate there, you see a page that looks like
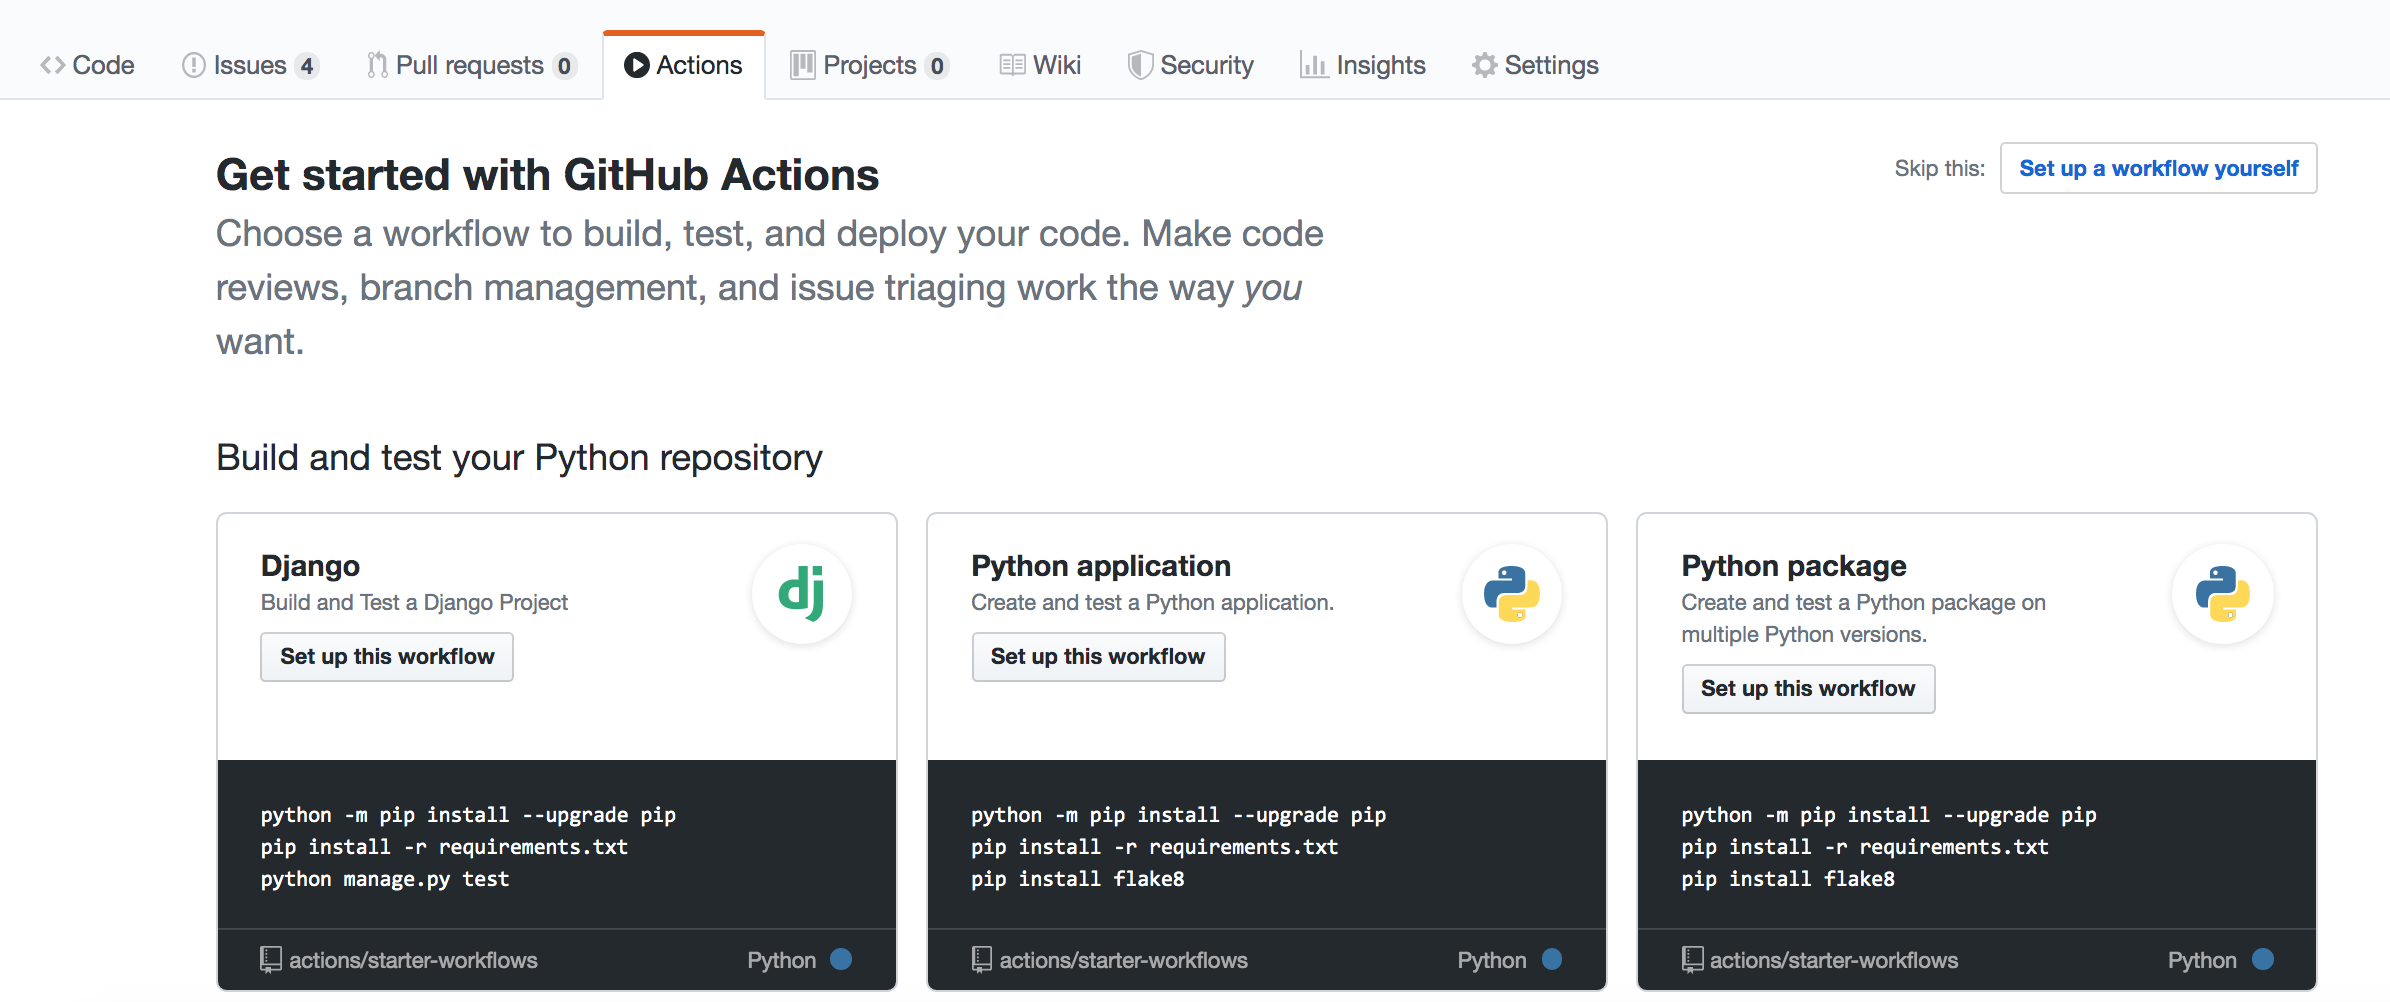
You could get started building your continuous-integration workflow there, but we will simply add a .yml file ourselves to the .github/workflows/ directory to do this instead.
To define GitHub Actions workflows, it’s easiest to use the online GitHub editor to add a new file or edit an existing file. This is because GitHub will automatically allow you to check the syntax of the file before committing it, by clicking on “preview”, which is handy to not get too many failed builds due to syntax errors (I have found this to happen often with workflow configuration files written in a separate editor and pushed to the repository like other files). Therefore, navigate to
the package’s GitHub repository and click on “create a new file” just above the directory listing. We’ll add a file .github/workflows/test_package.yml. To run the same integration tests that we ran on Travis CI and AppVeyor, we can use the following file
name: Test exampy

on: [push]

jobs:
  build:
    runs-on: ubuntu-latest
    strategy:
      matrix:
        python-version: [3.7, 3.8]
        numpy-version: [1.16,1.17,1.18]
        exclude:
          - python-version: 3.8
            numpy-version: 1.16
          - python-version: 3.8
            numpy-version: 1.17
    steps:
    - uses: actions/checkout@v2
    - name: Set up Python ${{ matrix.python-version }}
      uses: actions/setup-python@v1
      with:
        python-version: ${{ matrix.python-version }}
    - name: Install dependencies
      run: |
        python -m pip install --upgrade pip
        pip install numpy==${{ matrix.numpy-version }}
    - name: Install package
      run: |
        pip install -e .
    - name: Test with pytest
      run: |
        pip install pytest
        pip install pytest-cov
        pip install scipy
        pytest -v tests/ --cov=exampy/
The steps in this workflow are as follows:
name:sets the name for the workflowon:tellsGitHub Actionswhen to run this workflow, withon: [push]meaning that it should run this for every push to the repository. Typically, you’ll want to also run your tests upon each Pull Request, which can be achieved withon: [push,pull_request]. You can use very complex conditions of when to run your workflows.jobs:sets up the various jobs in this workflow. Every job runs in parallel, so you will typically just have a single one,build:here.In the job, the
runs_on:section defines the operating system, which can be versions ofUbuntu,Windows, orMac OS X.The
strategy:section allows you to define a build matrix, similar to how this is done forTravis CIandAppVeyor. Here, I create a matrix for two minor Python versions and three minornumpyversions to (partially) follow NEP 29, but according to NEP 29, Python 3.8 only requiresnumpyv1.18 support, so I exclude thenumpyversions 1.16 and 1.17 in theexclude:section. Note that there is aninclude:section as well, but unlike onTravis CIwhere this would add a new build to the matrix, forGitHub Actions, this can only modify a job defined in the matrix. That’s why I have to exclude the builds I don’t want rather than including the one I do want (Python 3.8 andnumpy1.18).steps:then lists the various steps that need to be run to perform the workflow and this is where you can use pre-defined actions as part of your workflow. For many workflows, the first step will be to clone the repository, which is done in theuses: actions/checkout@v2step. This is a step that is defined by an action implemented by GitHub itself and the entire step thus simply consists of you telling the workflow to use this pre-defined action.Similarly, the next step uses a pre-defined action to set up a specific Python version. As you can see, we can give steps a
name:. We also need to provide the action with the Python version that we want to set up and this is done in thewith:section, which lists parameters for the action. In this case, we set this to the Python version corresponding to the current build in the matrix, using the${{ matrix.python-version }}syntax.Next, I install the desired
numpyversion. Rather than using a pre-defined action, this step simply runs a set of shell commands in therun:section. A single command could directly followrun:, but multiple commands as in the example here need to userun: |and then list the commands on the next lines. We again access a variable defined in the matrix to install the correctnumpyversion.The following two steps are similar, we install the package, and then run the tests. Note that we could have split the tests into two, with one step for installing the test dependencies and one to run the actual tests (similar to what we did for
Travis CIandAppVeyor); withGitHub Actions, you can define as many steps as you want!
When you commit this file to your repository and navigate to the “Actions” tab again, you see a page that looks like
which shows all of the workflows that are running or have been run for your repository, currently only a single one, but eventually this would contain the entire history of runs. The workflow is labeled by its commit message. Clicking on that, we get an overview page for all of the builds in the current workflow, where as expected four builds are running for different versions of Python and numpy:
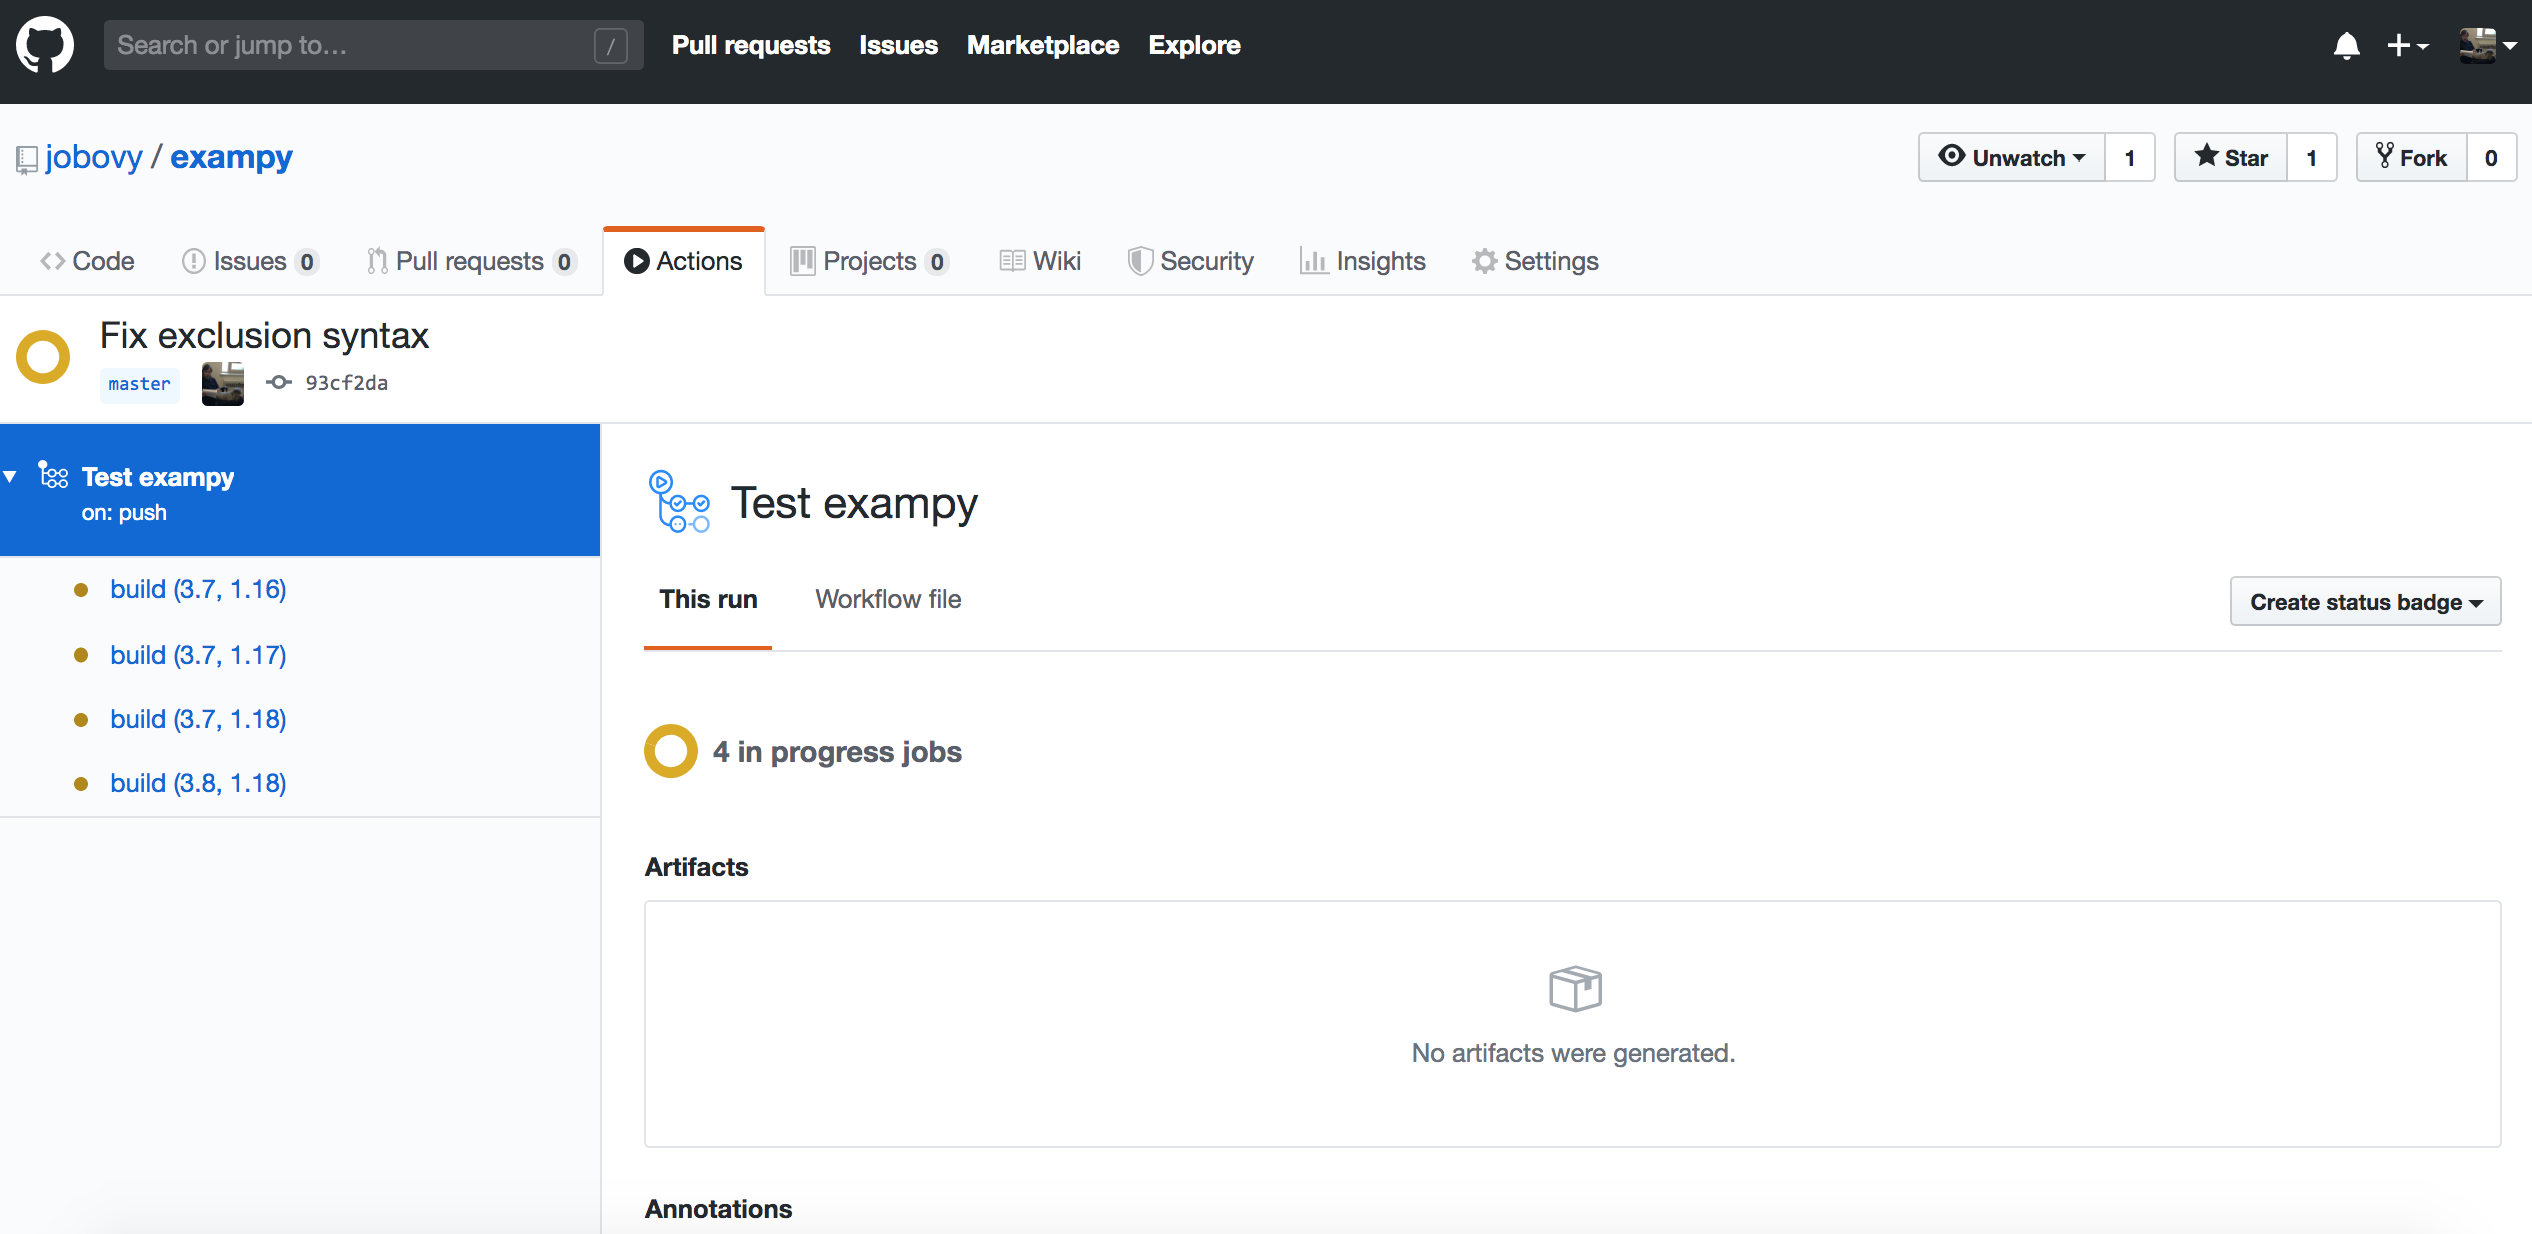
Clicking on an individual build, you get to a log of what happens in each of the steps, which once the build ends for one of these looks like

By clicking on the little arrows, you can get the detailed log for each step.
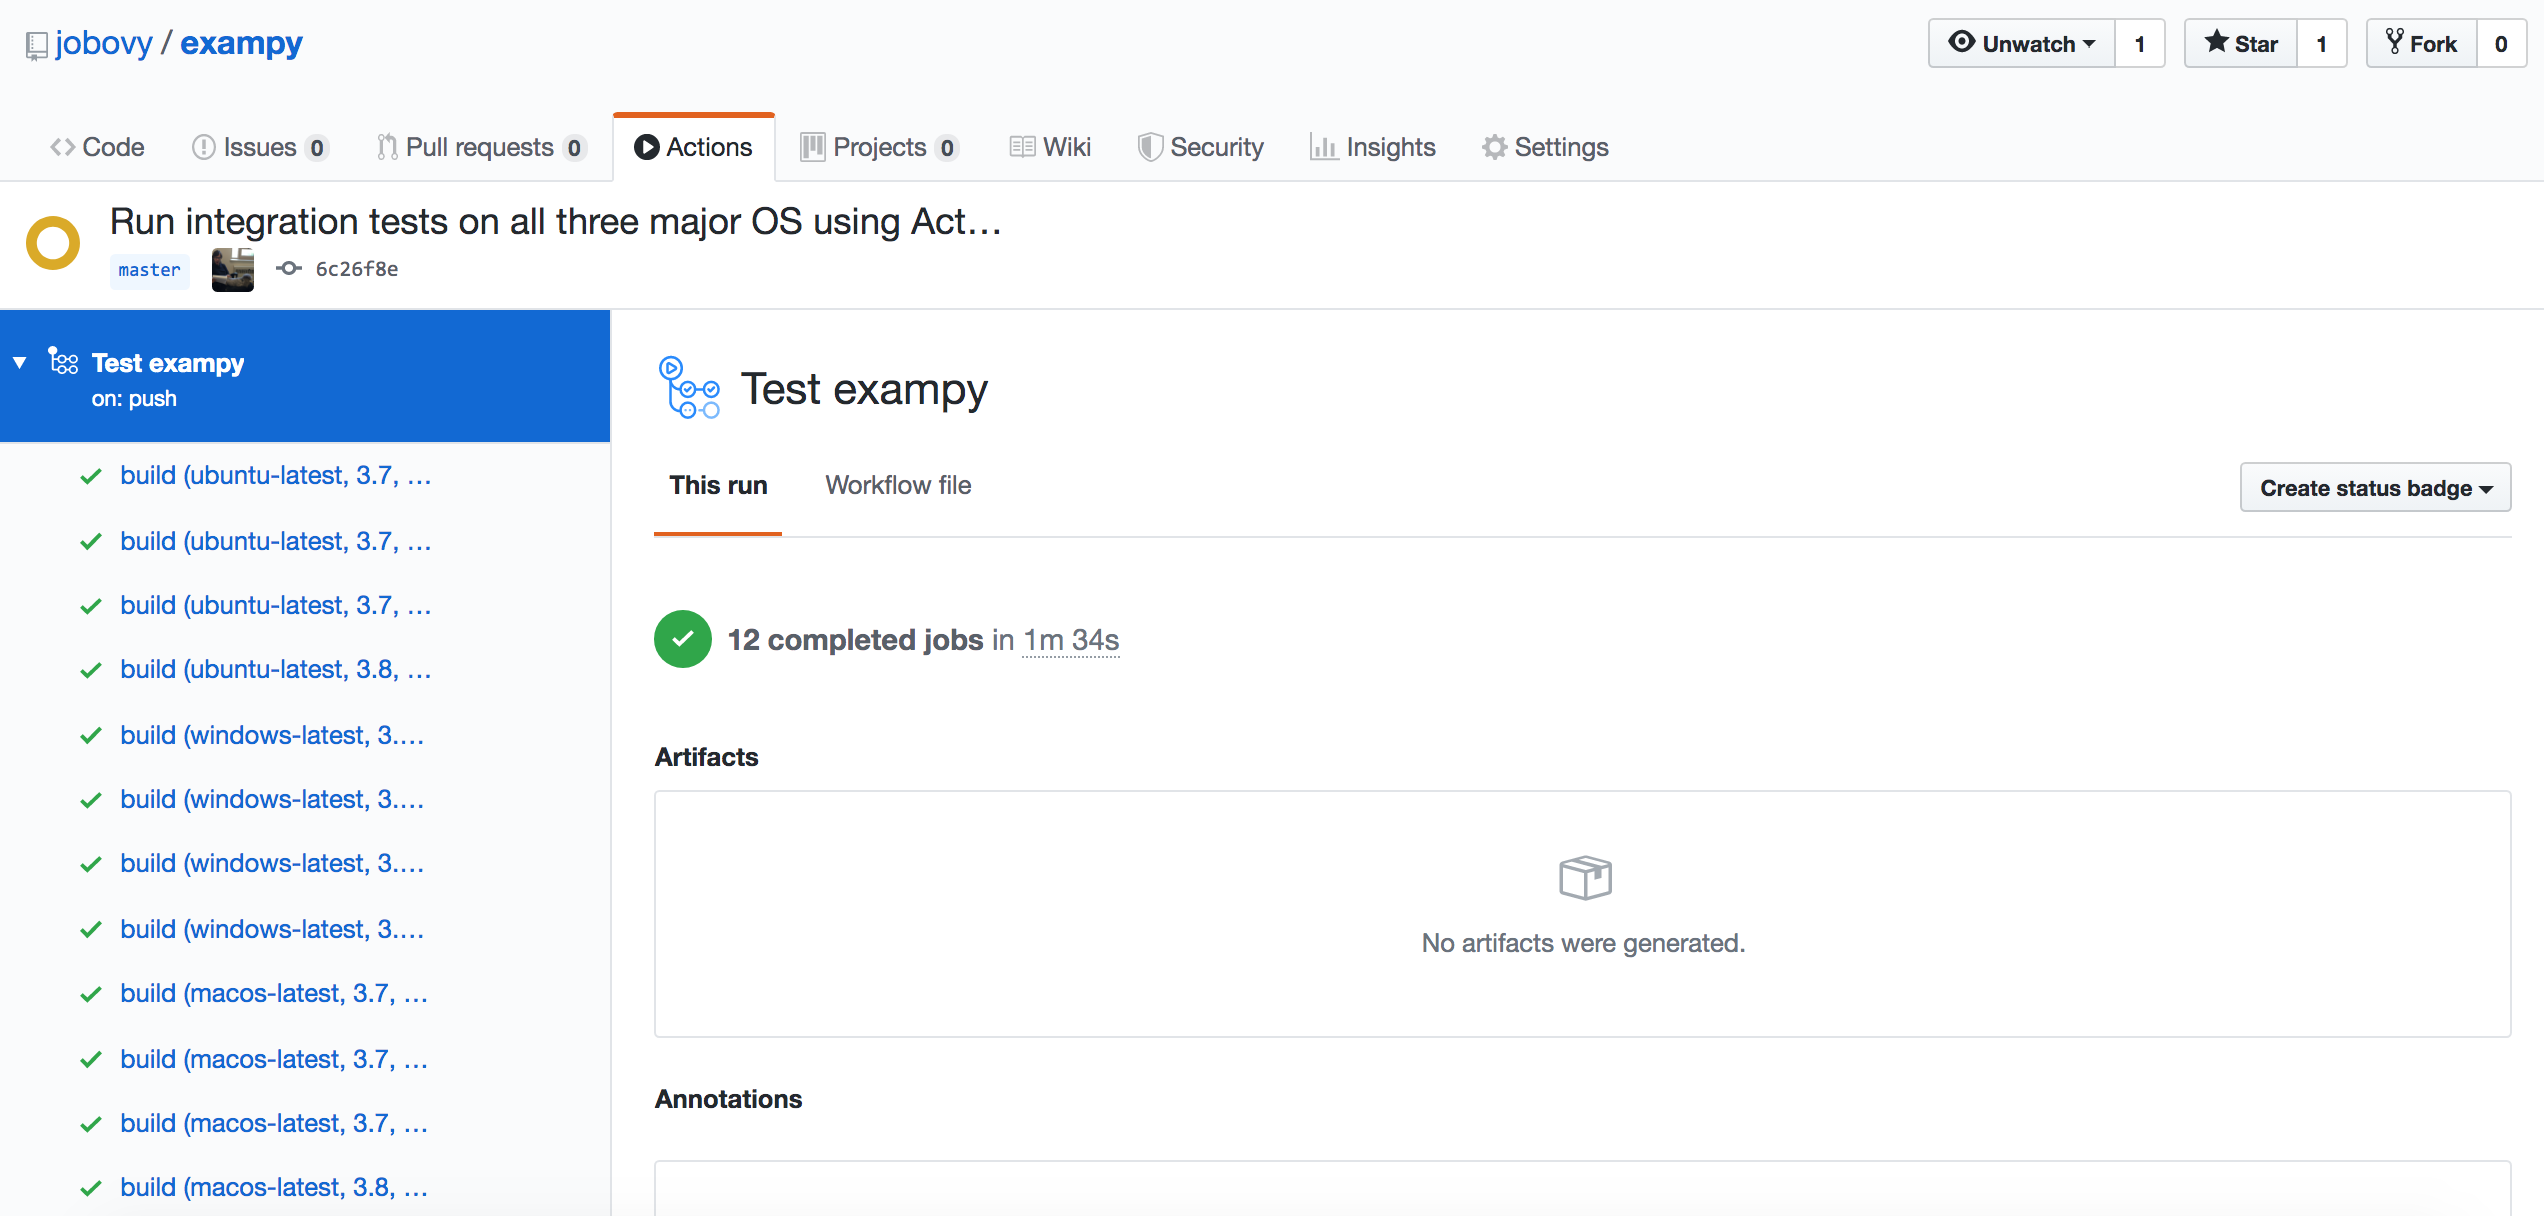
Going further and running the integration tests on all three major operating systems (OS) is very easy with GitHub Actions. To do this, we simply change the beginning of the test_package.yml file to
name: Test exampy

on: [push]

jobs:
  build:
    runs-on: ${{ matrix.os }}
    strategy:
      matrix:
        os: [ubuntu-latest, windows-latest, macos-latest]
        python-version: [3.7, 3.8]
        numpy-version: [1.16,1.17,1.18]
        exclude:
          - os: ubuntu-latest
            python-version: 3.8
            numpy-version: 1.16
          - os: ubuntu-latest
            python-version: 3.8
            numpy-version: 1.17
          - os: windows-latest
            python-version: 3.8
            numpy-version: 1.16
          - os: windows-latest
            python-version: 3.8
            numpy-version: 1.17
          - os: macos-latest
            python-version: 3.8
            numpy-version: 1.16
          - os: macos-latest
            python-version: 3.8
            numpy-version: 1.17
    steps:
where everything following steps: stays the same. As you can see, all we have changed is runs-on: to choose the OS defined by the matrx, ${{ matrix.os }}, and we have added a row os: [ubuntu-latest, windows-latest, macos-latest] to the matrix: section. To exclude the unnecessary components of the matrix, we have to (tediously) exclude every single OS, because one cannot use lists in exclusions. Once you push this change, the workflow that runs looks like
If you want to use Miniconda instead to manage Python and other dependencies, you can use an action that accomplishes this, e.g., conda-incubator/setup-miniconda, which you can use as a step as, for example,
- uses: conda-incubator/setup-miniconda@v2
    with:
      activate-environment: test-environment
      environment-file: environment.yml
      python-version: ${{ matrix.python-version }}
which sets up a conda environment named test-environment that is defined in the environment.yml file (this is a standard conda file). If you want to conda install a version specified in the matrix, e.g., numpy in the example that we have been using, you need to do this as conda install numpy==${{ matrix.numpy-version}} as part of a later step’s run:.
This is only a very small part of what GitHub Actions can do for you, so check out the documentation to learn more.
6.5. Analyzing test coverage online using Codecov
We are now able to run our build-and-test integration on various continuous-integrations services and as part of the logs of these runs we can see the test coverage of our test suite. That’s already very useful, but it’s easier to analyze your test coverage results if they are displayed in a nicer format, such as the HTML format that coverage.py can create. To make this easy, there are various free online services that will ingest your test coverage results every time you run the test suite
using continuous integration and display it as a convenient online website. Moreover, these services are also able to combine test coverage results from different, independent jobs that make up your build-and-test integrations. This is useful if you break up a single test suite into multiple parallel jobs; without the ability to combine the test coverage results from the parallel jobs, it would be very difficult to know your test suite’s actual coverage.
While the most popular online test-coverage tool still appears to remain Coveralls, I find the alternative Codecov service far superior, in everything from getting the simplest setup to work, to making more advanced features like combining test-coverage results from different jobs or different languages work, and it has a much more useful and pleasant interface than Coveralls. I will therefore focus on Codecov here.
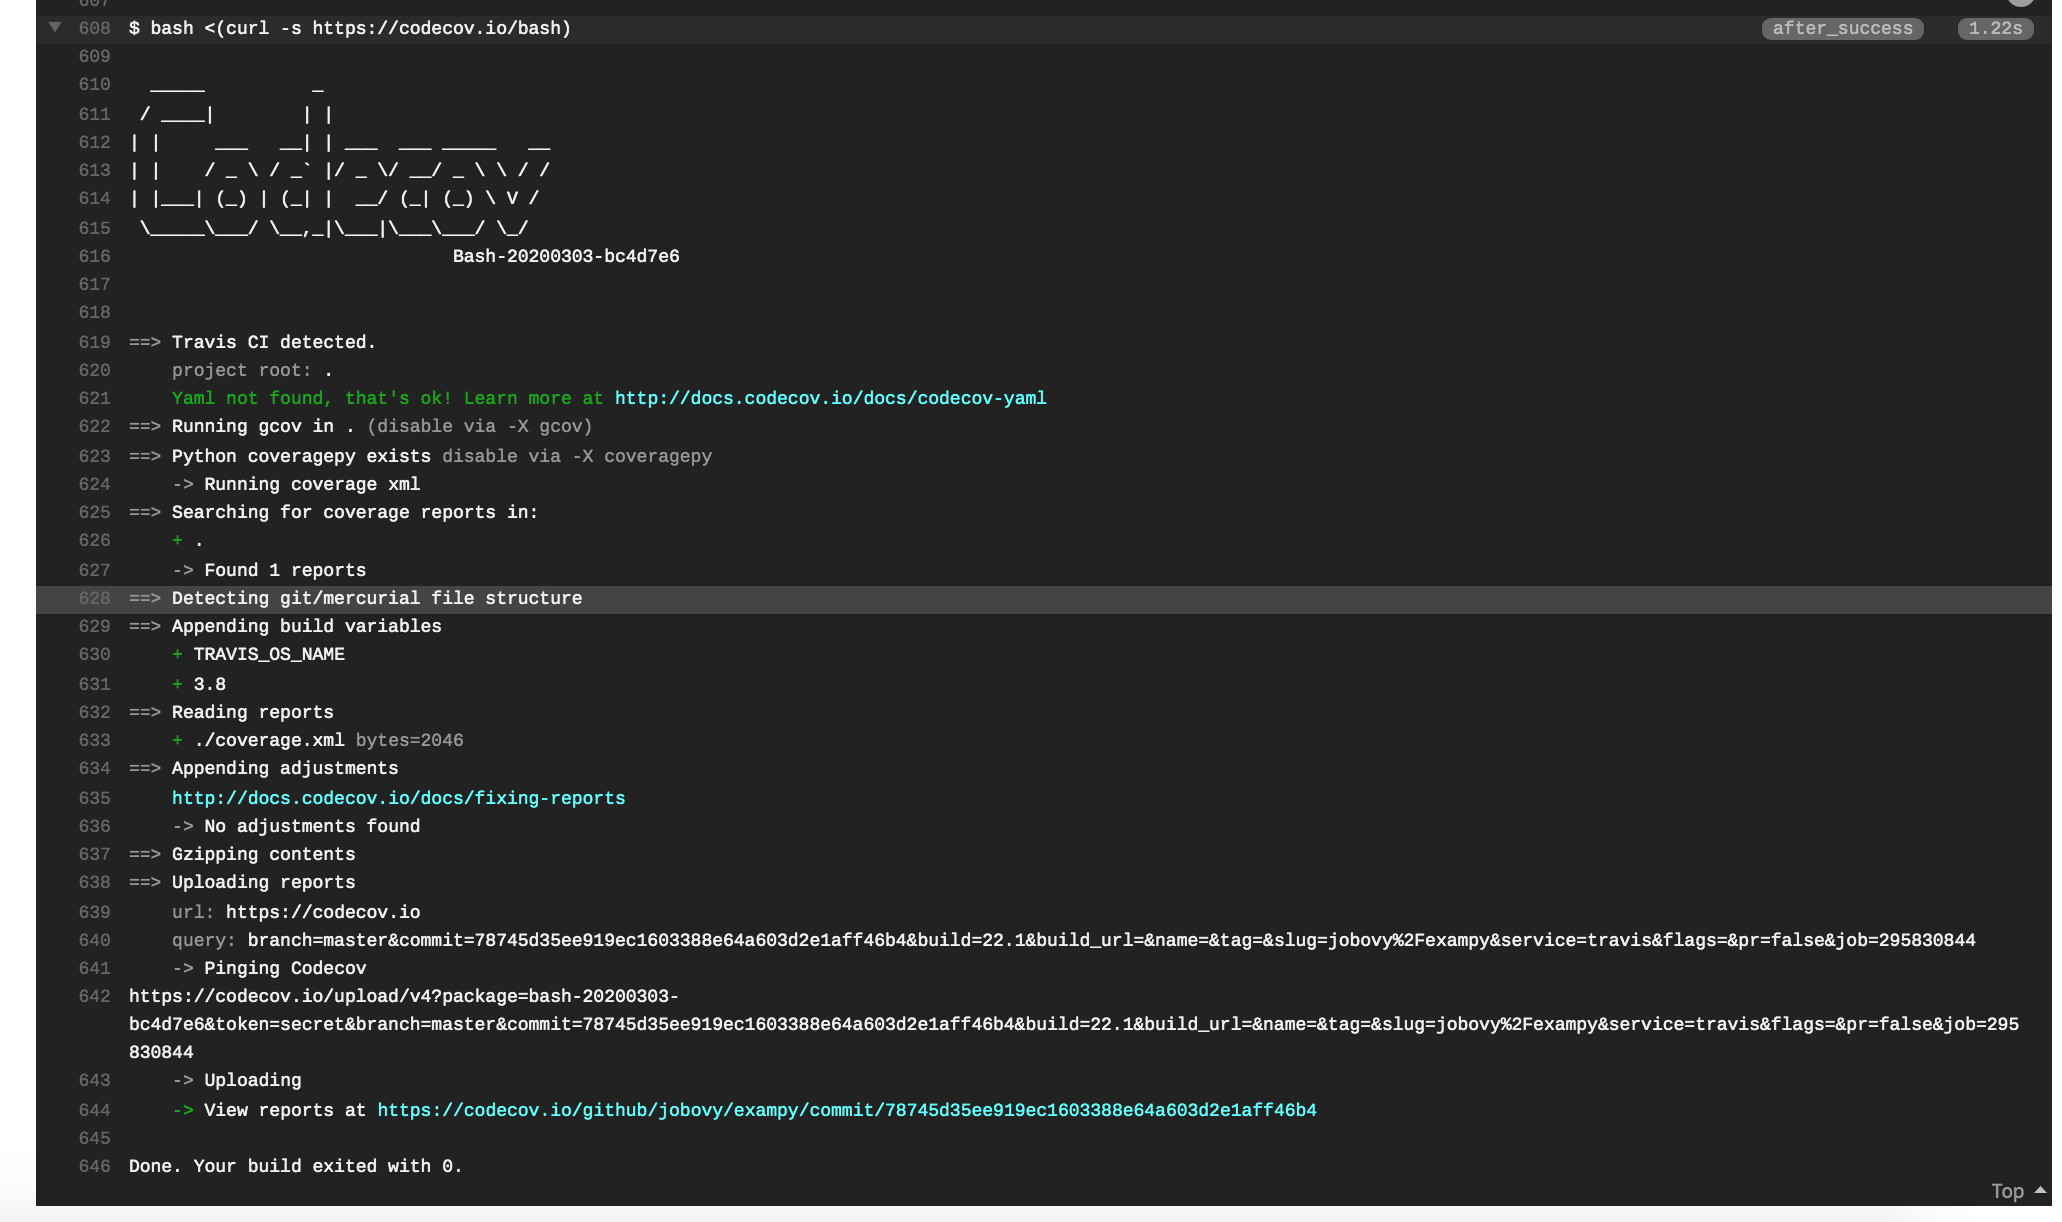
Codecov is yet another service that is seamlessly integrated with GitHub. To get started, navigate to https://codecov.io/ and sign up using your GitHub account. When you login, navigate to “Repositories”, click on “Add new repository”, and find the GitHub repository that you want to add (here exampy again). Then all you have left to do is to invoke the “bash Codecov uploader” in your .travis.yml’s after_success: section (I assume here that you want to upload reports from
Travis CI, but the procedure for AppVeyor or GitHub Actions would be similar) as
after_success:
  - bash <(curl -s https://codecov.io/bash)
Once you push this update to GitHub, your tests will once again run on Travis CI, and now at the end of a successful integration run, you reports will be uploaded to your Codecov page for your repository. The final part of the Travis CI log for a job looks like (you might have to expand this, by clicking on the arrow in front of bash <(curl -s https://codecov.io/bash)):
and if we navigate to the repository’s Codecov page, we now see an overview of the test coverage of all recent commits (just the one so far); for the exampy repository, this is https://codecov.io/gh/jobovy/exampy:
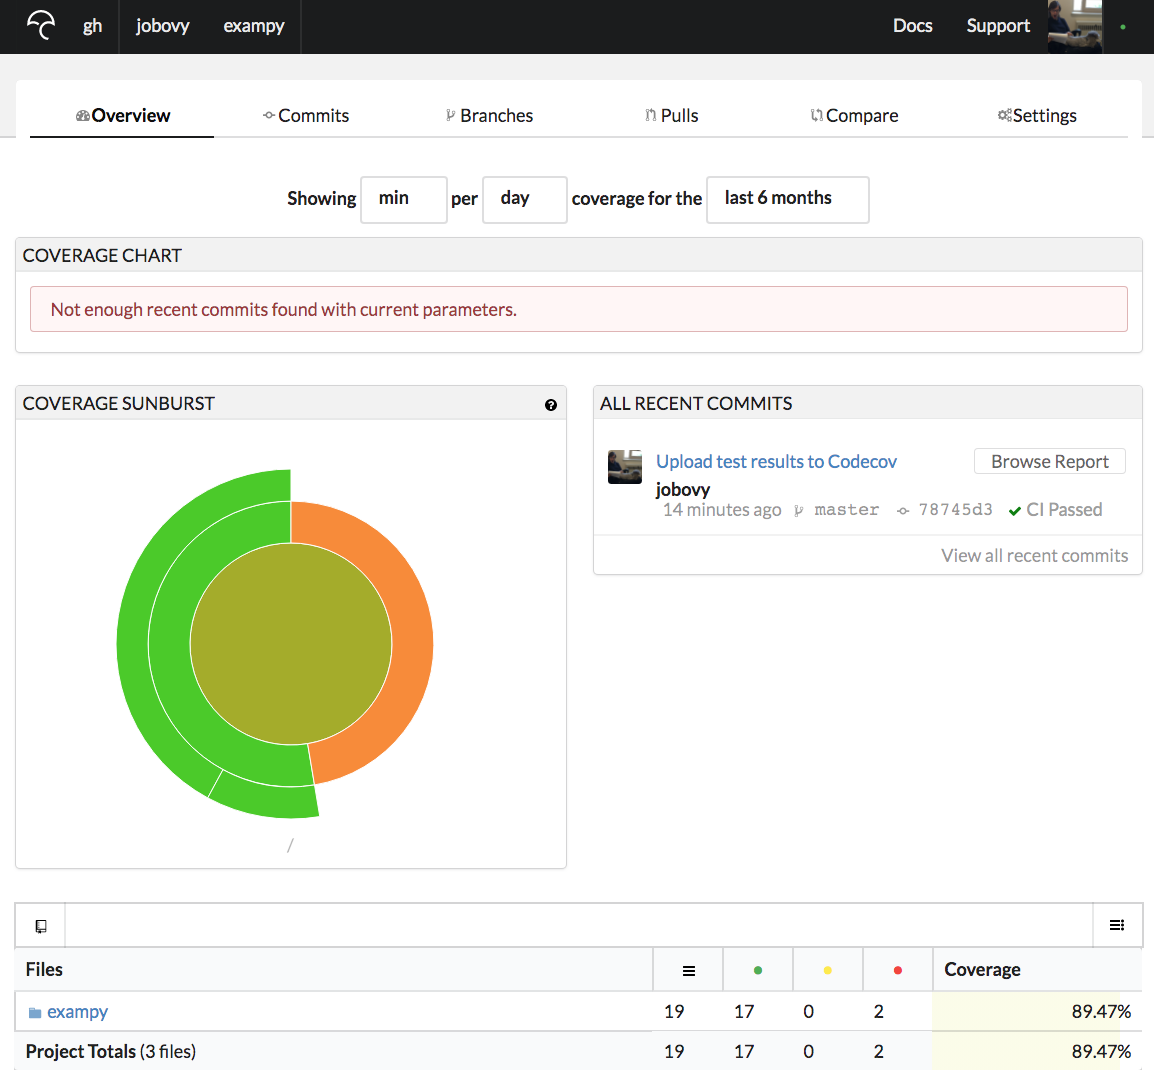
Clicking on the latest commit brings us to a page that shows the difference in test coverage with respect to the commit’s parent (typically the previous pushed commit for the branch you are on), which is empty at first because there is nothing to compare against. Clicking on “Files” instead, you get an overview of the test coverage of all of the files in your repository, shown as a directory tree or as a simple list of files:

This lists the total number of lines, the total number of covered lines, or partially-covered lines (we don’t typically use this), and lines that are not covered. For directories (e.g., the package directory shown above), you see a total for all of the files in that directory (so for the package directory you see the total for all files in the package; note that there appears to be an issue that still exists despite being closed on
GitHub where Codecov does not include the top-level __init__.py file, leading to a one line discrepancy to our results before).
If we navigate to a particular file, e.g., exampy/_math.py, we get a page that starts as
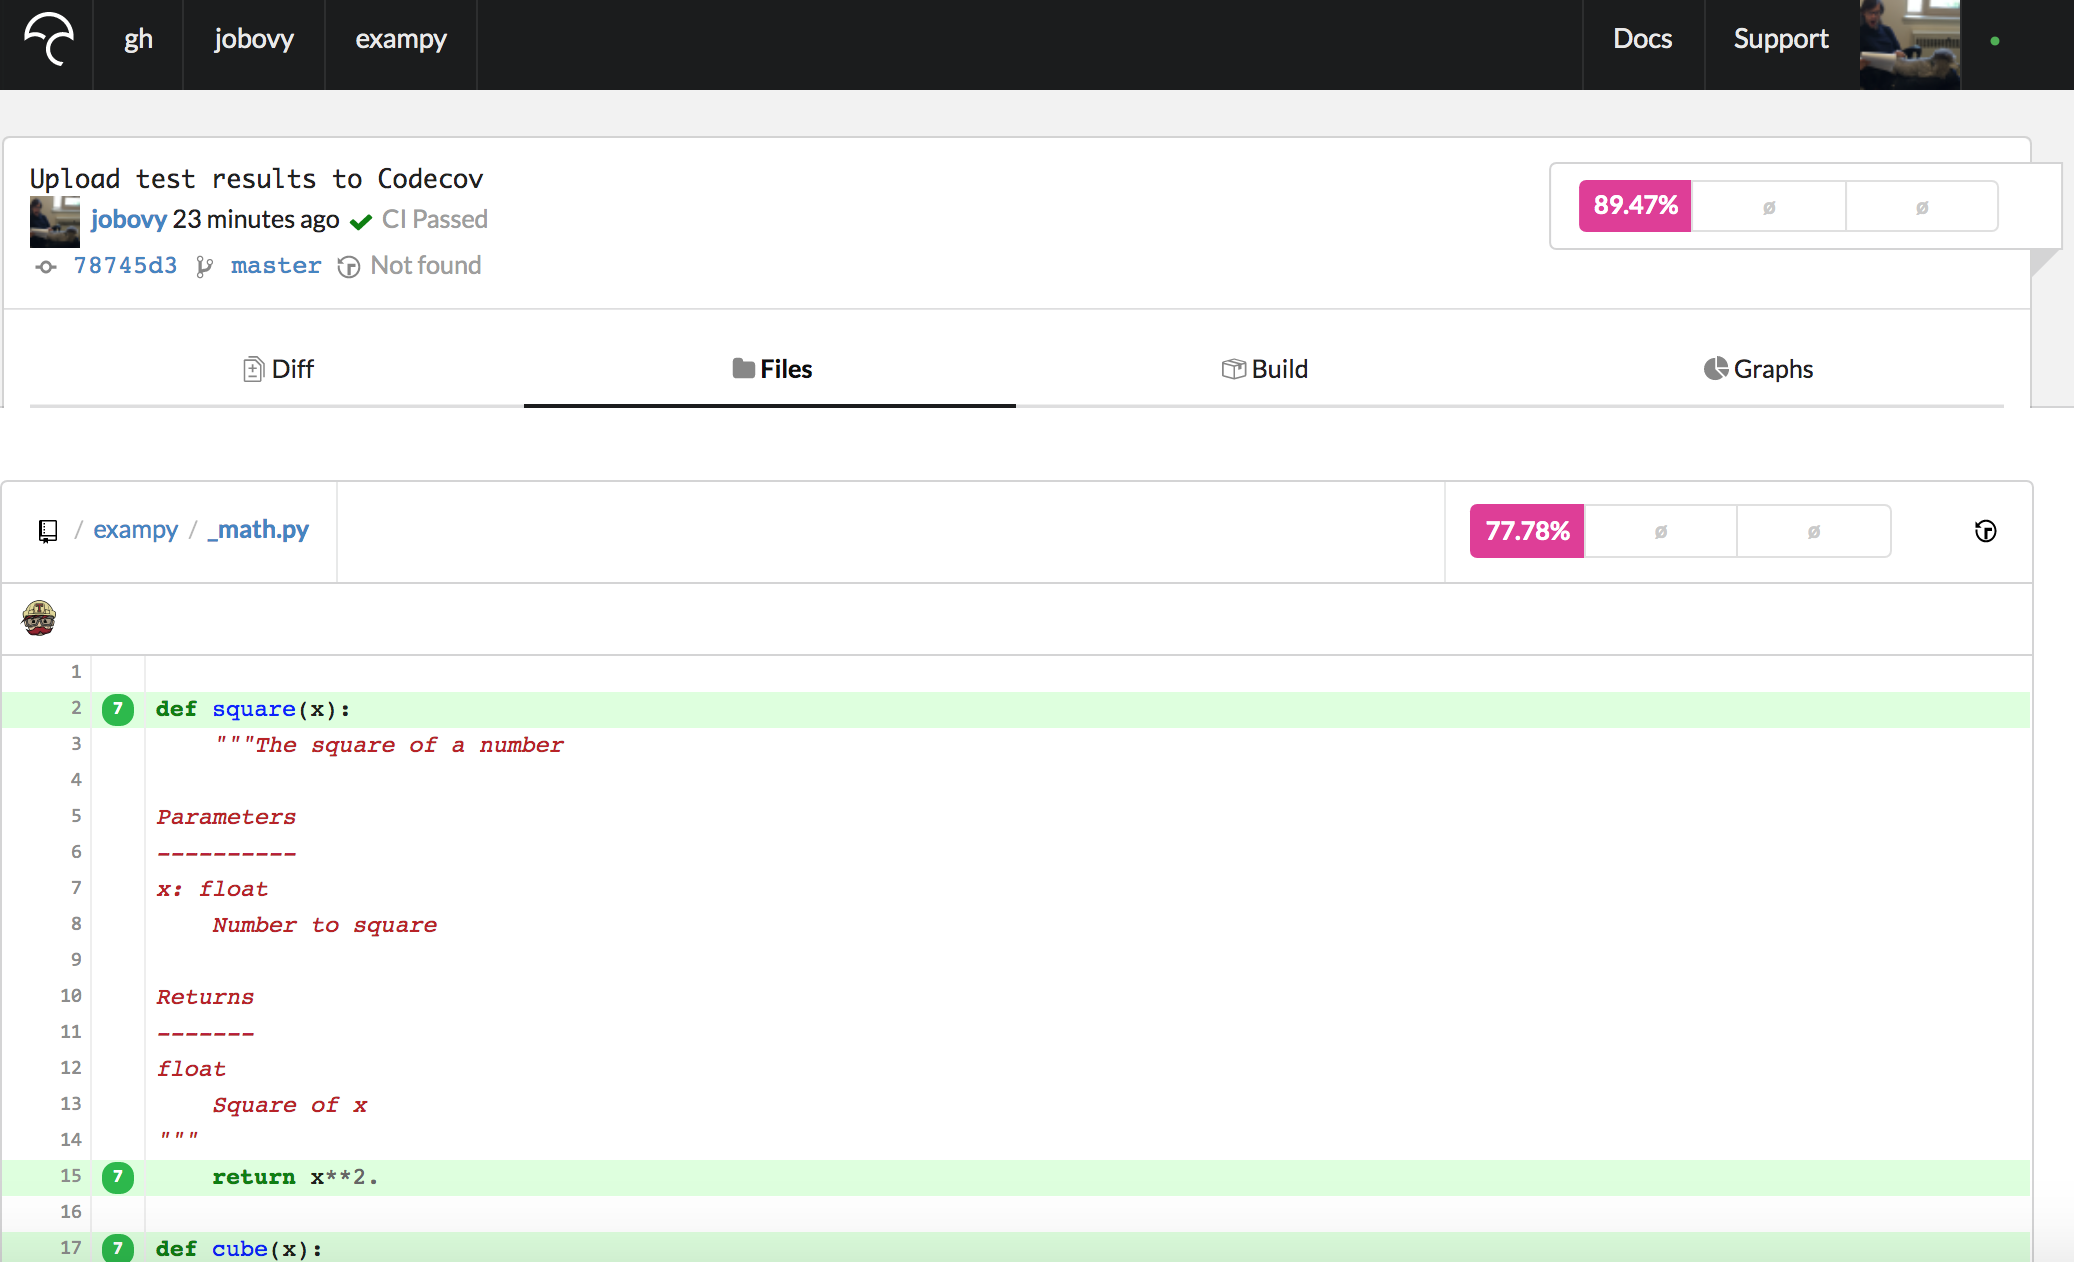
which shows the source code, with lines that are covered labeled in green and lines that are not covered indicated in red (lines that are not code lines like docstrings and comments or that are excluded by the exclude_lines = option in the .coveragerc are not labeled at all). These pages make it easy to spot which parts of your source code are not covered by the tests.
Note that the way we have added the Codecov bash uploader to the .travis.yml file, the reports for each run are uploaded and combined (go to the “Builds” section and you see the various Travis CI jobs that got uploaded). Because these all repeat the same tests, this uploads the same report multiple times (seven times in the exampy case here, leading to the number seven in front of the lines in the above image, indicating that the line was executed seven times). Typically, you
will want to only upload reports from a single, unique run of your test suite. If you’ve split it into multiple pieces, you want to upload reports for all of those, and they will be automatically combined, but if you run the test suite multiple times for different setups (e.g., different Python versions as in the example here), you want to only upload reports for one. To do this, you can put a conditional statement in front of the upload command, for example
after_success:
  - if [[ $TRAVIS_PYTHON_VERSION == 3.8 ]] && [[ $NUMPY_VERSION == 1.18.1 ]]; then bash <(curl -s https://codecov.io/bash); fi
which only uploads the reports for Python v3.8 / numpy v1.18.1 (you may want to define these as the environment variables PYTHON_COVREPORTS_VERSION and NUMPY_COVREPORTS_VERSION, such that they are easy to adjust when you update the versions that you run your tests for (you may use this condition multiple times). Pushing this update to the .travis.yml file to GitHub, the integration suite runs again, and now only the test-coverage results from the first job (with Python v3.8 /
numpy v1.18.1) get uploaded to Codecov, which you can check by going to the “Builds” section for this commit’s Codecov page. If we go to the Codecov page for exampy/_math.py now, we see a page that starts with
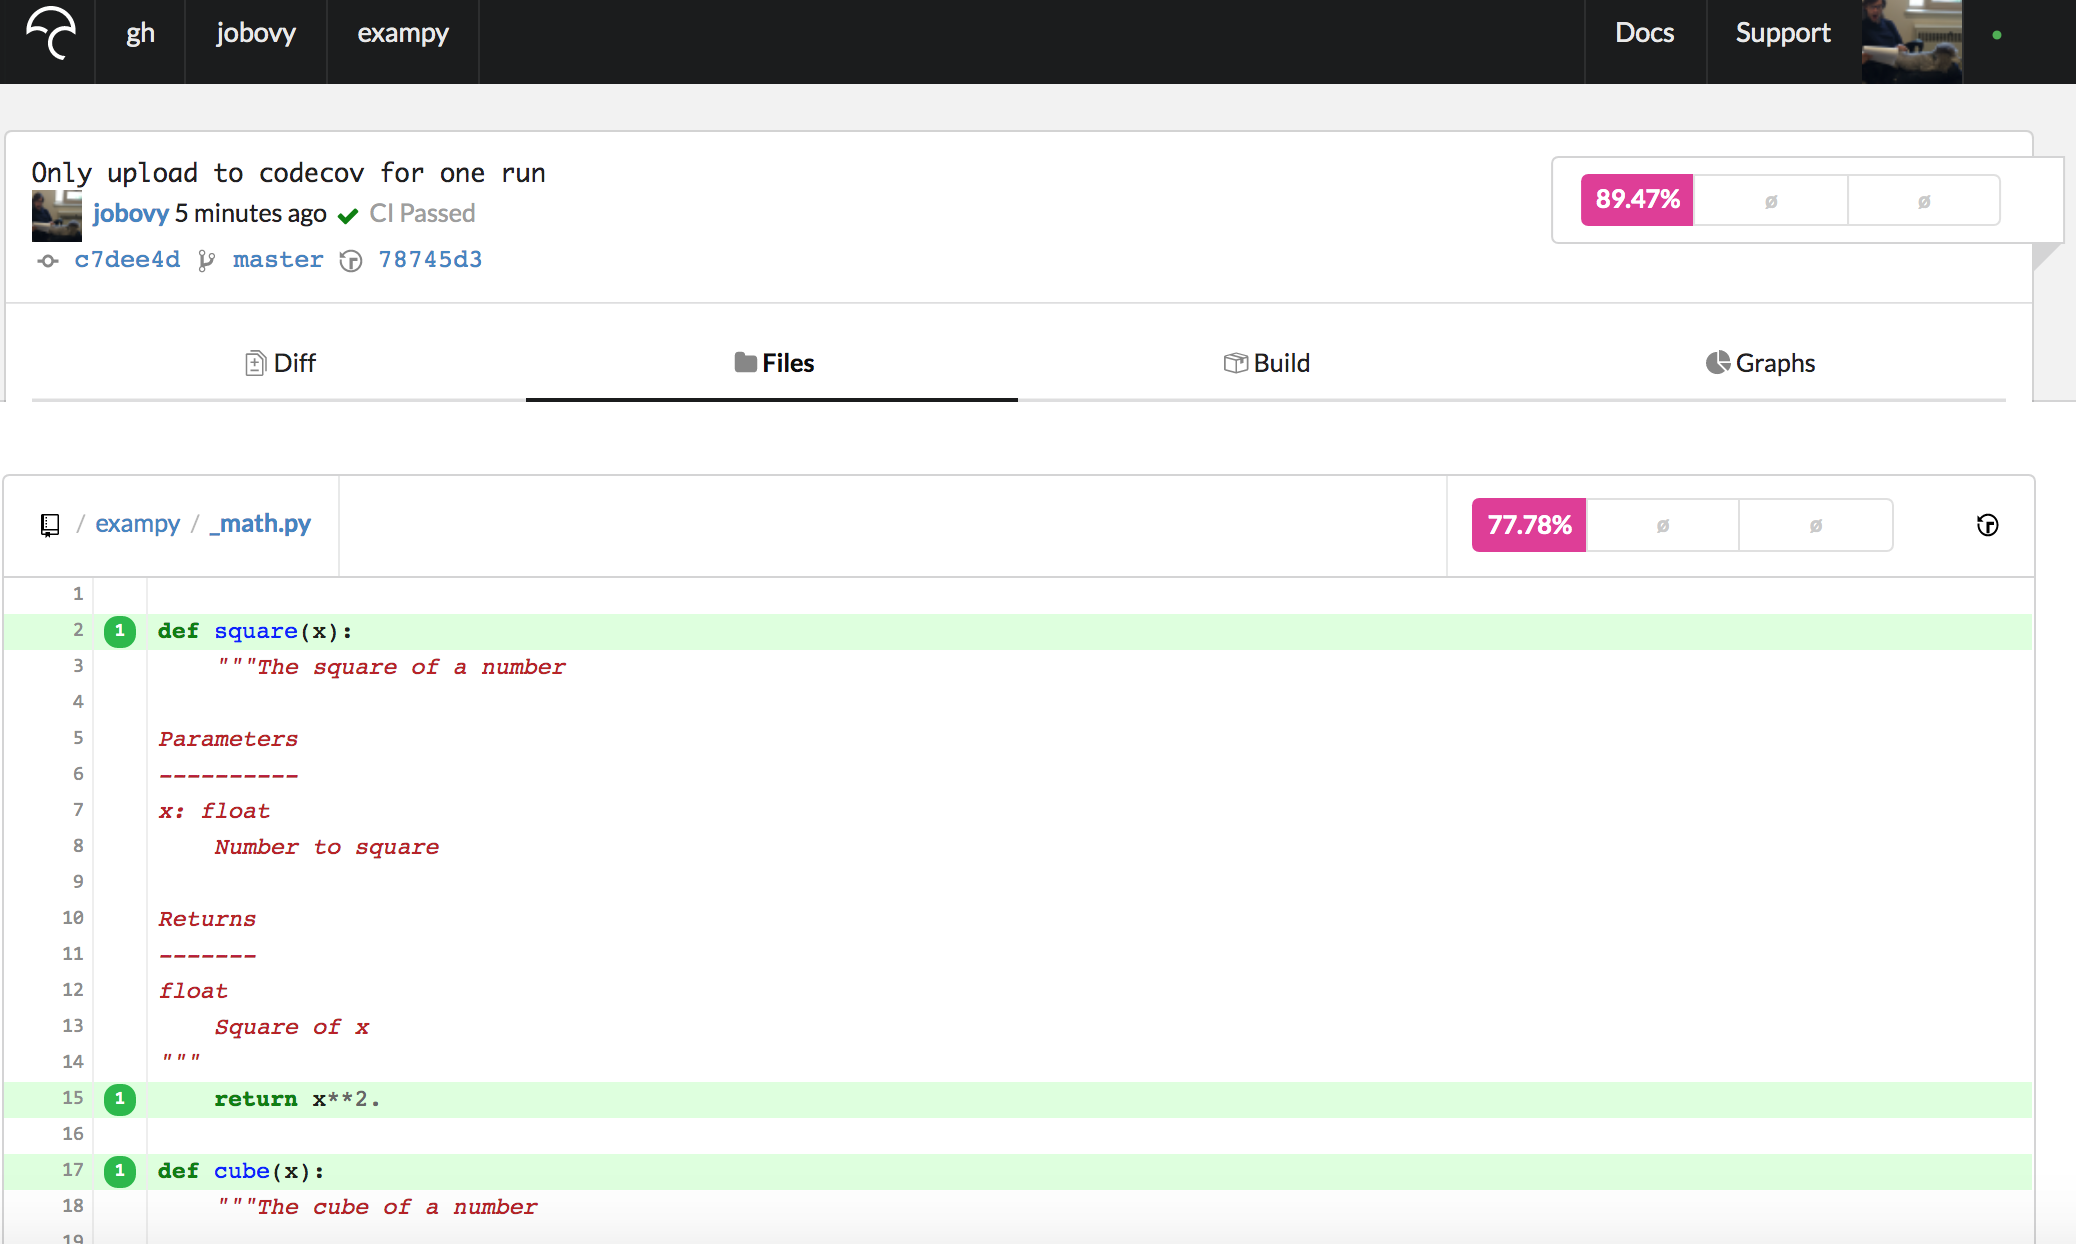
where we now see that the lines are preceded by a “1”, indicating that they were executed once. In general, these numbers tell you how often a line was executed during the test suite, and this is why you want to only upload the reports from a unique run of your test suite, such that the numbers given are the actual number of times the lines are executed without being multiplied by the number of times the test suite was run. The more often a line is executed, the more robust it probably is.
As I discussed in the section on test coverage, you can also generate test-coverage reports for parts of your code written in C (or in any other language). To upload these to Codecov in addition to the Python test-coverage results, simply run the uploader as
bash <(curl -s https://codecov.io/bash) -X gcov
and Codecov will automatically combine the Python and C reports into a single online report.
6.6. Status badges for your package
I have discussed how to run continuous-integration builds for your package with various different services and how to collect and display the test-coverage statistics from these builds. When you have different CI services running for your code, it can be easy to lose track of the status of each one. To help with keeping track, it’s useful to add status badges for all of the services that you are using to your package’s GitHub page to get a quick overview.
These badges are clickable images that look like:

(which is the status of the Travis CI run for exampy’s main branch; try clicking it!). In addition to showing the status of your CI runs and other services that you use, clicking them typically also directly leads to your project’s page on the service in question, making them also an easy way to navigate to your package’s page for various services.
To get a status badge for your Travis CI runs, head to your package’s Travis CI page (you need to be logged in) and click on the displayed badge next to your package’s name. This brings up a dialog box that allows you to specify the branch for which you want to display the status (typically main) and the format of the file that you will paste the badge code into (“Markdown” if your README is in Markdown format, “RST” if it is in reStructuredText format, etc.); this dialog box looks
like

Then add the resulting code snippet to your README, e.g.. for exampy in Markdown format, the snippet is
[](https://travis-ci.com/jobovy/exampy)
which creates .
For AppVeyor, the process is similar: go to your package’s AppVeyor page, click on “Settings”, and then “Badges”, which gives you URLs for various badge images and a sample Markdown code snippet:
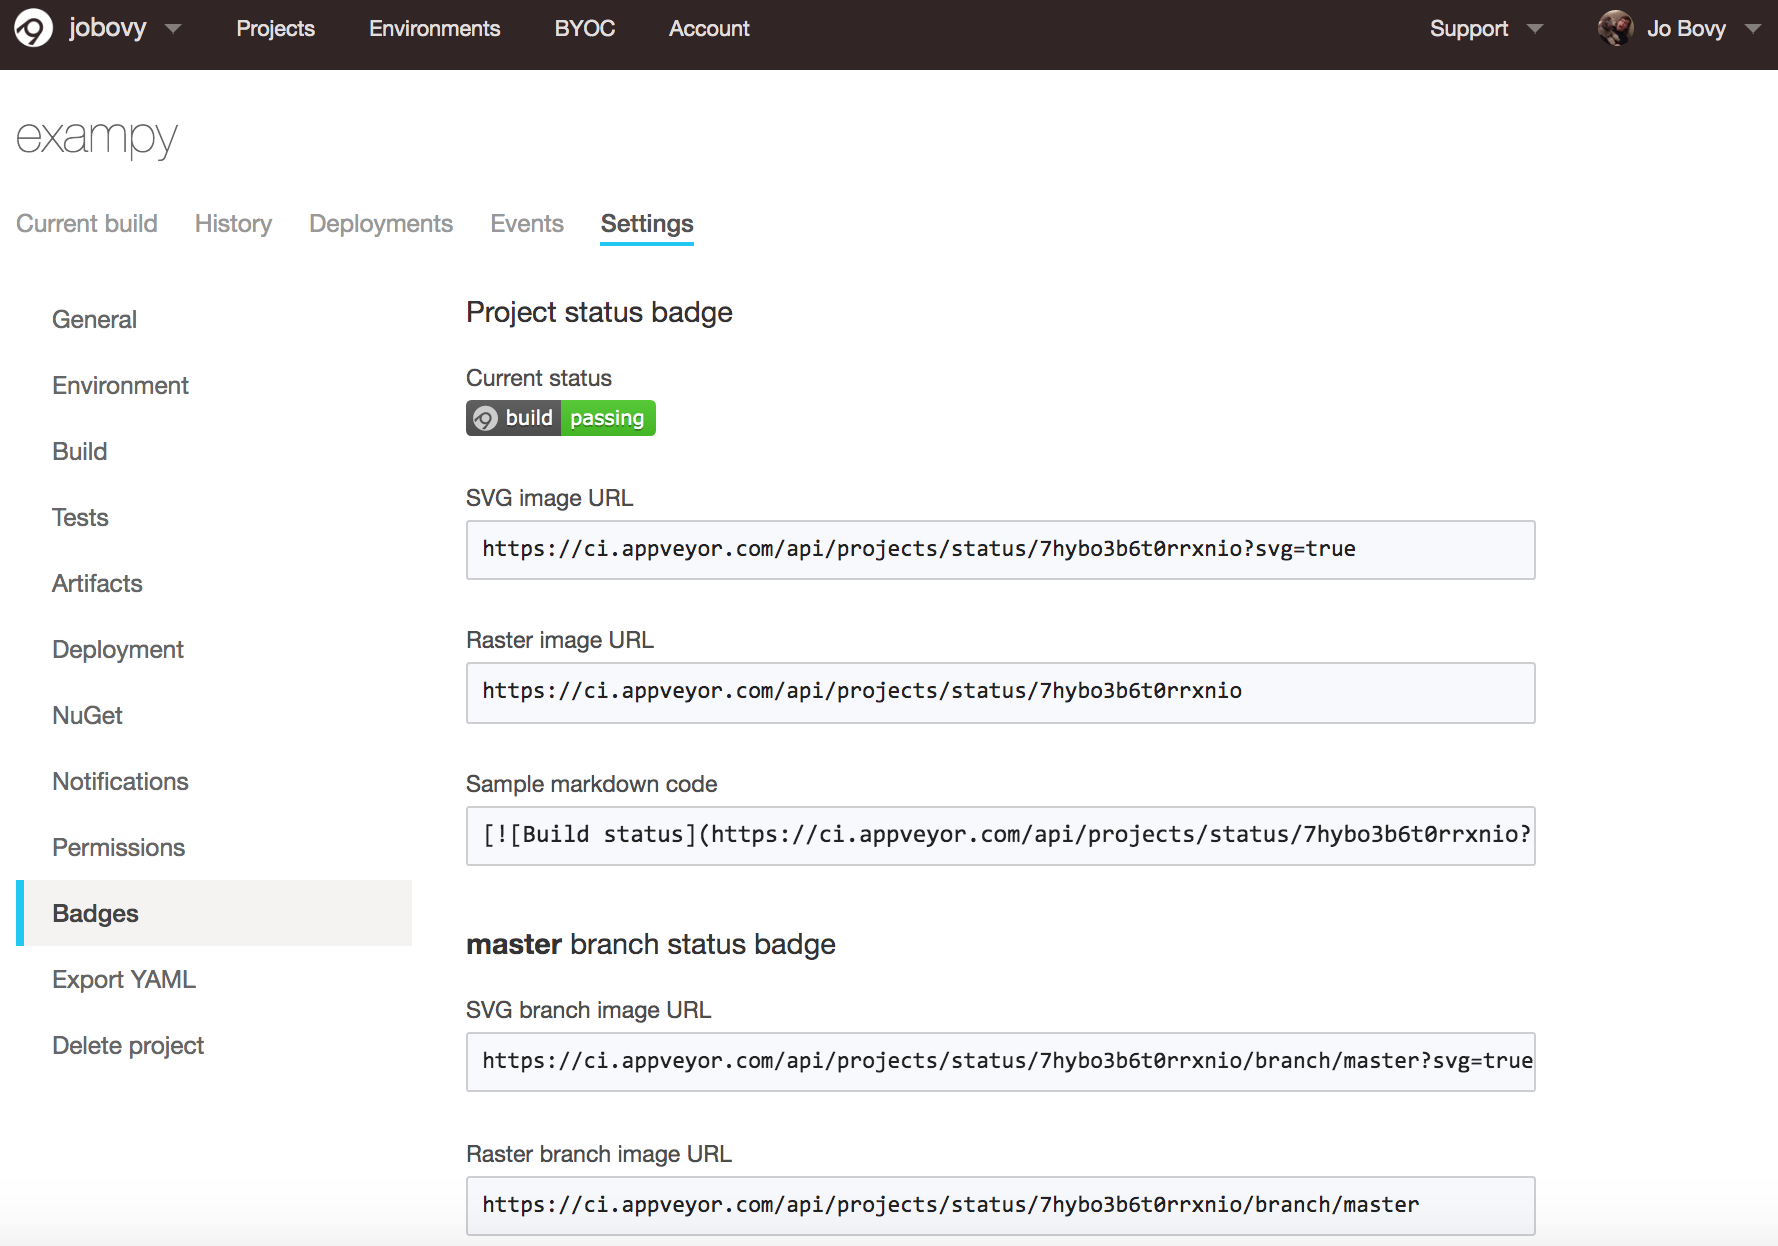
For exampy, the snippet in Markdown is
[](https://ci.appveyor.com/project/jobovy/exampy)
which creates .
For GitHub Actions, navigate to the “Actions” tab on your package’s GitHub page and click on the left on the workflow for which you want to get the badge (you can get badges for all different workflows). Then on the right you will see a “Create status badge” button that when you click it brings up a similar dialog as on Travis CI:
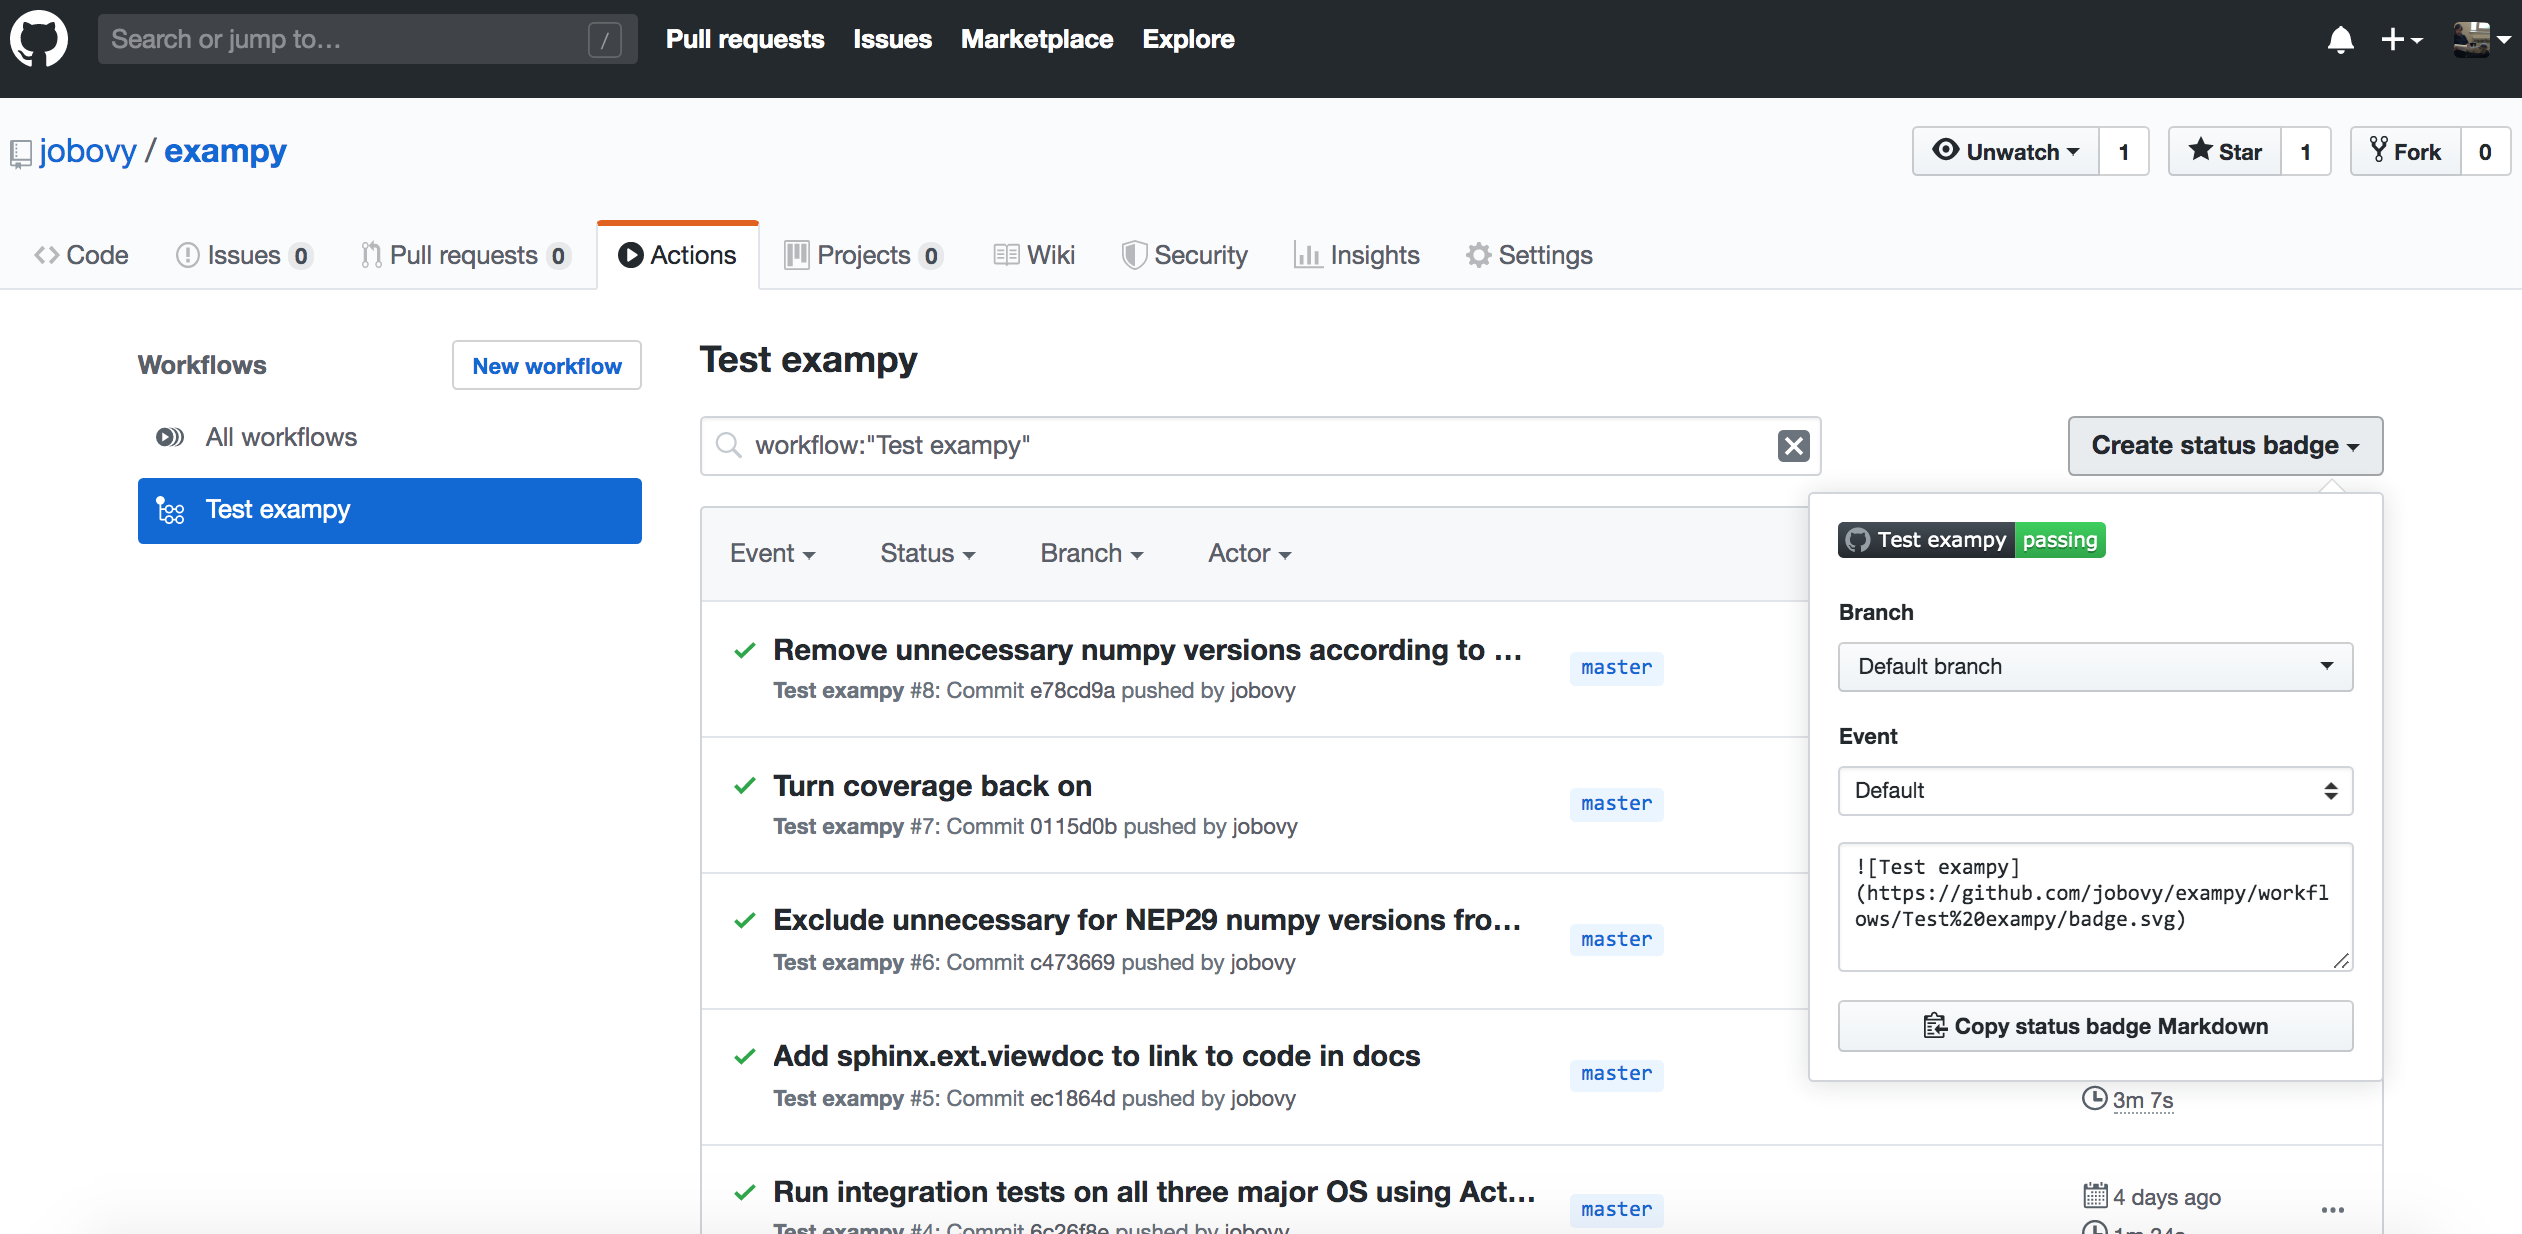
Now the Markdown snippet is

which creates a badge that has the workflow name in it: ![]() .
.
You can also create a badge for your code’s test-coverage statistics from Codecov. To get the badge, go to your package’s Codecov page (you need to be logged in), navigate to “Settings” and then “Badge”, which brings up a page with the code snippet for embedding the badge in a variety of file formats
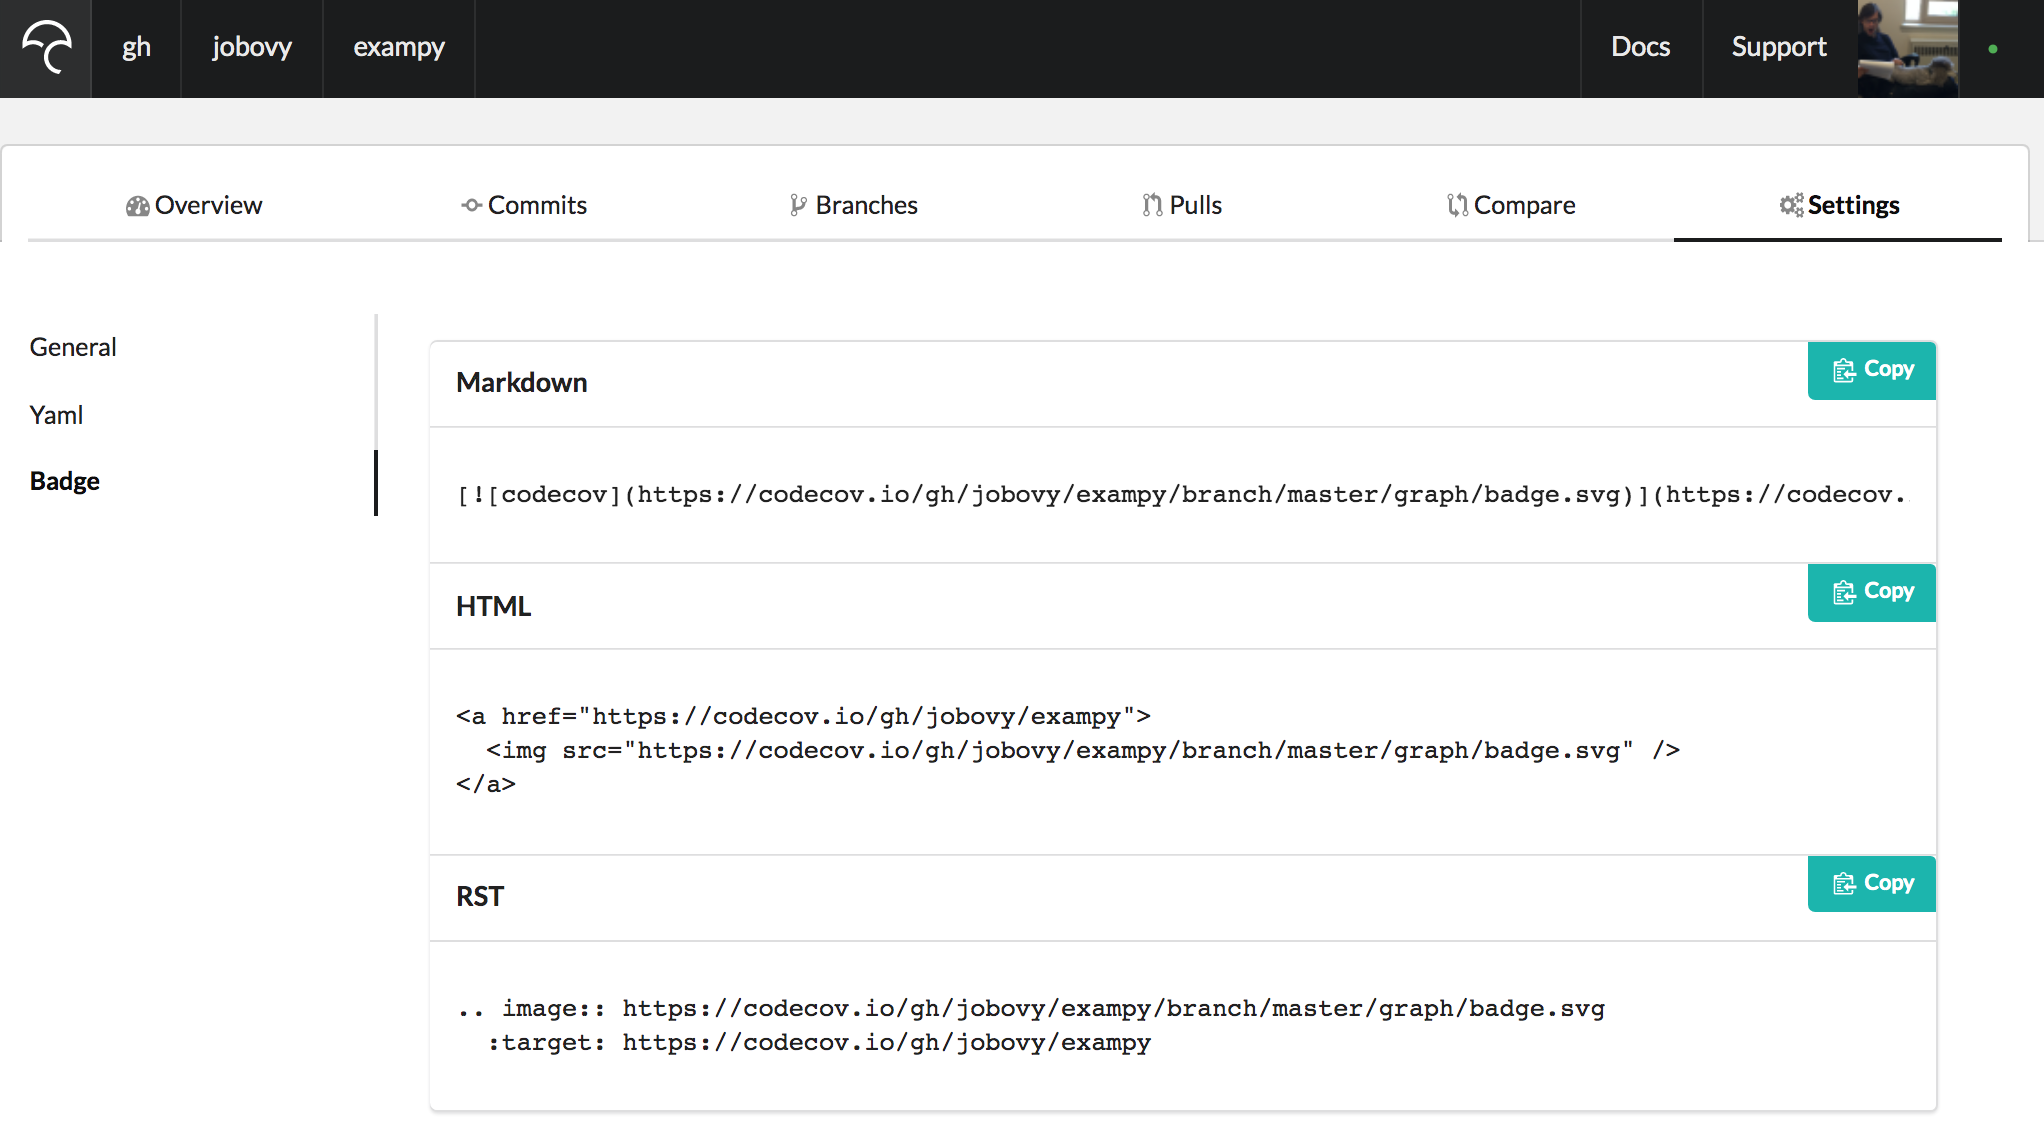
For Markdown, the snippet now is
[](https://codecov.io/gh/jobovy/exampy)
which brings up a badge that includes the fraction of your package’s statements that are covered by the test suite, colored according to how high it is (try to get it green!): ![]() .
.
You can also get a badge that shows the status of your documentation’s build on readthedocs.io, which we discussed in Chapter 4. Again, navigate to the admin page for your package’s readthedocs.io setup where you will see a badge on the right-hand side; clicking on the “i” symbol next to it brings up a dialog box with various badge options:
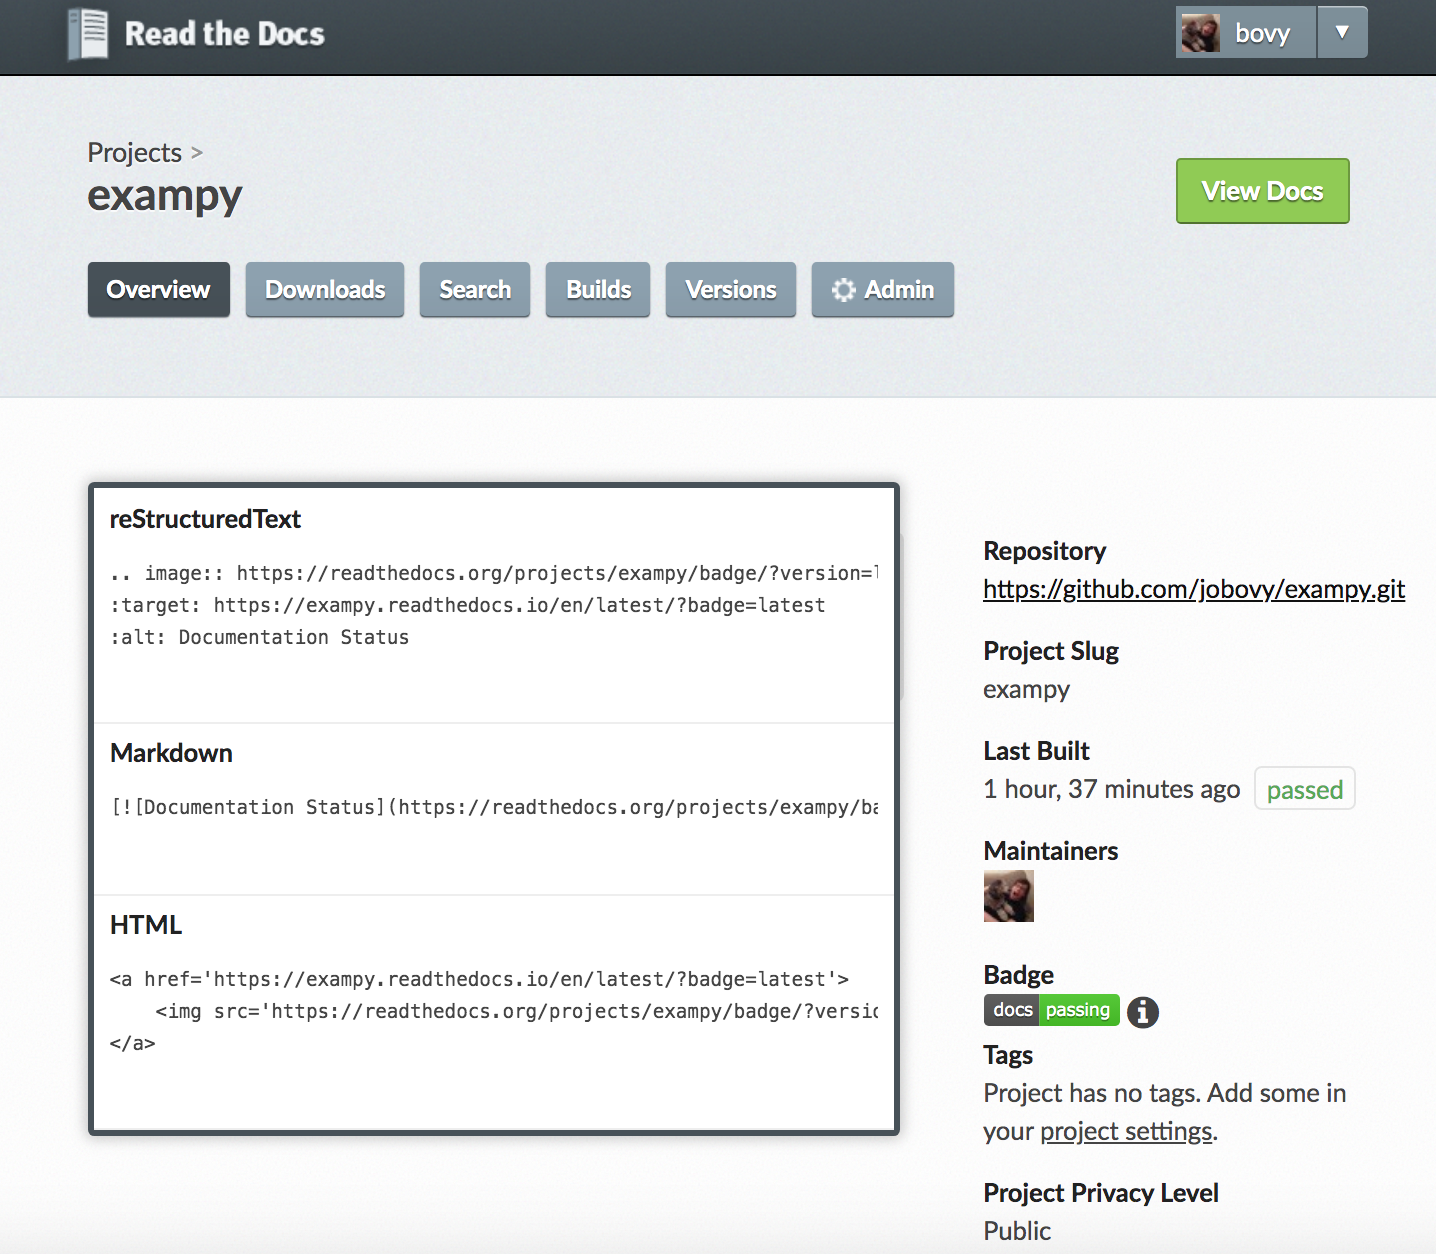
For example, the Markdown format is
[](https://exampy.readthedocs.io/en/latest/?badge=latest)
which gives a badge that looks like . If your documentation’s build fails for some reason, it would show up as a “docs: failing” status.
You can create more badges to show off other aspects of your package. You can create badges by hand using the shields.io service, which has a URL-based interface to request badges with different text, color, shape, etc. For example, you could show off your package’s license by linking it through a badge with
[](https://github.com/jobovy/exampy/blob/main/LICENSE)
which creates ![]() . Any text needs to be encoded as a URL (search for “encode URL” to get a working online service to do this for you). Note that
. Any text needs to be encoded as a URL (search for “encode URL” to get a working online service to do this for you). Note that shields.io can also create badges for certain services that are automatically created rather than hand-crafted. For example, we will use this to create a badge for the PyPI release of our package in the next chapter.
Adding all of these badges to the README, for exampy like
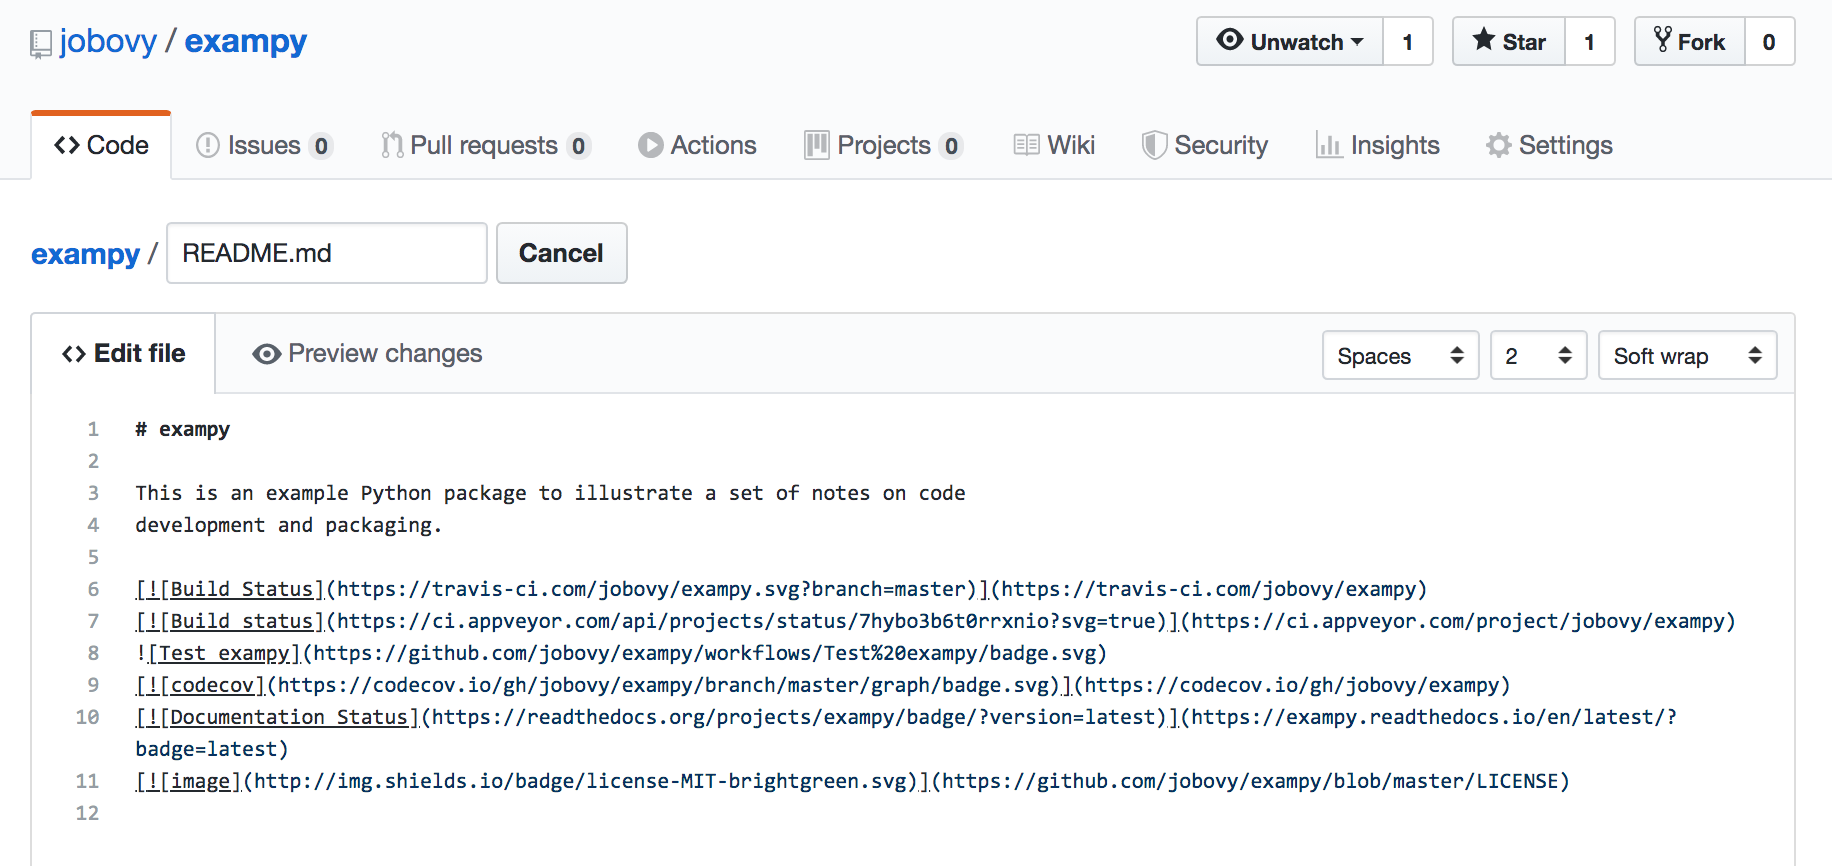
we get something that looks like:
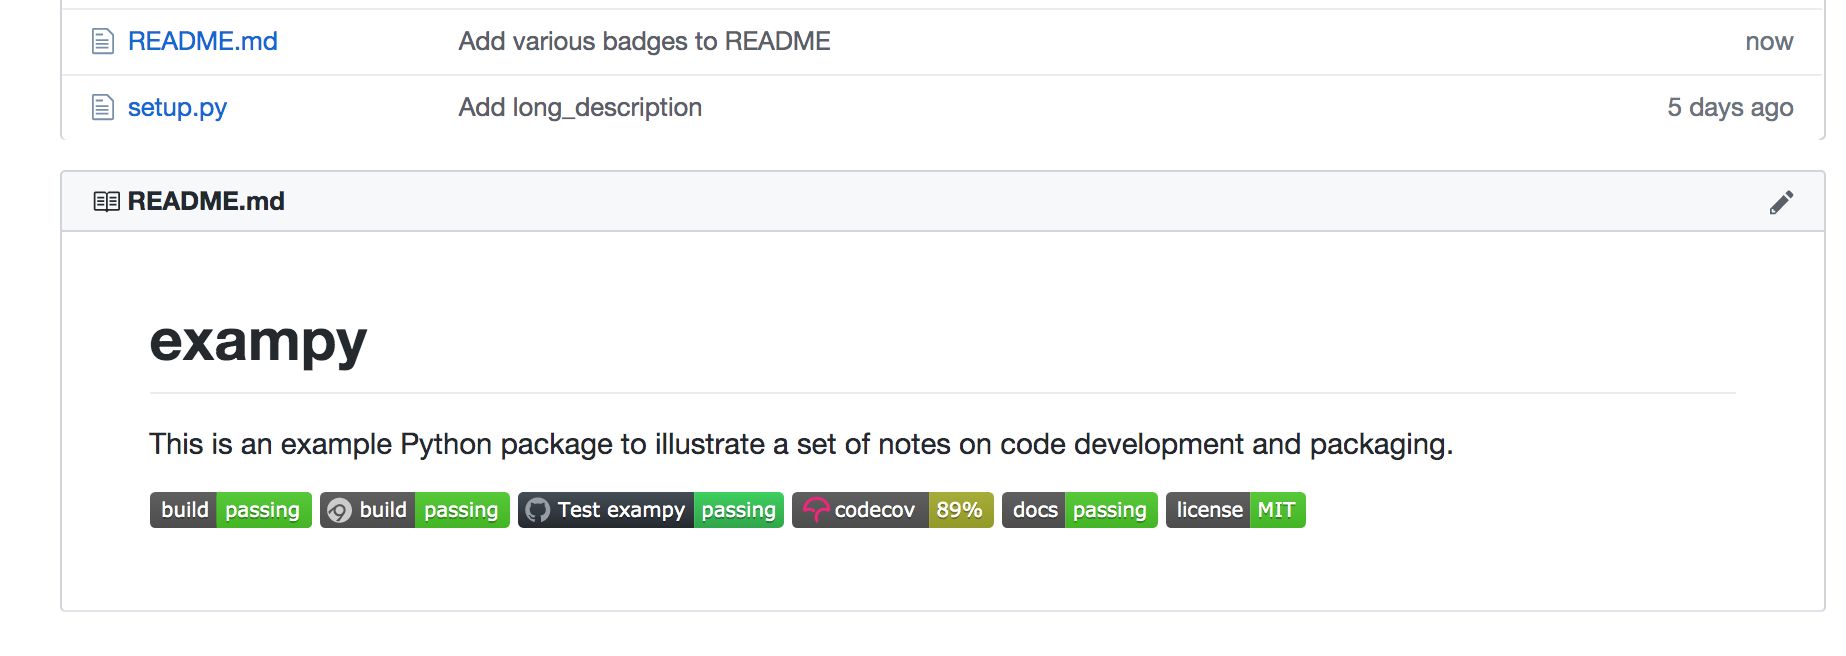
(note that this is a static image, while the embedded badges above are “live”, so if exampy has changed since writing this, they make give different statuses).