5. Testing your code
Thoroughly testing your code is crucial for allowing others (and yourself!) to use it confidently, for maintaining your code long-term, and for developing new features. Testing your code needs to be done continuously, that is, it is not long-term useful to perform a test of the implementation of a new feature or of its integration with the rest of your package if you do not save the test and re-run it every time the code changes; unfortunately, only testing code at its first implementation still remains the main mode in which scientific software is tested. Instead you need to write a comprehensive test suite that checks that your code keeps working the way you intend it to work as your package grows and evolves.
Having a comprehensive test suite is essential for being as confident as you can be that your code behaves correctly (of course, no test suite is 100% water tight). But having a comprehensive test suite also helps you maintain and develop your package. A test suite makes maintenance easier, because you can catch new problems early (e.g., an issue stemming from a change in a dependency), when they are typically easier to solve. It is also easy to check that your package works with a new minor (or major, but that will likely be a while) version of Python itself. It also helps you in developing your code, especially in allowing large-scale changes to the underlying framework of your package without changing the package’s user interface (or without changing it much). For example, if you want to completely re-vamp the way a complex sub-module of your code with many functions and classes is implemented, this is difficult to do without a comprehensive test suite, because it would be difficult to be sure that no user-facing functionality changed. But with a good test suite, you can be confident that your underlying changes do not break code that people have that uses your package or the way they interact with your code. Having a comprehensive test suite is also absolutely essential if you will be accepting pull requests from outside users (which you should!): without a test suite, it would be very difficult to know that changes proposed in a pull request (especially if there are many) do not break some part of your code (you would be surprised at how easily even a small change in one part of your package can cause problems in unexpected places).
In this chapter, I discuss the basics of testing your Python package, explain how to write good tests for different aspects of your package, and how to build and run a test suite with pytest, the current standard for Python testing. In this chapter, we will run this test suite by hand, but in the next chapter, I will discuss how to use online continuous integration services to automatically run your test suite on a set of external servers every time you change your code.
5.1. Basics of good testing
Tests of a Python package are regular Python statements, functions, etc., just like any other Python code. They become tests of your software package simply by virtue of context: tests are regular Python files that live in a designated spot for tests of your package and that consist of a set of statements checking that your code works as intended. At some level, any use of your package by yourself and other users is a test of your code, because users will (or should) be sanity-checking your code’s results and report issues if the results are incorrect or unexpected. But your package should contain a dedicated set of tests, which we refer to as a test suite.
The first decision you have to make is where to put your tests. Tests should be part of the same git repository that contains the package itself and then there are essentially two options: (i) you can put the tests outside of the package itself, by putting them in a sub-directory of the top-level directory of your package’s git repository, or (ii) you can incorporate the tests into the package itself, that is, include them as a sub-directory within your Python package’s directory (or
in a set of sub-directories, e.g., to separate tests by submodule). The latter option allows you to include the tests in distributions of your code, which may be useful to allow people who have installed your code to run the tests themselves and verify that they pass on their system. However, I believe it is better to choose option (i) and keep the tests outside of the package itself. This is for a few reasons: (a) packages should be as light-weight as possible and a comprehensive test suite
will be large (e.g., for galpy, the test suite currently contains about 30k lines, while the package itself has about 40k, excluding comments and docstrings), (b) your package should be as well documented and tested as possible, but you will likely not document the tests much and almost certainly not write a test suite for the tests (and so on!), (c) your tests may have difficult-to-install dependencies that you do not want users of your code to have to install, and (d) the main issues that
users will run into are installation issues; when they can install and load your code, it’s highly unlikely that a test of the code’s functionality would fail, so there really isn’t too much point in normal users of your code running the test suite themselves if you run it often yourself. Thus, you should include tests in a tests/ sub-directory of your top-level directory, which therefore now looks like (for the exampy example package from chapter
2):
TOP-LEVEL_DIRECTORY/
    docs/
    exampy/
    tests/
    README.md
    setup.py
The tests/ directory then contains a set of Python .py files that contain tests of your code. For a large software package, one option would be to mirror your package’s structure of sub-modules and arrange tests in a similar directory tree under tests/, but typically it’s easy enough to simply include a bunch of *.py files in the tests/ directory itself that test all of your package’s functionality in all of its submodules. To seamlessly integrate with the pytest test
framework, your tests should be arranged as follows:
Tests should be in files with filenames that start with
test_and end in.py, so for example,test_basic_math.pywill contain tests of the basic math included inexampy’s top-level module (see below).Functions that contain tests to be run within the test files should start with
test; if you use classes to arrange tests, these need to start withTest. Your test files can include other functions or classes, for example as helper functions/classes for your tests, but these will not be executed as tests bypytestbelow.
I will focus on the case of using functions to write tests, rather than classes. Using classes for tests is useful when your tests require common, expensive initialization procedures, which can easily be done with a TestX test class, but is difficult when using functions. When this is not necessary, it is easier to simply use functions that contain all of the setup for your test, such that they can stand alone and can be run independently from each other. This is useful when diagnosing
problems with your tests or code, so you don’t always have to run the entire (or a large part of the) test suite.
It is a matter of taste how you arrange tests of different parts of your package into a set of test files. One option is to have a single file per package file that contains the tests of that package file’s functionality, but that leaves it unclear where to put tests of the integration of different parts of your package. Another option is to use one file (or a few files, if a logical division can be made) for each submodule and then include tests of the interplay between different submodules in the most relevant submodule’s test file(s). However you choose to arrange your tests, use a logical structure that makes it easy to find where tests are located for your future self and for other developers.
Before going on to describe how to write Python tests, it is useful to consider what are good properties of tests of a scientific software package and how to construct a good test suite:
Many of your tests should be as minimal, short, and atomic as possible: you should strive to make sure that each function in your package does what you intend it to do and that it does this correctly; this is called unit testing. If your package is well written, it should consist mostly of relatively small units (functions, classes, etc.) that work together to do more complex things. Unit testing makes sure that the smallest units of code in your package work as intended, because having all of the parts of a complex code work is a prerequisite to having the entire complex code working correctly. Testing these small units of your package should be possible with relatively brief tests: they should require as little setup as possible.
Your test suite should include integration tests: Besides making sure that the atomic parts of your code work correctly, you should test that they work together to create more complex workflows that work as expected. Even if all of the individual parts of your code work to your satisfaction, it can still easily be the case that their combination does not work as you intended (this can be as simple as their outputs and inputs not being compatible, or more complicated when, e.g., approximations that seem correct for parts of your code are not good enough for their combination with other parts of your code). These integration tests will typically be more complex pieces of Python code that more directly resemble actual use of your code, but that’s okay.
Your tests should run in as little time as possible: Having to wait for a long test-suite to run before knowing whether or not your code contains bugs or other errors will strongly impede your progress (I should know,
galpy’s test suite currently runs for close to an hour, even when spreading the tests over six machines!). Thus, you want your tests to run fast. Because a test suite for any decent-sized package will contain many individual test functions, each of the individual test functions should run very fast in order for the entire test suite to run quickly.Of course, for complex scientific software, it is inevitable that some tests will require a longer time to run (long in the context of tests starts at something like one second, and you should definitely avoid any test that requires more than a minute to run). You might want to check that your code works to a certain high level of precision and that level of precision requires a long computation. In such cases, it is useful to also include a shorter version of the same test if this is possible (for example, one that requires less time to get a lower precision result) that can be run before the longer version of the test, such that not-too-subtle bugs can be found using the shorter test without having to wait for the longer test to finish. Of course, this only makes sense of the shorter test is significantly shorter, such that it does not increase the total test runtime much.
You should test outputs of your code as well as the important errors and warnings that it raises: You want to focus your efforts on making sure that the values your code returns are correct, but if your code raises errors in certain cases or warnings, it is important to test whether these are raised appropriately as well.
You should test setting non-default values for your functions’ keyword parameters: For all functions with optional parameters, you should test that changing the value of any optional parameters is properly handled by the code (e.g., to make sure you haven’t accidentally hard-coded the value of an optional parameter somewhere). If you have more than one optional parameter, it quickly becomes difficult to test all possible combinations of setting or not setting keywords, but there is little harm in combining these and simply using a test that changes the value of all keywords from their defaults.
You want to have at least one test for each function, but it’s typically best to test many different invocations: Even for simple functions, try multiple values of the input arguments and keywords to more extensively test the function. If your function has conditional statements, this is likely necessary to obtain a high coverage, as we will discuss more below (because a single invocation only tests a single path through your code’s conditional statements, thus not testing the other paths).
Add a test for each reported issue whose fix requires a code change: When users report an issue with the code that requires you to change the code, add a test that checks that the issue was fixed. This will prevent the issue from arising again in the future, e.g., when you accidentally undo the fix later. Often the best way to start editing your code in response to a reported issue is to first write a test that fails because of the issue and then make the fix in the code; once the test passes you are ready to close the issue.
You should document your test suite: Many tests of a scientific software package will be non-trivial (e.g., checking the code against the result of an analytical calculation). To make sure you remember what you were thinking when you wrote specific test, extensively document your reasoning with code comments. Users will not (typically) be importing and using your test suite, so there is no need for true docstrings, but keeping a basic level of documentation of all functions in your test suite will make it easier for you and other developers to understand, use, and extend it.
Aside from these general desirable properties of a good test suite, the structure of good tests for a scientific software package will depend strongly on the package itself. While including very simple test cases of general functions is useful for catching major issues (e.g., testing the exampy.integrate.riemann function with a constant function), be careful in only depending on the simplest possible tests, because it is likely that these would not catch more subtle issues with your code
because they are too simple (i.e., even a slightly wrong version of your code might get them right enough). In my own field of astrophysics, we often have analytical solutions for certain inputs of computations that our code can perform in general and it is useful to test that such analytical solutions are correctly reproduced (and it is good to test against non-trivial analytical solutions if they exist). If a computational problem has no known analytical solution, we often still know of
certain properties that the solution should have or we have constraints on the solution and we can test that these properties and constraints are satisfied (e.g., when solving the Newtonian equation of motion for a conservative, time-independent force, we know that the energy associated with the solution is conserved). Another way to test your code may be to compare it to an alternative solution, for example, one that only applies in certain cases (but isn’t analytic) and/or one that is part of
a different package that should be consistent. As with documentation before, it is difficult to write too many tests and as long as they run in a reasonable amount of time, erring on the side of testing your code too much is better than not testing it enough!
5.2. Writing simple tests
To illustrate how to write basic tests, we will add some tests of the basic exampy functionality that we implemented in the previous chapters. A more advanced discussion of test writing is inevitably tied up with the framework that we choose to use to run the tests and, thus, I postpone a more advanced discussion until the next section, where running tests with pytest is described in detail.
I start by adding a file test_basic_math.py in the tests/ directory that will contain tests of the basic math contained at the top level of the exampy package. Thus, the top-level package directory, expanded to one level looks now as follows
TOP-LEVEL_DIRECTORY/
    docs/
        build/
        source/
        Makefile
        make.bat
    exampy/
        integrate/
        __init__.py
        _math.py
    tests/
        test_basic_math.py
    README.md
    setup.py
As discussed above, I keep the tests outside of the package itself here.
The way we check in a test whether the code conforms to our expectations of how it should work is using one or more assert statements that assert that a certain behavior holds. For example, the simplest function in exampy is exampy.square and we check that this function returns the square by checking a few known solutions. This is done in the following function that we add to tests/test_basic_math.py
def test_square_direct():
    # Direct test that the square works based on known solutions
    import math
    import exampy
    tol = 1e-10
    assert math.fabs(exampy.square(1.)-1.) < tol, \
        "exampy.square does not agree with known solution"
    assert math.fabs(exampy.square(2.)-4.) < tol, \
        "exampy.square does not agree with known solution"
    assert math.fabs(exampy.square(3.)-10.) < tol, \
        "exampy.square does not agree with known solution"
    return None
As you can see, I add a total of three assert statements that check the behavior of the square function against the known square of the numbers one, two, and three (which I worked out analytically for you …). Python assert statements have a very simple behavior: in the case of assert True, msg, nothing happens and the statement following this is executed; in case of assert False, msg, an AssertionError is raised and the msg string is printed, and msg should
therefore contain a useful message explaining what went wrong. Therefore, I have written the test of the square function as an assert that the result from the square function agrees with the known value to a known absolute tolerance (using the math.fabs function). I have chosen to include the two import statements to make this test a fully self-contained code example, but when this test file grows, you may want to move these to the top level of the file, such that they do not need to
be repeated in each test (however, repeating them makes all of the tests self-contained code snippets, which may be useful when developing and testing the tests). Note that you can also use the numpy.allclose function to test whether two numbers or arrays agree to some relative and absolute tolerance (e.g., as numpy.allclose(exampy.square(2.),4.)), but I will not discuss that here.
I will discuss how to run the tests using the pytest commandline utility below, but for now you could run the test manually by going to the tests/ directory, opening a Python terminal, and doing
>>> import test_basic_math
>>> test_basic_math.test_square_direct()
which produces
AssertionError: exampy.square does not agree with known solution
We get this error, because I actually got the known solution of \(3^2\) wrong! To fix this, we change the test to
def test_square_direct():
    # Direct test that the square works based on known solutions
    import math
    import exampy
    tol = 1e-10
    assert math.fabs(exampy.square(1.)-1.) < tol, \
        "exampy.square does not agree with known solution"
    assert math.fabs(exampy.square(2.)-4.) < tol, \
        "exampy.square does not agree with known solution"
    assert math.fabs(exampy.square(3.)-9.) < tol, \
        "exampy.square does not agree with known solution"
    return None
Running the test again, we now get no output, indicating that the test passed.
As an example of testing a known property of the solution, we add a test of exampy.cube that checks that this is an odd function, that is, that for example \((-2)^3 = - (2)^3\)
def test_cube_oddfunction():
    # Test of the cube function by checking that it is an odd function
    tol= 1e-10
    assert math.fabs(exampy.cube(1.)+exampy.cube(-1.)) < tol, \
        "exampy.cube is not an odd function"
    assert math.fabs(exampy.cube(2.)+exampy.cube(-2.)) < tol, \
        "exampy.cube is not an odd function"
    assert math.fabs(exampy.cube(3.)+exampy.cube(-3.)) < tol, \
        "exampy.cube is not an odd function"
    return None
Opening a Python terminal and running
>>> import test_basic_math
>>> test_basic_math.test_cube_oddfunction()
then returns nothing, indicating that the test passed. Of course, we could more simply write this function as
def test_cube_oddfunction():
    # Test of the cube function by checking that it is an odd function
    tol= 1e-10
    for nn in range(1,10):
        assert math.fabs(exampy.cube(nn)+exampy.cube(-nn)) < tol, \
            "exampy.cube is not an odd function"
    return None
and testing all the way up to \(N=9\).
In cases where no relevant analytical solution is known or where no strong constraints exist on the solution that provide enough piece of mind that satisfying them makes you confident that your code works, you can also test against more approximate solutions or properties or against a different way of solving the problem that may be available in another package. As an example of this type of testing, I first implement a better approximate integration method in exampy.integrate, adding the
Simpson’s rule as the function exampy.integrate.simps, which (with documentation!) looks like
def simps(func,a,b,n=10):
    """Integrate a function using Simpson's rule

Parameters
----------
func: callable
    Function to integrate, should be a function of one parameter
a: float
    Lower limit of the integration range
b: float
    Upper limit of the integration range
n: int, optional
    Number of major intervals to split [a,b] into for the Simpson rule

Returns
-------
float
    Integral of func(x) over [a,b]

Notes
-----
Applies Simpson's rule as

.. math::

    \\int_a^b \\mathrm{d}x f(x) \\approx \\frac{(b-a)}{6n}\\,\\left[f(a)+4f(a+h\
/2)+2f(a+h)+4f(a+3h/2)+

    \ldots+2f(b-h)+4f(b-h/2)+f(b)\\right]

See Also
--------
exampy.integrate.riemann: Integrate a function with a simple Riemann sum
"""
    return (2.*np.sum(func(np.linspace(a,b,n+1)))
            -func(a)-func(b) # adjust double-counted first and last
            +4.*np.sum(func(np.linspace(a+(b-a)/n/2,b-(b-a)/n/2,n))))\
            *(b-a)/n/6.
(note that I am not particularly concerned with implementing this in an efficient manner here). Suppose we didn’t know any analytical integrals, then we could still check that exampy.integrate.simps at least gives approximately the same answer as exampy.integrate.riemann, by including a test in a new tests/test_integrate.py file like this
import numpy as np
import exampy.integrate

def test_simps_against_riemann():
    # Test that simps and riemann give approximately the same answer
    # for complicated functions
    complicated_func= lambda x: x*np.cos(x**2)/(1+np.exp(-x))
    tol= 1e-4
    n_int= 1000
    assert np.fabs(exampy.integrate.simps(complicated_func,0,1,n=n_int)
                   -exampy.integrate.riemann(complicated_func,0,1,n=n_int)) \
                   < tol, \
                   """exampy.integrate.simps gives a different result from """\
                   """exampy.integrate.riemann for a complicated function"""
    return None
which tests that the function \(f(x) = x\,\cos x^2/(1+e^{-x})\) is consistently integrated over the interval from zero to one. The point of a test like this is to gain confidence in the validity of the implementation of the more complex method by making sure that it approximately agrees with a simpler method; the thinking being that if they agree, the more complex one is probably implemented correctly, because otherwise it would be chance that they agree well. Of course, this assumes that you have made a decent effort to implement the more complex method correctly, simply copying in the simpler method as the more complex method would obviously also pass this test!
We could also test that our integration routines are consistent with those in an external package, scipy.integrate, by adding the following test to tests/test_integrate.py
def test_simps_against_scipy():
    # Test that exampy.integrate.simps integration agrees with
    # scipy.integrate.quad
    from scipy import integrate as sc_integrate
    complicated_func= lambda x: x*np.cos(x**2)/(1+np.exp(-x))
    tol= 1e-14
    n_int= 1000
    assert np.fabs(exampy.integrate.simps(complicated_func,0,1,n=n_int)
                   -sc_integrate.quad(complicated_func,0,1)[0])\
                   < tol, \
                   """exampy.integrate.simps gives a different result from """\
                   """scipy.integrate.quad for a complicated function"""
    return None
If you run this test, you will see that it passes, which given the 1e-14 tolerance demonstrates that our exampy.integrate.simps method works very well! It is left as an exercise to write a test that checks whether the error made by Simpson’s rule scales as the fifth power of the number of intervals times the fourth derivative, as expected from the math behind Simpson’s rule.
5.3. Running a test suite with pytest
So far, we have been running the tests that we wrote above by going into the tests/ directory, opening a Python terminal, and importing and running the tests manually. Test suite runners provide an easier way to run your tests, while also giving useful outputs of the status of your test runs and providing much additional functionality to make test writing and running easier and more comprehensive. While there are different test runners available in the Python ecosystem (notably nose),
currently the dominant framework is pytest and we will focus on pytest in these notes. You can install pytest as
pip install -U pytest
To get to know how pytest works, we run the tests that we have written so far in tests/test_basic_math.py using pytest as
pytest -v tests/test_basic_math.py
in a regular terminal in the top-level of the package. This produces output that looks like
============================= test session starts ==============================
platform darwin -- Python 3.7.3, pytest-5.1.0, py-1.8.0, pluggy-0.12.0 -- /PATH/
TO/PYTHON/BINARY
cachedir: .pytest_cache
rootdir: /PATH/TO/exampy
plugins: arraydiff-0.3, doctestplus-0.3.0, openfiles-0.4.0, remotedata-0.3.1
collected 2 items

tests/test_basic_math.py::test_square_direct PASSED                      [ 50%]
tests/test_basic_math.py::test_cube_oddfunction PASSED                   [100%]

============================== 2 passed in 0.07s ===============================
This output shows the Python and pytest versions that you are using, the directory that you are executing the command from, any plugins (ignore these for now), and then displays a verbose summary of the test run (obtained using the -v flag that we passed to the pytest invocation). The final summary is that two tests passed and all is well. If we had run the pytest command before we fixed the erroneous square of three in the test_square_direct function, we would have instead
gotten
============================= test session starts ==============================
platform darwin -- Python 3.7.3, pytest-5.1.0, py-1.8.0, pluggy-0.12.0 -- /PATH/
TO/PYTHON/BINARY
cachedir: .pytest_cache
rootdir: /PATH/TO/exampy
plugins: arraydiff-0.3, doctestplus-0.3.0, openfiles-0.4.0, remotedata-0.3.1
collected 2 items

tests/test_basic_math.py::test_square_direct FAILED                      [ 50%]
tests/test_basic_math.py::test_cube_oddfunction PASSED                   [100%]

=================================== FAILURES ===================================
______________________________ test_square_direct ______________________________

    def test_square_direct():
        # Direct test that the square works based on known solutions
        tol = 1e-10
        assert math.fabs(exampy.square(1.)-1.) < tol, \
            "exampy.square does not agree with known solution"
        assert math.fabs(exampy.square(2.)-4.) < tol, \
            "exampy.square does not agree with known solution"
>       assert math.fabs(exampy.square(3.)-10.) < tol, \
            "exampy.square does not agree with known solution"
E       AssertionError: exampy.square does not agree with known solution
E       assert 1.0 < 1e-10
E        +  where 1.0 = <built-in function fabs>((9.0 - 10.0))
E        +    where <built-in function fabs> = math.fabs
E        +    and   9.0 = <function square at 0x1080fad90>(3.0)
E        +      where <function square at 0x1080fad90> = exampy.square

tests/test_basic_math.py:12: AssertionError
========================= 1 failed, 1 passed in 0.10s ==========================
We see that both tests are still run, but that the first one failed. All failures are presented in a detailed FAILURES section that contains a traceback of which assert statement failed and the components of this assert statement are somewhat dissected, which is helpful in diagnosing what went wrong in the test.
Besides the basic math tests, we have also already written tests of the exampy.integrate submodule. To run all tests of the package, we can do either
pytest -v tests/test_basic_math.py tests/test_integrate.py
that is, we specify both files directly, or
pytest -v tests/
Both of these give
============================= test session starts ==============================
platform darwin -- Python 3.7.3, pytest-5.1.0, py-1.8.0, pluggy-0.12.0 -- /PATH/
TO/PYTHON/BINARY
cachedir: .pytest_cache
rootdir: /PATH/TO/exampy
plugins: arraydiff-0.3, doctestplus-0.3.0, openfiles-0.4.0, remotedata-0.3.1
collected 4 items

tests/test_basic_math.py::test_square_direct PASSED                      [ 25%]
tests/test_basic_math.py::test_cube_oddfunction PASSED                   [ 50%]
tests/test_integrate.py::test_simps_against_riemann PASSED               [ 75%]
tests/test_integrate.py::test_simps_against_scipy PASSED                 [100%]

============================== 4 passed in 0.22s ===============================
and we see that all four existing tests are run and that they pass. pytest has a rather straightforward set of rules for discovering tests when you specify directories and files and which we summarized above.
There are many options available when running pytest. Useful options of the command-line tool are
-x: Exit upon the first failure. This causes the test run to be interrupted as soon as a test fails. The default is to run all tests and report all passes and all failures.-s: Print any stdout and stderr output produced by your code. The default behavior is to not print these, but if you have, for example, print statements in your tests (e.g., when debugging the tests) and you want these to show up, you need this option.-k EXPRESSION: Use this to only run tests with names that match theEXPRESSION. For example, runningpytest -v tests/test_basic_math.py -k squarewould only run tests withsquarein their name. This is useful if you only want to run a single test or a subset of related tests (e.g., when debugging tests or during the implementation of a new feature).--lf: Only run tests that failed during the previous invocation ofpytest. This is helpful when you have a situation where a test unexpectedly fails as part of a bigger test suite and you are trying to fix the code or test to make the test pass again, without having to re-run the entire test suite over and over. Once you’ve fixed the issue, make sure to run the entire test suite again to make sure that your fix did not accidentally break something else!--disable-pytest-warnings: When your code emits warnings,pytestcaptures these and prints them as part of a warnings summary at the end of the run. If your code emits many warnings, this can clobber the entire output from the test run and setting this option turns off the warnings summary.
pytest has additional functionality to help you write tests for your code. For example, you will want to test that your code correctly raises exceptions in cases where an exception should be raised. pytest allows this through the raises context manager, which checks that a piece of code raises a certain error. For example, the functions in exampy.integrate require that the to-be-integrated function can handle array inputs, which fails when a function is provided that only works
for scalar inputs, as in the following snippet
>>> import math
>>> import exampy.integrate
>>> print(exampy.integrate.simps(lambda x: math.exp(x),0,1))
This raises
TypeError: only size-1 arrays can be converted to Python scalars
which is not a very useful error message for users of the code. To remedy this, we can edit the source code for the exampy.integrate.simps function to catch this error and re-raise it with a more informative error message. The code (without the docstring) becomes
def simps(func,a,b,n=10):
    try:
        return (2.*np.sum(func(np.linspace(a,b,n+1)))
                -func(a)-func(b) # adjust double-counted first and last
                +4.*np.sum(func(np.linspace(a+(b-a)/n/2,b-(b-a)/n/2,n))))\
                *(b-a)/n/6.
    except TypeError:
        raise TypeError("Provided func needs to be callable on arrays of inputs")
such that if we run the snippet above, we now get
TypeError: Provided func needs to be callable on arrays of inputs
(in addition to the full traceback). Now we want to check that our code indeed raises this exception properly when it encounters this situation, so we add a test to tests/test_integrate.py that does this with the raises context manager; the new test is
def test_simps_typerror():
    # Test that exampy.integrate.simps properly raises a TypeError
    # when called with a non-array function
    import math
    import pytest
    with pytest.raises(TypeError):
        out= exampy.integrate.simps(lambda x: math.exp(x),0,1)
    return None
This test passes. See for yourself what happens if you use with pytest.raises(ValueError):; you should see that the test now fails with an informative (but long!) message about the raised exception. If you want more fine-grained control over the tested exception, for example, to make sure the correct TypeError was raised (not just any TypeError), you can get access to the full error message with
with pytest.raises(TypeError) as excinfo
which has the type of the exception raised, the value of the exception message string, and the traceback with the full traceback. You can then for example test that the message of the TypeError is exactly the expected one as follows:
def test_simps_typerror():
    # Test that exampy.integrate.simps properly raises a TypeError
    # when called with a non-array function
    import math
    import pytest
    with pytest.raises(TypeError) as excinfo:
        out= exampy.integrate.simps(lambda x: math.exp(x),0,1)
    assert str(excinfo.value) == "Provided func needs to be callable on arrays of inputs"
    return None
Note that the assert on the raised error is outside and after the with pytest.raises(...) as context manager
The second option is to use the match= keyword of pytest.raises, which checks whether the error message matches an expected value, expressed as a regular expression. For example, we can do
def test_simps_typerror():
    # Test that exampy.integrate.simps properly raises a TypeError
    # when called with a non-array function
    import math
    import pytest
    with pytest.raises(TypeError,match="Provided func needs to be callable on arrays of inputs"):
        out= exampy.integrate.simps(lambda x: math.exp(x),0,1)
    return None
The with pytest.raises(...) as excinfo: syntax gives you more freedom to assert things about the raised error, but for most use cases the match= method will do.
Similarly, you can test that your code raises the expected warnings, with the pytest.warns context manager, described in detail here. You will have to make sure that warnings are printed and not suppressed to properly test warnings, for example, by doing warnings.simplefilter("always",WARNING_CLASS) where WARNING_CLASS is a type of warning (e.g., DeprecationWarning).
Sometimes your test suite will contain tests that the current version of the code does not pass. This could be for an in-progress fix of the code when you have already added the test that the code is fixed, but the code hasn’t been fixed yet (this is good practice). Or you may have a test of old behavior that no longer works, but you want to keep the test for historical reasons and for keeping a record that this behavior changed (obviously, you want to do this very sparingly and only for
important changes; most tests that have become out-of-date should be edited and/or removed). Functionality for this is part of pytest’s framework for skipping tests. What you can do is to label a test as an expected failure, by marking it with the @pytest.mark.xfail decorator. For example, say that we have started work on fixing the fact that exampy.integrate.simps fails for functions that only work for scalar inputs and we
write a test that should pass once this works; we first write this test as
def test_simps_scalarfunc():
    # Test that exampy.integrate.simps works even when called with a
    # non-array function
    import math
    tol= 1e-7
    assert np.fabs(exampy.integrate.simps(lambda x: math.exp(x),0,1)
                   -(math.e-1.)) < tol, \
                   """exampy.integrate.simps does not work for scalar-input"""\
                   """functions"""
    return None
If we then run the test suite, the test fails with the TypeError: Provided func needs to be callable on arrays of inputs error. However, if we mark it as
@pytest.mark.xfail
def test_simps_scalarfunc():
    # Test that exampy.integrate.simps works even when called with a
    # non-array function
    import math
    tol= 1e-7
    assert np.fabs(exampy.integrate.simps(lambda x: math.exp(x),0,1)
                   -(math.e-1.)) < tol, \
                   """exampy.integrate.simps does not work for scalar-input"""\
                   """functions"""
    return None
the test now XFAILs, that is, it is an expected failure. If the test does happen to pass, the test suite will still report the tests as being successfully run, which is not typically the behavior that you want, because a test that is expected to fail, but that actually passes, is an unexpected behavior of the code (and what tests truly establish is that your code behaves as expected, more so than that it behaves correctly). By setting the strict=True parameter as
@pytest.mark.xfail(strict=True)
...
an expected failure that passes will now raise a test error. Other options of pytest.mark.xfail allow you to provide a reason for the failure as the reason= keyword, the specific exception that should be raised as the raises= keyword, and you can even make the test not run at all by setting run=False (which is useful if the test’s failure crashes the interpreter and thus the entire test suite).
5.4. Test coverage
Now that we are well underway to writing a good test suite, an important question crops up: How comprehensive is our test suite? That is, to what extend does the test suite actually test all of the code included in the package and to what degree does it cover different ways different parts of the package work together? Answering these questions is the domain of test coverage and in this section I give a brief introduction to the important concepts to consider when worrying about your code’s test coverage and how to use software tools to check your tests’ code coverage.
There are different coverage criteria depending on how thoroughly you want to define “coverage”:
Function coverage (including class coverage and method coverage): This type of coverage checks whether every function (or class, or method) of your package is called by the test suite (and thus, if your test suite passes all tests, that there is a successful evaluation of each function/class/method of your package). This is the first type of coverage you should aim to have when starting to build a test suite. But if your functions contain conditional parts, then 100% function coverage can still leave many parts of your code untested.
Statement coverage: Going beyond function coverage, this type of coverage demands that each statement in your code is executed. Thus, 100% statement coverage means that every single statement in your software package is executed at least once by your test suite. As I will discuss further below, this is relatively easy to measure, realistic to attain, and achieving 100% statement coverage is what your test suite should aim for. However, statement coverage may still leave parts of your code untested, especially if your code is written in a way that gets around statement coverage (see example below). To more fully characterize test coverage, there are two more advanced coverage types.
Branch coverage: This type of coverage checks that every branch in your code (e.g., the three possible evaluations of an
if: ... elif: ... else: ...block) gets executed by your tests. Thus, for every conditional part of your code, your tests should go through each possibility. More generally, branch coverage can mean testing every possible distinct path through your code’s conditional statements. If your code contains more than a few conditional statements, the number of possible paths grows exponentially and in practice it becomes impossible to test each possible path, but it is useful to keep in mind that testing different paths through your code is a good idea. Measuring branch coverage is difficult.Condition coverage: If your code contains conditional statements with complex boolean expressions (e.g.,
if (x > 0 and y < -1):), then this type of coverage checks whether each boolean sub-expression evaluates to bothTrueandFalsein your test suite. That is, this goes beyond statement coverage, which in this example could be achieved by the total boolean expression evaluating toTrue(andFalseif there is anelse:statement as well), without going through all possible combinations of boolean sub-expressions. Condition coverage is also difficult to measure, but is a good standard to aim for when writing tests.
While branch coverage implies statement coverage, and statement coverage implies function coverage, statement coverage does not imply branch coverage, because of edge cases such as
if math.fabs(x) < 1e-10: x= 0
which as a line (which is the unit most tools for measuring coverage use) registers as executed no matter whether the condition math.fabs(x) < 1e-10 is True or False. To avoid getting into this situation, always start on a new line after an if, elif, else, for, while etc. statement (that is, any statement ending in a colon :). Neither of condition coverage and branch coverage also necessarily implies the other.
The only useful type of coverage in the end is that which can be easily measured while running your test suite and this is statement coverage. While you should aim for as comprehensive as possible condition and branch coverage, because these are difficult to measure they are hard to quantitatively achieve.
The standard Python tool to measure statement coverage is coverage.py, which you can install with
pip install coverage
You can then run your tests while collecting test coverage information by replacing the standard
pytest ...
call with
coverage run -m pytest ...
This does not print any information on your test coverage, but simply collects the information for use by other coverage commands and other tools (in the .coverage file). To obtain a report, run
coverage report
Thus, if we run
coverage run -m pytest -v tests/
coverage report
we get
Name                             Stmts   Miss  Cover   Missing
--------------------------------------------------------------
exampy/__init__.py                   1      0   100%
exampy/_math.py                      9      2    78%   73, 88
exampy/integrate/__init__.py         2      0   100%
exampy/integrate/_integrate.py       8      0   100%
tests/test_basic_math.py            13      0   100%
tests/test_integrate.py             27      1    96%   52
--------------------------------------------------------------
TOTAL                               60      3    95%
As you see, this prints an overview of the number of individual statements, statements not run by the test suite (in absolute and relative terms), and the line numbers for statements not run, for every file. Note that the report also contains the files in the test suite. To limit the report to those files in your package, use the --source option:
coverage run --source=exampy/ -m pytest -v tests/
coverage report
we now get
Name                             Stmts   Miss  Cover   Missing
--------------------------------------------------------------
exampy/__init__.py                   1      0   100%
exampy/_math.py                      9      2    78%   73, 88
exampy/integrate/__init__.py         2      0   100%
exampy/integrate/_integrate.py       8      0   100%
--------------------------------------------------------------
TOTAL                               20      2    90%
Sometimes you want to exclude lines or entire code blocks from coverage, for example, when you have a conditional statement that goes to a general error that you do not feel needs to be tested or when you include a function that is not used in the code and that users should not use, but that you want to keep for later use (in that case, it’s probably best to remove it and keep it elsewhere for future use, but this isn’t an ideal world…). The standard method for doing this is to add a comment
# pragma: no cover at the end of the statement. For a regular statement, this excludes the current line from the coverage report, but if you add it at the end of a function definition, a conditional statement (e.g., if x < 0: # pragma: no cover), a for loop, or any statement ending in a colon, then the entire following code block will be excluded. So for example, the entire function
def fourth_power(x): # pragma: no cover
    return x**4.
would be excluded from the coverage report. Once you put in this comment, the line will disappear from the coverage report and you will get lulled into a false sense of security about your code’s coverage (which will appear higher than it truly is), so this should be used sparingly for lines and code blocks that truly can be ignored at little risk.
You can more generally exclude lines or files using a configuration file, which is by default a .coveragerc file in the directory where you run the command; this file has the standard .ini format (but does not end in this extension!), an example is
[run]
source= exampy/

[report]
# Regexes for lines to exclude from consideration
exclude_lines =
    # Have to re-enable the standard pragma
    pragma: no cover

    # Don't complain if tests don't hit defensive assertion code:
    raise AssertionError
    raise NotImplementedError

    # Don't complain if non-runnable code isn't run:
    if 0:
    if __name__ == .__main__.:

omit =
    exampy/__init__.py
    exampy/integrate/*

ignore_errors = True

[html]
directory = coverage_html_report
This sets the runtime option --source=exampy/ so that we don’t have to specify this by hand every time we run coverage run, the [report] section uses the exclude_lines option to exclude source lines that contain these expressions (we have to add the standard pragma: no cover, because otherwise it would be overwritten by the rules here), the omit option to exclude entire files or directories (use very sparingly! This is a bad example!), and the ignore_errors to ignore
any errors when trying to find source files. The final section specifies where to place the HTML version of the report, which is created by
coverage html
instead of coverage report and when running with this .coveragerc file, the HTML page looks like
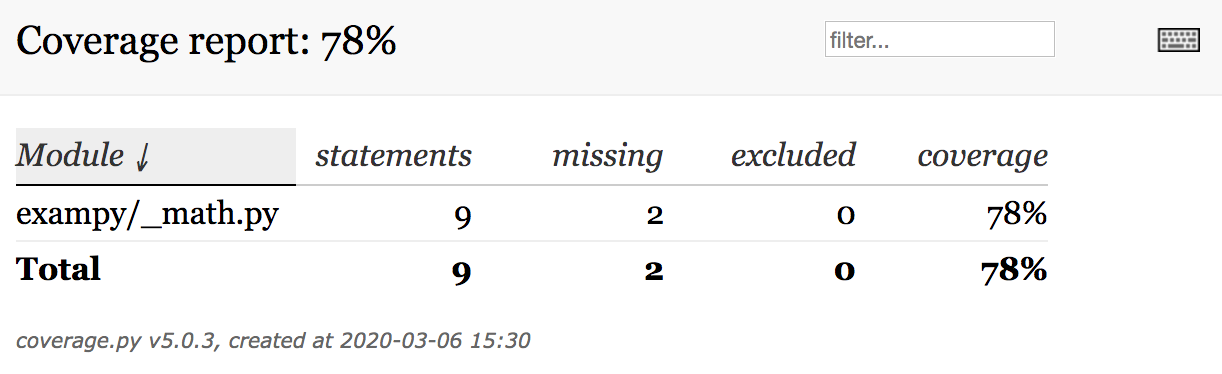
Going forward, we remove the omit= part from the .coveragerc file so that all files are included in the test coverage reports.
A different way of running the coverage script that is often more convenient is using the pytest-cov plugin, which you can install with
pip install pytest-cov
then you can get the report in one go as (in our example):
pytest -v tests/ --cov=exampy/
which produces
============================= test session starts ==============================
platform darwin -- Python 3.7.3, pytest-5.1.0, py-1.8.0, pluggy-0.12.0 -- /PATH/
TO/python
cachedir: .pytest_cache
rootdir: /PATH/TO/exampy
plugins: arraydiff-0.3, cov-2.8.1, doctestplus-0.3.0, openfiles-0.4.0,
remotedata-0.3.1
collected 6 items

tests/test_basic_math.py::test_square_direct PASSED                      [ 16%]
tests/test_basic_math.py::test_cube_oddfunction PASSED                   [ 33%]
tests/test_integrate.py::test_simps_against_riemann PASSED               [ 50%]
tests/test_integrate.py::test_simps_against_scipy PASSED                 [ 66%]
tests/test_integrate.py::test_simps_typerror PASSED                      [ 83%]
tests/test_integrate.py::test_simps_scalarfunc XFAIL                     [100%]

---------- coverage: platform darwin, python 3.7.3-final-0 -----------
Name                             Stmts   Miss  Cover
----------------------------------------------------
exampy/__init__.py                   1      0   100%
exampy/_math.py                      9      2    78%
exampy/integrate/__init__.py         2      0   100%
exampy/integrate/_integrate.py       8      0   100%
----------------------------------------------------
TOTAL                               20      2    90%


========================= 5 passed, 1 xfailed in 1.15s =========================
To also get the line numbers of statements not run as part of the test suite, do
pytest -v tests/ --cov=exampy/ --cov-report term-missing
To get the HTML version, do
pytest -v tests/ --cov=exampy/ --cov-report html
which without the omitted files looks like
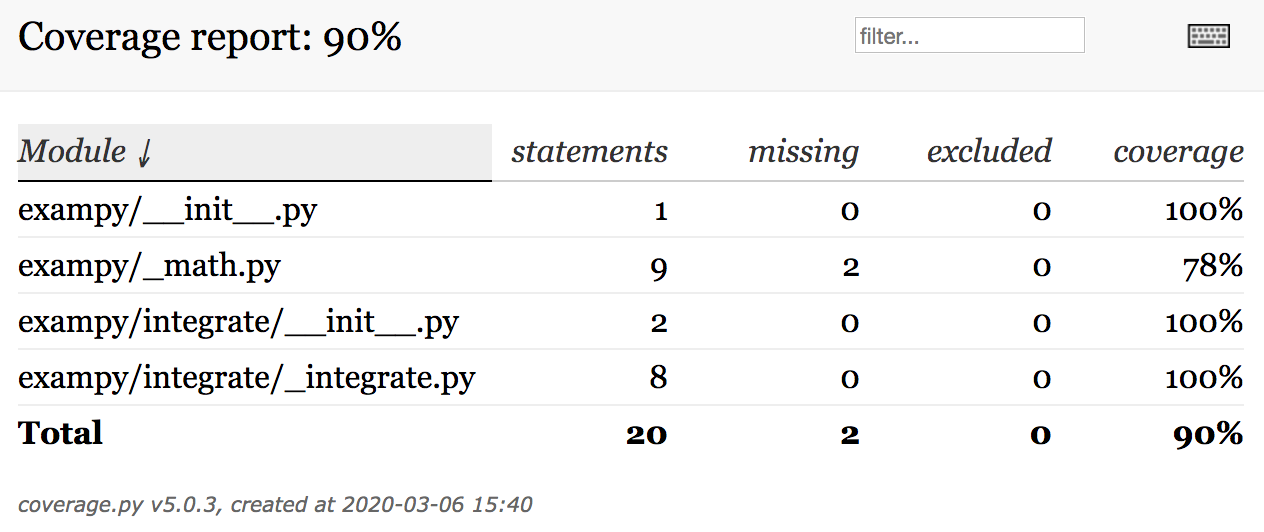
If your package contains non-Python code, for example, compiled C code to speed up computations, and you want to check the test coverage of this code as well, you need to use additional tools. This is too advanced of a topic to cover in detail here, but to get you on your way here is an overview of the process for C code: (i) to collect coverage information, you need to compile your C code without optimization (-O0) and with the gcov coverage option -coverage (in compilation and
linking). This will allow the gcov coverage tool to collect coverage information for any execution of your code (similar to what coverage run does above); (ii) use lcov to generate a coverage report, e.g., with commands like lcov --capture --base-directory . --directory build/temp.linux-x86_64-3.7/exampy/ --no-external --output-file coverage.info which collects the coverage information into the coverage.info file, (iii) generate a
HTML page with the coverage reports with, e.g., genhtml coverage.info --output-directory out. The online services that I discuss in the next chapter also allow you to combine Python and C coverage reports into a single HTML overview.