4. Documenting your code and hosting the documentation online
Writing good documentation for your code is essential to allowing others to use it and it is crucial for lowering your own burden of supporting users of your code. Having excellent documentation that is easily accessible and that is up-to-date for the latest version of your code at all times allows people to use your code without having to constantly contact you with questions about the code (which many people will anyway not do, but they will rather simply not use your code if they cannot easily figure it out). Documentation is also important for your own use of the code: a few months after you’ve written a piece of code, it will not be immediately clear any longer how to use it (for me this can be as quick as a few days!), so by writing good documentation, you will also help yourself save time in the future from having to reconstruct how your own code works.
In this chapter, I first discuss the basics of how to write good documentation and then I discuss various software tools that make writing good, up-to-date documentation easy and that allow you to share the documentation online.
4.1. Basics of good documentation
Before starting a discussion of what makes for good code documentation, it is worth re-stressing the importance of making your code easy and intuitive to use, with many of the basic features taking at most a few lines to run. When that is the case, users will have to consult the documentation much less often than when your code is difficult to use or when even using a basic feature of your code requires them to write dozens of lines of code (e.g., setting up many related objects or many configuration options in a complicated way). It will also make your documentation much easier to write, because you will be able to illustrate your code’s use with short, copyable code snippets, which makes the documentation much more pleasurable to read.
What’s most important about documentation is that it is as complete as possible and as up-to-date as possible. Both of these are difficult to achieve, which is why using automated tools such as those discussed below is useful, because they can help significantly with achieving this goal. It is important that your documentation is as complete as possible, because otherwise users will run into undocumented features and need to contact you or give up. The only reasonable features to exclude from the strict complete-documentation requirement are internal features that users shouldn’t use; even then it is good practice to document them (albeit perhaps at a lower level of formatting clarity) for your own and other code developers’ use. Documentation should be up-to-date to avoid mis-use of your code after major changes and to again avoid user frustration when they find that the documentation is out-of-date with the code and they cannot figure out how to use it. In addition to using automation tools to help you out, the best way to achieve complete and up-to-date documentation is to start writing documentation as soon as you implement new features and even before you implement them. That is, ideally you would write a first draft of the documentation of a function or class before implementing a first version of it, which has the added benefit of requiring you to think through carefully what you want the function or class to do, what inputs to take, and what outputs to return (similarly for tests later, ideally one would write them before writing the code). This is a hard ideal to achieve in practice, but it is good to write at least some documentation in parallel with the first implementation of the code. That way, your documentation will be complete. Keeping it up-to-date requires you to make sure to immediately update the documentation when you change the function.
Good documentation should cover at least the following sub-components:
A guide to the installation of your package, discussing any pre-requisites. Your code should be able to be installed with standard installation commands, but even so it is good to list the commands (especially if you have both
pipandcondainstallation options available, it is necessary to alert users).A quick-start guide and a set of brief tutorials: This helps users to get started using your code quickly by copying and pasting example code and it’s a good way to show off what your code can do without requiring people to run it.
A full API (Application programming interface): a complete listing of all of your code’s functions, classes, and their methods. This is a reference guide that users can consult to learn about exactly how each feature works and what its options are.
Your code’s installation guide should cover the typical way in which your package is installed. This can be as easy as explicitly stating that your code should be installed with pip as
pip install exampy
(for our example package from Chapter 2). This may seem obvious to you, but it is useful to explicitly give the command, people love to simply copy-and-paste code (and we will show below how to add automatic copy-to-clipboard buttons like the one above). If your code has dependencies that wouldn’t be easily and unobtrusively installed by pip (which will attempt to install all requirements listed in the install_requires part of your setup.py file, as
we discussed in Chapter 2), then it is useful to list how to install these as well, again giving explicit commands as much as possible, e.g.,
conda install numpy scipy
or
pip install numpy scipy
if your dependencies are numpy and scipy. Especially if your code requires harder-to-install dependencies or non-Python libraries (like the GSL, which provides many scientific functions in C and is often used in C backends of Python packages), it is helpful to give commands for how to install these on different operating systems (the GSL is now luckily available on conda-forge, so the easiest way to install it is
conda install -c conda-forge gsl). The installation guide is also a good place for a ‘frequently-asked-questions’ (FAQ) section with common installation problems. Again, if your code is pure Python with few dependencies, just stating that your code can be installed with pip install is likely all you need to say here.
The quick-start guide is a way to show off what your package can do and a place to give your users some code snippets that they can start adapting for their own use. When potential users of your package first look at your code they will be deciding whether or not using your package and going to the trouble of installing it and learning to use it is worth it for them. Therefore, a page in your documentation that demonstrates features of your code while also serving as a way to get started is a good way to get people to start using your code. The key to a good quick-start guide is to keep it brief and simple, but also get to interesting use of your code to show off what it can do; achieving these two somewhat competing goals is again easier if your code is easy and intuitive to use, because you can do impressive things with your code with very few keystrokes and, thus, you can write a good quick-start tutorial that also shows of what amazing things your code can do. It is difficult to keep these quick-start guides updated, so it is worth spending a bit of time carefully thinking what you want it to cover and to only cover very stable features of your code.
You can complement the quick-start guide with a more extensive set of tutorials that go into more detail. In practice, most outside users of your code (i.e., not yourself or your collaborators) will likely only use features that are clearly documented and for which a usage example exists, because most users will not attain a full understanding of all that your code can do (e.g., when combining different aspects of it that aren’t obvious) to allow them to go far beyond the tutorials that you provide. So a set of tutorials is where you can go over all of the most common use cases of your code and all the things that you think people can use your code for. It is important to keep them clear and succinct (with pointers for more advanced use), but it is difficult to write too many tutorials (just like it is difficult to write too much documentation), so don’t hold back (keeping your own time in mind of course).
Finally, a complete API should contain documentation for every function and class and every method in a class in your code, arranged by sub-module. The objective of this is to fully document your code, so users can get information on the inputs and outputs of all of your code’s functionality. The API should be arranged in a logical manner, grouping functions and classes with similar functionality. This is a part of your documentation where you should do a minimal amount of manual work in the documentation itself, but rather you should use automated tools to directly grab documentation from your code itself, in your functions’ and class’ docstrings, which I discuss next.
4.2. Python docstrings
Python has a built-in mechanism to attach documentation to modules, functions, and classes and their methods: docstrings. Docstrings are a place to put documentation for users of your code, that is, the type of documentation that we are interested in here. Docstrings are not for developers: don’t use them to comment on specifics of the implementation or on how the code works, unless this is necessary for users of your code; for developer notes,
use regular comments in the code (in Python: lines that start with #).
Docstrings are simply regular strings that by virtue of their placement in the code get attached to a module, function, class, or method as its documentation. They do not need to be explicitly assigned as documentation, rather, the Python interpreter does this assignment automatically when it encounters a string in the correct place. This location is as follows:
For functions: immediately following the statement that defines the function
def func(a,b,c=0):, that is, between thedefstatement and the function body.For classes: immediately following the statement that defines the class
class a_class(object):, that is, between theclassstatement and the class body.For methods in a class: immediately following their definition using
def, in the same way as for functions.For modules and submodules: at the very top of the file defining the module.
I will give examples of these using the exampy example package that we set up in Chapter 2. When the Python interpreter encounters a string in the place specified above, it binds this string to the __doc__ attribute of the module/function/class/method, where it is available to any user. Variables cannot have docstrings in Python itself (that is, the Python interpreter does not bind these to the variable’s __doc__ attribute), but many
documentation tools will pick up docstrings immediately following a variables assignment in the source code:
frac_out= 0.25
"""Fraction of the data that is considered an outlier"""
While docstrings can be any string, the convention is to use triple-quoted strings of the type """A triple-quoted string""", because most docstrings contain multiple lines, which is only allowed for triple-quoted strings. Thus, even if you have a docstring that is just a single line (which should rarely be the case), use a triple-quoted string. A good docstring should contain at least: (a) a brief description of what the module/function/class/method does, (b) an explanation of any input
arguments and keywords, and (c) a discussion of any return value(s) or, for functions and methods, the lack thereof (it’s useful to know that a function does not return anything, unless this is obvious, such as with a class’ __init__ function). You can include extra information such as possible failure modes or references as well. While there are many standard formats for docstrings, one of which I will discuss below, you do not have to follow a standard format, but it is important to use
a consistent style throughout your package such that users can easily parse the documentation once they are used to your format.
As an example, we can write a docstring for the top-level module of the exampy package. To do this, we edit the exampy/__init__.py__ file such that it now looks like
"""exampy: an example Python package"""
from ._math import *
and the """exampy: an example Python package""" string then becomes the module’s docstring. To verify this, open a Python interpreter and do
[1]:
import exampy
?exampy
which shows a message that says something like
Type:        module
String form: <module 'exampy' from '/PATH/TO/exampy/exampy/__init__.py'>
File:        /PATH/TO/exampy/exampy/__init__.py
Docstring:   exampy: an example Python package
and in which you see the docstring that we just defined. You can also verify that it was indeed attached as the module’s __doc__ attribute:
[2]:
print(exampy.__doc__)
exampy: an example Python package
You should only use one-line docstrings for modules, submodules, and classes, because these do not have direct inputs and outputs, so all of the documentation can easily fit on a single line (however, you should feel free to have a multi-line docstring if there is more to say). A class’ docstring simply describes the purpose of the class, not how to initialize the class or details on its methods (although it could contain a list of attributes or methods; this isn’t generally considered to be
necessary); a class’ initialization should be documented as the docstring of the class’ __init__ function, just like any regular method as I discuss below.
Functions and methods typically have inputs and outputs in addition to the brief description, and these inputs and outputs should be separated onto their own line each; to keep a uniform style for your documentation, you should therefore also use multi-line docstrings for functions that have no inputs or outputs, stating explicitly that there are no arguments or keywords and no outputs. Methods in a class are functions that are defined as part of a class and they are essentially the same as
regular functions, except that their first argument is self as the representation of the class instance. self is not typically listed as a documented argument of a method, because it is always the first argument of a method and it always has the same meaning. Therefore, methods and functions follow the same documentation rules. I will discuss documentation for functions below, but keep in mind that the same considerations apply to methods in exactly the same way.
While there are many standard docstring formats, for scientific code packages it is simplest to follow numpy’s docstring convention (also used, e.g., by scipy, packages in the scikit series, and astropy). The most basic version of a docstring for a function should contain a description, inputs list, and outputs list in the numpy docstring format looks as follows, using as an example the exampy.square function
that we defined in exampy/_math.py in Chapter 2:
def square(x):
    """The square of a number

Parameters
----------
x: float
    Number to square

Returns
-------
float
    Square of x
"""
    return x**2.
The brief description is followed by a Parameters section that lists each argument and keyword with the format
parameter: type
    Parameter description
Similarly, the return value is described as
type
    Description of return value
If your function returns multiple values, Returns becomes a list as well; in that case, you may want to name your return values for extra clarity and follow the same format for each as that for each input parameter. If your function does not take any arguments or keywords, you can simply state
Parameters
----------
None
Similarly, if your function does not return anything, you can use
Returns
-------
None
    None
where the two “None”s are necessary, because the sphinx typesetting of the numpy-style docstrings that I will discuss below breaks the return section up into the two components “type” and “Description of return value”.
If we then run
[3]:
?exampy.square
a message shows up that looks as follows
Signature: exampy.square(x)
Docstring:
The square of a number

Parameters
----------
x: float
    Number to square

Returns
-------
float
    Square of x
File:      /PATH/TO/exampy/exampy/utils.py
Type:      function
We can again check that the docstring was indeed assigned to the function’s __doc__ attribute with
[4]:
print(exampy.square.__doc__)
The square of a number

Parameters
----------
x: float
    Number to square

Returns
-------
float
    Square of x
For most functions, you will want to include a longer description than the one-line description that we could use for the square function above. In that case, you would still start the docstring with a one-line summary, but also provide an extended description after two line breaks. For example, for a verbose exampy.square docstring
def square(x):
    """The square of a number

Calculates and returns the square of any floating-point number;
note that, as currently written, the function also works for
arrays of floats, ints, arrays of ints, and more generally,
any number or array of numbers.

Parameters
----------
x: float
    Number to square

Returns
-------
float
    Square of x
"""
    return x**2.
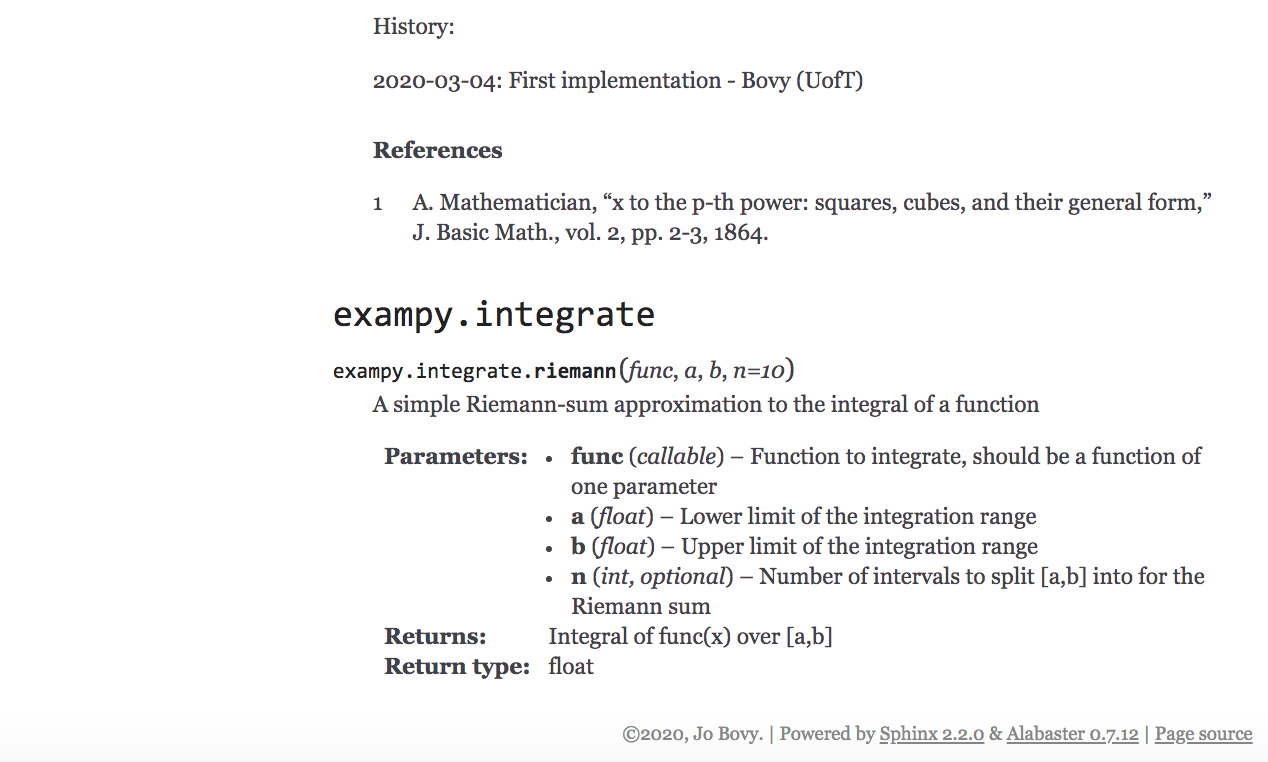
If a function has optional keyword arguments, the documentation should make it clear that these are optional, either by adding , optional after the parameter’s type or by stating this in the description of the parameter (but the first method is most clear). You can also specify what the default value of the keyword is, but this is not really necessary, because most documentation tools will display the function’s signature, which normally shows the default value. For example, we can document
the exampy.integrate.riemann function in exampy/integrate/_integrate.py; with documentation, that function looks like
def riemann(func,a,b,n=10):
    """A simple Riemann-sum approximation to the integral of a function

Parameters
----------
func: callable
    Function to integrate, should be a function of one parameter
a: float
    Lower limit of the integration range
b: float
    Upper limit of the integration range
n: int, optional
    Number of intervals to split [a,b] into for the Riemann sum

Returns
-------
float
    Integral of func(x) over [a,b]
"""
If we then request the documentation for the riemann function
[5]:
import exampy.integrate
?exampy.integrate.riemann
we get a message that says something like
Signature: exampy.integrate.riemann(func, a, b, n=10)
Docstring:
A simple Riemann-sum approximation to the integral of a function

Parameters
----------
func: callable
    Function to integrate, should be a function of one parameter
a: float
    Lower limit of the integration range
b: float
    Upper limit of the integration range
n: int, optional
    Number of intervals to split [a,b] into for the Riemann sum

Returns:
--------
float
    Integral of func(x) over [a,b]
File:      /PATH/TO/exampy/exampy/integrate/_integrate.py
Type:      function
and we see that the function signature includes the default value of n even though the docstring didn’t specify it. If the default value of a keyword is the result of calling a function, such that it isn’t immediately clear what the default value is from the function signature or how it is calculated, you probably want to state it in the docstring.
Additional commonly-used sections of a function’s docstring are (each following the
SECTION
--------
format) are:
Raises: a list of exceptions that the function may raise and when it raises them.See Also: a list of related functions; automated documentation tools will be able to link these automatically if you list them in the same way that you would import and use them (e.g., insquareabove you can refer tocube, if such a function exists in the same file, but to refer toriemannwhich is inexampy.integrate, you need to say explicitlyexampy.integrate.riemann).Notes: extended notes on the function. Use this to list calculation or implementation details that you think the user should be aware of. You can also use this section to give details on the history of the function, keeping track of major changes and when they occurred. For example,History: 2020-03-01: First implementation - Bovy (UofT) 2020-04-06: Added new keyword Y to allow for Z - Bovy (UofT)
References: a list of bibliographic references, using the format.. [1] J. Bovy, "galpy: A Python Library for Galactic Dynamics," Astrophys. J. Supp., vol. 216, pp. 29, 2015.
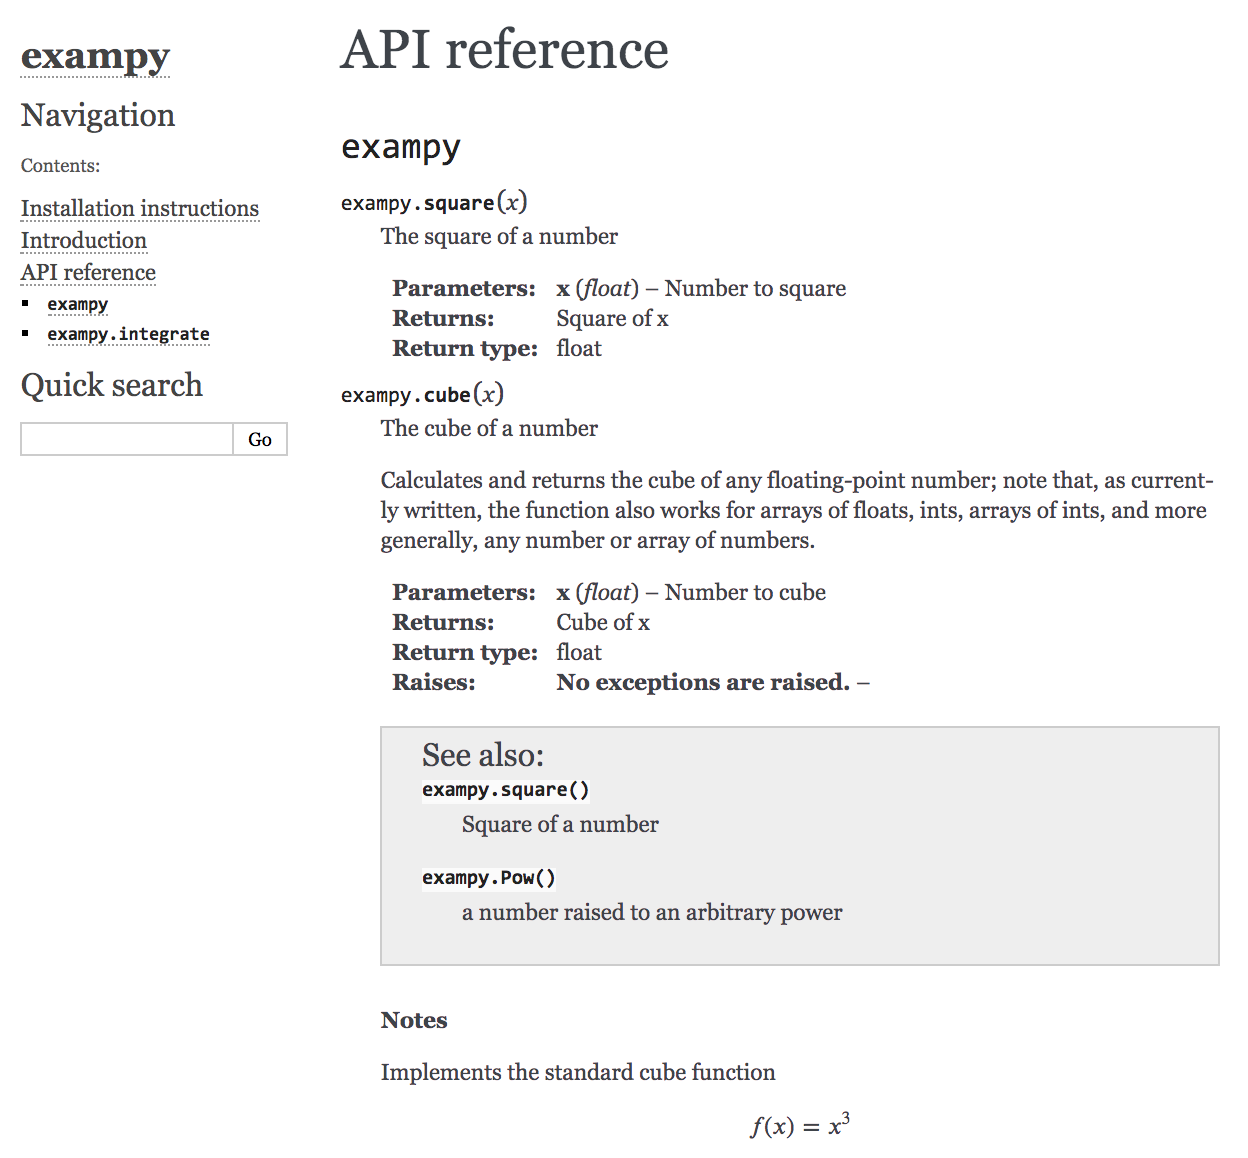
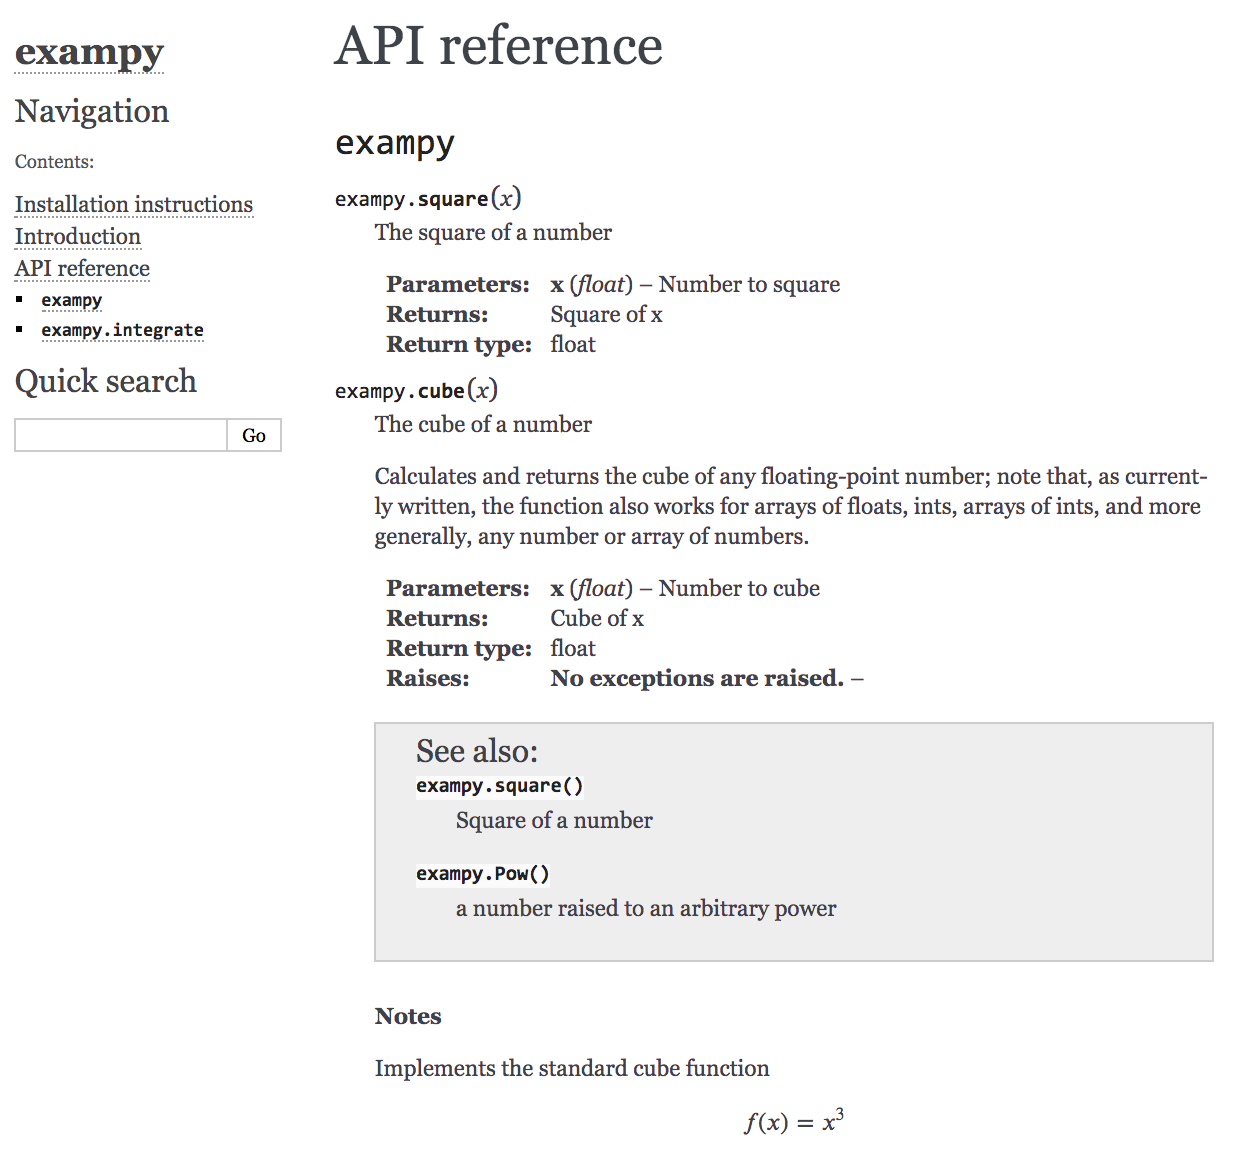
As a full example, we implement a docstring for a new exampy.cube function that computes the cube of a number, which is located in exampy/_math.py (see Chapter 2) and display it here:
[6]:
print(exampy.cube.__doc__)
The cube of a number

Calculates and returns the cube of any floating-point number;
note that, as currently written, the function also works for
arrays of floats, ints, arrays of ints, and more generally,
any number or array of numbers.

Parameters
----------
x: float
    Number to cube

Returns
-------
float
    Cube of x

Raises
------
No exceptions are raised.

See Also
--------
exampy.square: Square of a number
exampy.Pow: a number raised to an arbitrary power

Notes
-----
Implements the standard cube function

.. math:: f(x) = x^3

History:

2020-03-04: First implementation - Bovy (UofT)


References
----------
.. [1] A. Mathematician, "x to the p-th power: squares, cubes, and their
   general form," J. Basic Math., vol. 2, pp. 2-3, 1864.
In the Notes section here, I also illustrate how LaTeX math can be used to typeset equations (more on that below).
That docstrings are simply a submodule/function/class/method’s __doc__ attribute means that they can be generated, parsed, and modified programatically. That is, you can also specify a docstring by explicitly setting the __doc__ attribute, you can automatically extract information from the docstring by parsing it as you can any string in Python, or you can modify the docstring (e.g., adding additional information to it). This is, for example, useful when you are defining functions
programatically, e.g., automatically defining a set of functions with similar functionality; then you can add documentation to these automatically generated functions by explicitly setting their __doc__ attribute. For example, we set the docstring for the exampy.integrate submodule by editing exampy/integrate/__init__.py to be
__doc__= """exampy.integrate: submodule with utilities for calculating
the integral of functions"""
from ._integrate import *
When we then do
[7]:
?exampy.integrate
We get a message that says something like
Type:        module
String form: <module 'exampy.integrate' from '/PATH/TO/exampy/exampy/integrate/__init__.py'>
File:        /PATH/TO/exampy/exampy/integrate/__init__.py
Docstring:
exampy.integrate: submodule with utilities for calculating
the integral of functions
that is, we see that the docstring was correctly attached.
As an example of documenting a class, we add a Pow class to exampy/_math.py to calculate an arbitrary power of a number. We add an __init__ function to setup the power to raise numbers to and a __call__ function to raise a number to the object’s power. With documentation, the class looks as follows
class Pow(object):
    """A class to compute the power of a number"""
    def __init__(self,p=2.):
        """Initialize a PowClass instance

Parameters
----------
p: float, optional
    Power to raise x to
"""
        self._p= p

    def __call__(self,x):
    """Evaluate x^p

Parameters
----------
x: float
    Number to raise to the power p

Returns
-------
float
    x^p
"""
        return x**self._p
We see that we follow the class definition statement class Pow(object): with a docstring that briefly describes what the class does and then we document the two methods __init__ and __call__ just as we would normal functions, leaving the self argument undocumented. If we ask for the docstring of a class instance, we get the overal class docstring:
[8]:
po= exampy.Pow(p=4.)
print(po.__doc__)
A class to compute the power of a number
if we ask for the help for the class, we get the class docstring and the docstring for how to initialize the function:
[9]:
?exampy.Pow
gives something like
Init signature: exampy.Pow(p=2.0)
Docstring:      A class to compute the power of a number
Init docstring:
Initialize a PowClass instance

Parameters
----------
p: float, optional
    Power to raise x to
File:           /PATH/TO/exampy/exampy/_math.py
Type:           type
Subclasses:
and it we ask for the help for the instance, we get all three docstrings, because calling the instance is also how you access the __call__ method:
[10]:
?po
gives something that looks like
Signature:      po(x)
Type:           Pow
String form:    <exampy._math.Pow object at 0x1179e2c18>
File:           /PATH/TO/exampy/exampy/_math.py
Docstring:      A class to compute the power of a number
Init docstring:
Initialize a PowClass instance

Parameters
----------
p: float, optional
    Power to raise x to
Call docstring:
Evaluate x^p

Parameters
----------
x: float
    Number to raise to the power p

Returns
-------
float
    x^p
At the risk of sounding like a broken record, I will once more repeat that you should write these docstrings as soon as you implement a function and ideally before you implement it and you should implement a full docstring of your preferred format from the get-go. If you do this enough times, it will become second nature and you will not even be able to imagine writing code and documentation in any other way!
4.3. Using sphinx to write and generate documentation for your package
Docstrings are the way to document each submodule, function, class, and method that your package consists of, but if you want to go further and create an (online) manual, more work is required. The main tool used for this in the Python eco-system is sphinx, which was originally created for the documentation of the Python language and standard library itself, but it is a very general documentation system that can be used for any Python package and beyond. These notes, for example, are created using sphinx.
There are many ways to install sphinx, but the easiest way is to simply install sphinx from PyPI as
pip install sphinx
In addition to the basic sphinx package, additional sphinx functionality can be obtained by installing a variety of extensions, some of which I will discuss below.
sphinx uses the reStructuredText mark-up language for writing documentation pages that can be rendered as HTML, LaTeX, or any of a large number of other formats. Thus, a single manual written in reStructuredText can be used to create online HTML help pages, a PDF manual, an e-book version, etc. The PDF version of these notes that is linked on the Contents page is generated from the same underlying files as the HTML version. reStructuredText is similar in spirit to the Markdown mark-up language that is typically used for READMEs and that can be used in GitHub Issues and Pull Request comments, but in detail has a different syntax. I will cover the basics of reStructuredText as part of the discussion in this chapter, but these notes do not try to give a full overview of reStructuredText.
The easiest way to get started with building a sphinx manual for your package is to create a directory that will contain the manual in the top-level directory of your code, named doc/ or docs/. For example, for the exampy example package, our top-level directory looks now as follows
TOP-LEVEL_DIRECTORY/
    docs/
    exampy/
    README.md
    setup.py
Then go into the docs/ directory and start the sphinx manual by running
sphinx-quickstart
This script asks you a few basic questions to set up the skeleton of the manual. It asks whether you want to “Separate source and build directories (y/n) [n]”, which is to say, either have separate source/ and build/ directories containing the manual’s source (which you will edit) and the manual’s builds for different formats (which are automatically generated); alternatively, if you say “n”, the builds will go into a _build/ sub-directory of the source/ directory. The current
default is the latter, but I strongly prefer separating the source/ and build/ directories to keep a clean separation between source and automatically-generated builds (for one thing, this makes managing your documentation’s changes with git much easier, because you will not as easily accidentally add built files to the git repository).
Next, the script asks for the project’s name, which typically should be the name of your package (exampy in our example case); the author’s name; the current release (typically you should start with “0.0.1” or “0.1” depending on how fine-grained you want to version your code), and the language of your documentation. All of these can be changed later (some more easily than others). After this, sphinx sets up the basic structure of the manual and how to build it: for the current version of
sphinx, the contents of the docs/ directory after running sphinx-quickstart is
build/
source/
    _static/
    _templates/
    conf.py
    index.rst
Makefile
make.bat
Here, the Makefile and make.bat are files that allow different formats of your documentation to be built using make, the standard build tool. The build/ directory is initially empty and will contain builds of different formats of your manual; for example, later it will contain a html/ directory with the HTML version of your manual and perhaps a latex/ directory with the LaTeX and PDF versions of your manual.
The source/ directory is where you write the manual itself as a set of reStructuredText (.rst) files. sphinx-quickstart has populated a skeleton for the main index page of your manual that is its entry page and lists its contents, it looks something like
.. exampy documentation master file, created by
   sphinx-quickstart on Wed Mar  4 20:11:34 2020.
   You can adapt this file completely to your liking, but it should at least
   contain the root `toctree` directive.

Welcome to exampy's documentation!
==================================

.. toctree::
   :maxdepth: 2
   :caption: Contents:


Indices and tables
==================

* :ref:`genindex`
* :ref:`modindex`
* :ref:`search`
The statement following the .. directive is a comment that is not displayed in the manual. All reStructuredText directives start with .., these directives are used for figures, code examples, math, etc. The “Welcome to exampy’s documentation!” is the main title header on the page and title headers in reStructuredText are indicated by a style of underlining (here “=======”); note that there is no specific order of
different underlining styles for different types of headers, reStructuredText automatically figures out what the hierarchy is based on the different styles that you use (so you can use “=======” for the first, main header, then use ‘——–’ for each sub-title within this section, another “======” underlined title for a second title at the highest-level, and more “——’ sub-titles below that, perhaps even a ‘**********’ underlined sub-sub-title…).
The .. toctree:: directive is the most important part of the index page and it contains the main table of contents as a set of files that contain the documentation: a sphinx manual is a set of pages that are all part of some table-of-contents (some toctree), either listed in this main table of contents, or in a .. toctree:: directive that gives a table of contents on a page included in the main toctree. sphinx does not like pages that are not part of any toctree directive
and it will warn if it encounters one of these; these pages will still be processed and you can link to them, but sphinx won’t include a link to them automatically. To populate the toctree we will create a set of pages in the source/ directory, such as installation.rst, intro.rst, etc. and to include these in the manual, the main toctree looks like
.. toctree::
   :maxdepth: 2
   :caption: Contents:

   installation.rst
   intro.rst
Note that it is not necessary to include the .rst part of the filename, but when you are including different types of files (as we will discuss below), it is useful to make it explicit what the format of each page is. When you include the manual’s chapters like this, sphinx automatically grabs the titles from each file to make an entry in the table of contents, but you can also specify a custom title here, by doing
.. toctree::
   :maxdepth: 2
   :caption: Contents:

   Installation instructions <installation.rst>
   intro.rst
The toctree directive has many options. For example, the :maxdepth: 2 option specifies that the displayed table of contents should include the main sections of each page (like for the table of contents of these notes); setting it to 1 would only include the title of each page/chapter, setting it to 3 would include subsections. Some of the more commonly used options are
:caption: A CAPTIONa caption for the table of contents; used as the title of the table-of-contents part of the page.:numbered:by default, entries in the table of contents are not numbered, but setting this option numbers them.:name: a_namea name to use to reference the table of contents, that is, to create internal links to the table of contents using the:ref:mechanism discussed below
The final part of the automatically-generated index page is “Indices and tables”, which contains an automatically-generated index and search function. I don’t personally find these very useful typically and they can be removed from the index.rst file to remove them from the manual without any adverse affect.
The two directories _static/ and _templates/ that sphinx-quickstart generated in the source/ directory are empty. For most basic documentation needs, you will not need to populate these, but they are used to: store “static” files in _static/ such as css style files to customize the look of your manual’s HTML page or any extra Javascript code that you might want to use on your manual’s HTML page (this is not typical); and to store changes to the default page templates that
sphinx uses to create HTML, etc. pages from your reStructuredText source. sphinx is highly customizable, but typical users do not need to worry about all of these customization options and directories.
Finally, sphinx-quickstart created a conf.py file in the source/ directory. This is the configuration file for your manual, which is a Python script itself and which tells sphinx how to build your manual. At first, it looks like
# Configuration file for the Sphinx documentation builder.
#
# This file only contains a selection of the most common options. For a full
# list see the documentation:
# https://www.sphinx-doc.org/en/master/usage/configuration.html

# -- Path setup --------------------------------------------------------------

# If extensions (or modules to document with autodoc) are in another directory,
# add these directories to sys.path here. If the directory is relative to the
# documentation root, use os.path.abspath to make it absolute, like shown here.
#
# import os
# import sys
# sys.path.insert(0, os.path.abspath('.'))


# -- Project information -----------------------------------------------------

project = 'exampy'
copyright = '2020, Jo Bovy'
author = 'Jo Bovy'

# The full version, including alpha/beta/rc tags
release = '0.1'


# -- General configuration ---------------------------------------------------

# Add any Sphinx extension module names here, as strings. They can be
# extensions coming with Sphinx (named 'sphinx.ext.*') or your custom
# ones.
extensions = [
]

# Add any paths that contain templates here, relative to this directory.
templates_path = ['_templates']

# List of patterns, relative to source directory, that match files and
# directories to ignore when looking for source files.
# This pattern also affects html_static_path and html_extra_path.
exclude_patterns = []


# -- Options for HTML output -------------------------------------------------

# The theme to use for HTML and HTML Help pages.  See the documentation for
# a list of builtin themes.
#
html_theme = 'alabaster'

# Add any paths that contain custom static files (such as style sheets) here,
# relative to this directory. They are copied after the builtin static files,
# so a file named "default.css" will overwrite the builtin "default.css".
html_static_path = ['_static']
At first, this configuration file basically just contains the info that you provided to sphinx-quickstart: the name of the project, the author, a copyright string created from the current year and the given author, and the version that you provided. Then there is a section for any sphinx extension that you use (like the ones that I discuss below) and a statement about templates being in the _templates/ directory. The last section is specific to the HTML build of the manual: the theme
(default: alabaster, but there are many theme options) and the path where additional static files are located (the _static/ directory discussed above). If you are creating other formats as well and want to customize these, you can add sections for LaTeX output etc. below this. A full list of options for the conf.py file is available
here. The conf.py file is a list of Python commands and it is executed whenever the documentation is built; this allows you to run arbitrary Python code during the build of your manual (e.g., this is how these notes add the git revision hash for the current version on the main page and in the PDF filename).
To create the documentation, we use make. Simply running make in the docs/ directory returns a list of make options:
make
gives
Sphinx v2.2.0
Please use `make target' where target is one of
  html        to make standalone HTML files
  dirhtml     to make HTML files named index.html in directories
  singlehtml  to make a single large HTML file
  pickle      to make pickle files
  json        to make JSON files
  htmlhelp    to make HTML files and an HTML help project
  qthelp      to make HTML files and a qthelp project
  devhelp     to make HTML files and a Devhelp project
  epub        to make an epub
  latex       to make LaTeX files, you can set PAPER=a4 or PAPER=letter
  latexpdf    to make LaTeX and PDF files (default pdflatex)
  latexpdfja  to make LaTeX files and run them through platex/dvipdfmx
  text        to make text files
  man         to make manual pages
  texinfo     to make Texinfo files
  info        to make Texinfo files and run them through makeinfo
  gettext     to make PO message catalogs
  changes     to make an overview of all changed/added/deprecated items
  xml         to make Docutils-native XML files
  pseudoxml   to make pseudoxml-XML files for display purposes
  linkcheck   to check all external links for integrity
  doctest     to run all doctests embedded in the documentation (if enabled)
  coverage    to run coverage check of the documentation (if enabled)
The option you will use most commonly for online software documentation is:
make html
which creates the HTML version of your manual in the build/html/ directory (or in the source/_build/html/ directory if you did not separate the build/ and source/ directories. For the basic version created by sphinx-quickstart, this creates an index page that looks like
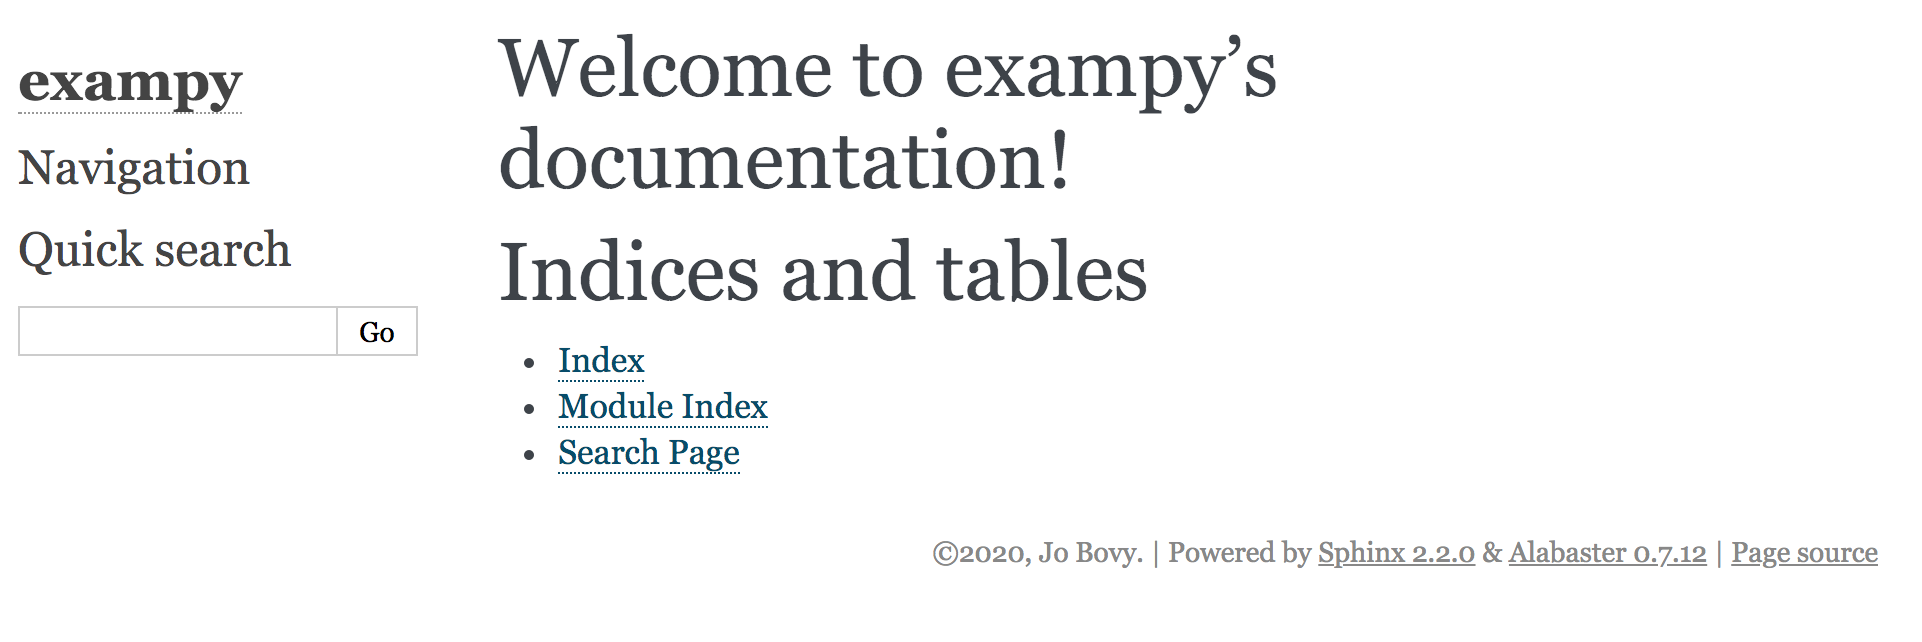
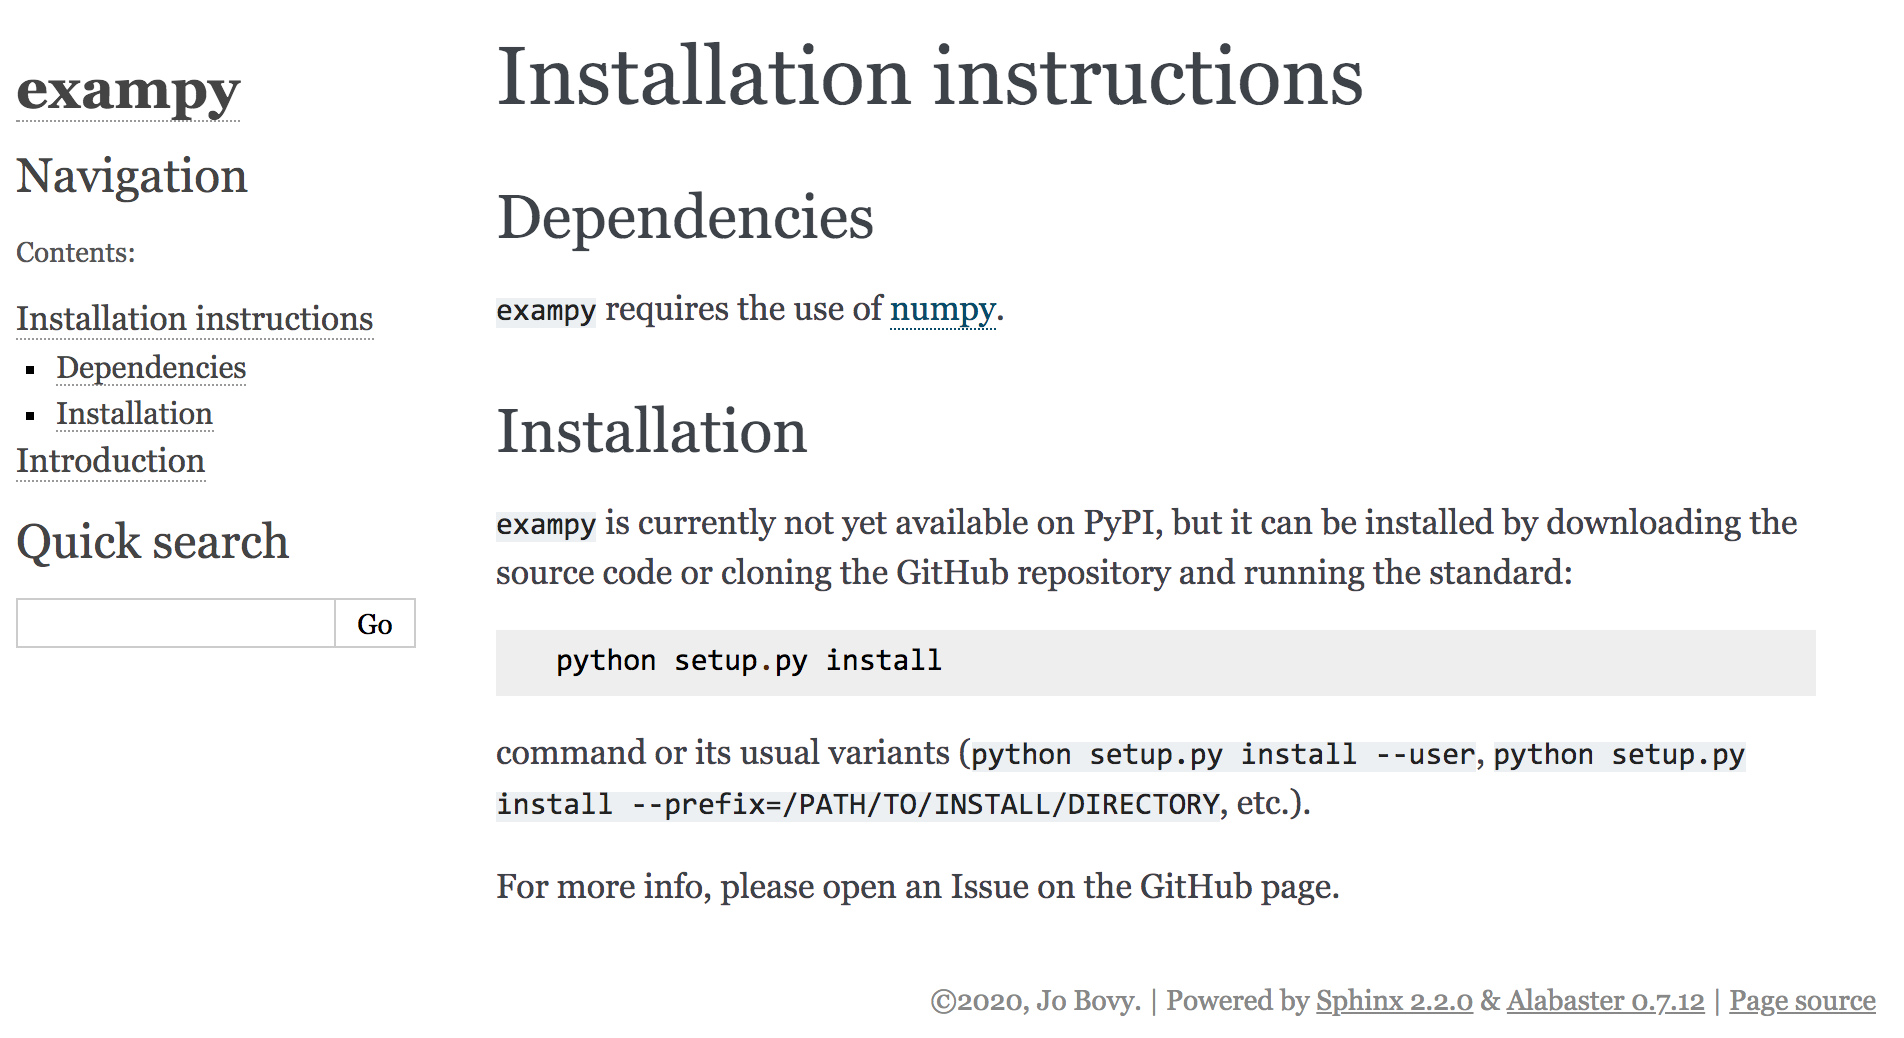
We then start writing the documentation, starting with adding the installation.rst and intro.rst files that I mentioned above. The installation.rst file contains the basic installation instructions and looks like
Installation instructions
=========================

Dependencies
------------

``exampy`` requires the use of `numpy <https://numpy.org/>`__.

Installation
------------

``exampy`` is currently not yet available on PyPI, but it can be
installed by downloading the source code or cloning the GitHub
repository and running the standard::

       python setup.py install

command or its usual variants (``python setup.py install --user``,
``python setup.py install --prefix=/PATH/TO/INSTALL/DIRECTORY``,
etc.).

For more info, please open an Issue on the GitHub page.
where I use the different underlining styles of headers discussed above to create a main page title and two sections. The first sentence contains a link to an external website, the numpy website in this case. The words enclosed in “``” highlight them as “code” and the separate indented line following a double colon “::” give a code block, which will be type-set in a special way (this indented block can consist of multiple lines for a multi-line code-block). Code blocks can also be created
using the .. code-block:: directive, which sets the highlighting language (default: Python) and then gives the code example, e.g.,
.. code-block:: python

    python setup.py install
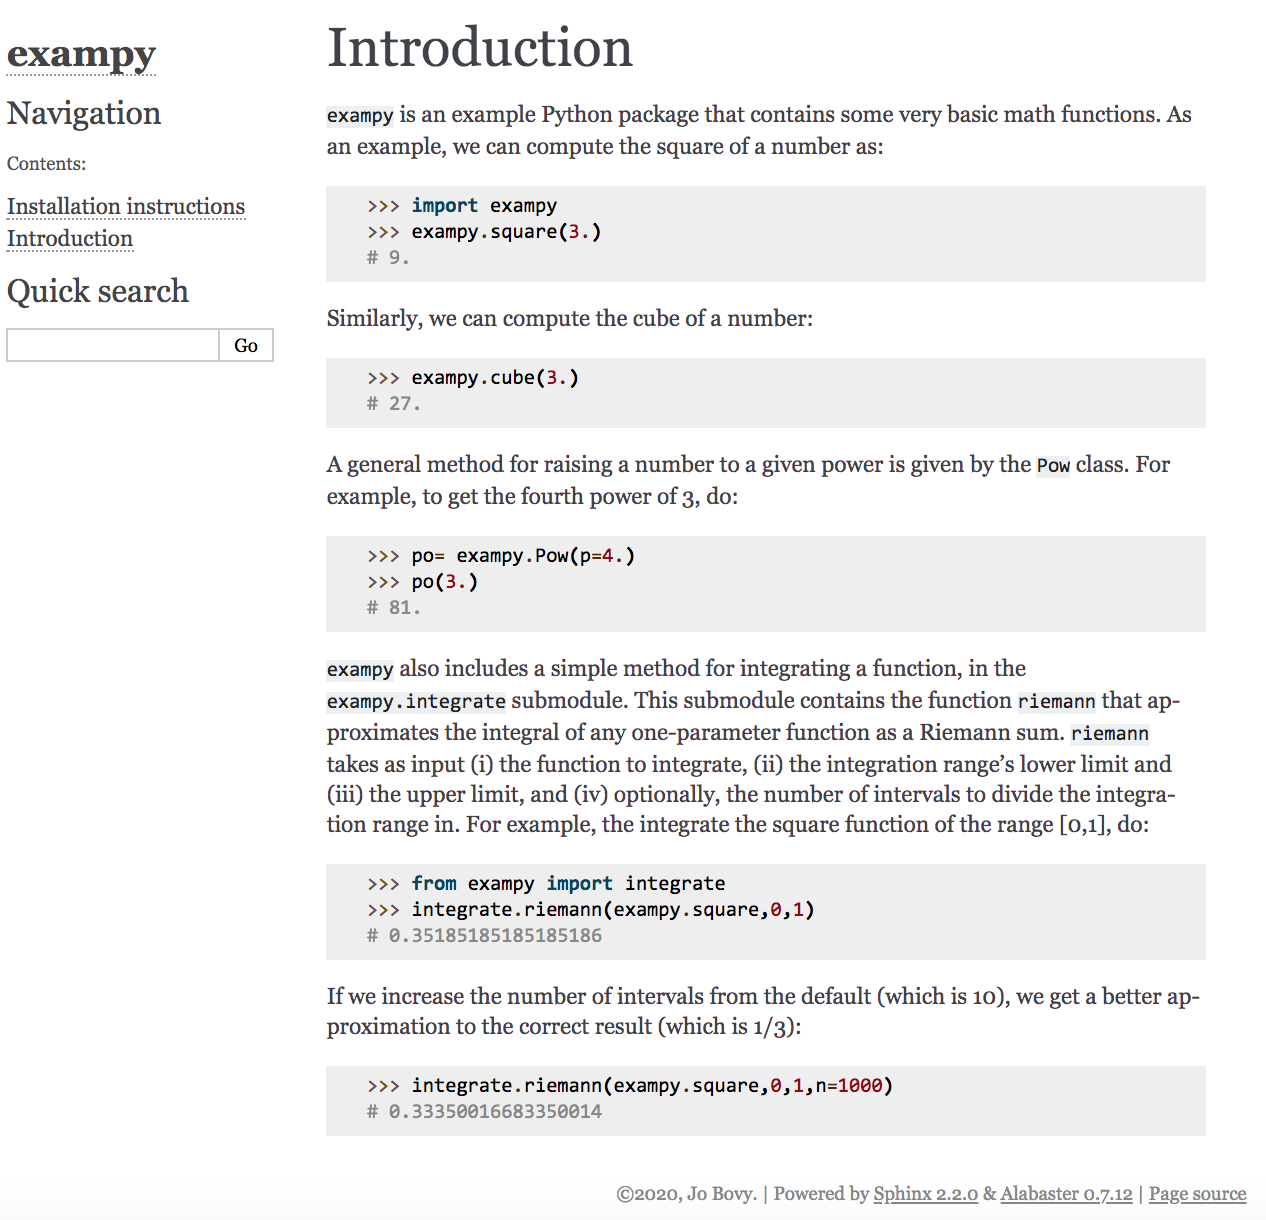
instead of the indented statement following “::” above. This is illustrated further in the intro.rst page, which looks like
Introduction
============

``exampy`` is an example Python package that contains some very basic math
functions. As an example, we can compute the square of a number as::

       >>> import exampy
       >>> exampy.square(3.)
       # 9.

Similarly, we can compute the cube of a number:

.. code-block:: python

   >>> exampy.cube(3.)
   # 27.

A general method for raising a number to a given power is given by the
``Pow`` class. For example, to get the fourth power of 3, do::

    >>> po= exampy.Pow(p=4.)
    >>> po(3.)
    # 81.

``exampy`` also includes a simple method for integrating a function,
in the ``exampy.integrate`` submodule. This submodule contains the
function ``riemann`` that approximates the integral of any
one-parameter function as a Riemann sum. ``riemann`` takes as input
(i) the function to integrate, (ii) the integration range's lower
limit and (iii) the upper limit, and (iv) optionally, the number of
intervals to divide the integration range in. For example, the
integrate the square function of the range [0,1], do::

      >>> from exampy import integrate
      >>> integrate.riemann(exampy.square,0,1)
      # 0.35185185185185186

If we increase the number of intervals from the default (which is 10),
we get a better approximation to the correct result (which is 1/3)::

   >>> integrate.riemann(exampy.square,0,1,n=1000)
   # 0.33350016683350014
Here, I list the expected output with a comment such that these code-blocks can be copied verbatim into a Python interpreter or into a jupyter notebook cell without raising an error. An interactive Python session is represented by including the “>>>” prompt; this can be copied into the Python interpreter or into jupyter notebook cells without any problem.
We then also include the installation.rst and intro.rst pages into the toctree directive in index.rst as explained above and after that we run make html to get a set of pages that looks as follows: index.html:
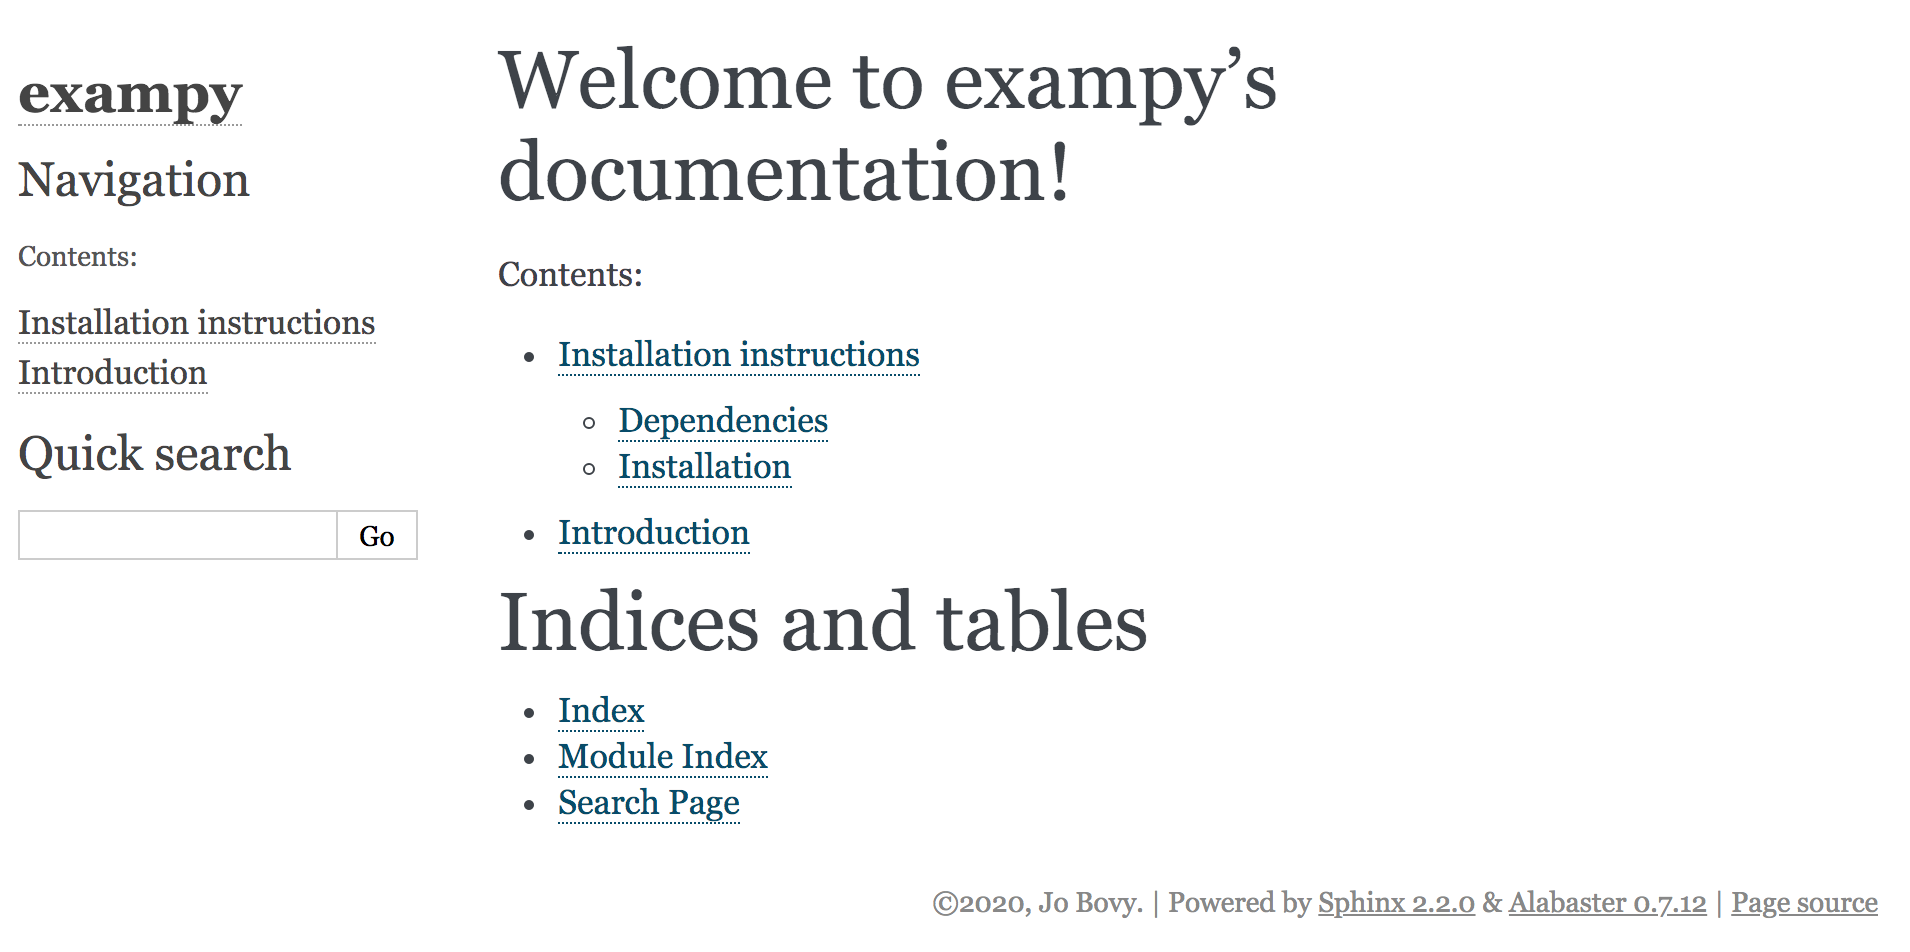
where we see that the different sections in installation.rst are included because we set :maxdepth: 2 in the toctree directive. The installation.html is:
and intro.html:
Thus, we now have the basic structure of a manual for our software package, which we can expand upon by adding material and by adding pages. To make the manual more useful and attractive, I give a brief overview of some commonly-used reStructuredText features that help with this and then describe how to automatically include docstrings from your code as part of the documentation.
4.4. A brief tour of reStructuredText
reStructuredText has many features that you can all use in sphinx documentation and these notes do not intend to give a comprehensive overview of these. The objective of this brief section is to get you underway with the most commonly used features of reStructuredText when building documentation; consult reStructuredText documentation and guides to learn about more advanced functionality. A good quick-start guide is available on the reStructuredText webpage, where you can also find full documentation and a cheat sheet.
As I have already discussed above, the basic lay-out of a reStructuredText page is set by headings that are indicated by underlined lines. The type of symbol that you use to underline does not matter, reStructuredText automatically figures out the hierarchy of titles and sub-titles based on your use of different underline styles (”——” or “+++++++” or “========” or ….); this of course requires you to use these consistently! If reStructuredText outputs a hierarchy that you did not intend, you probably made a mistake in the consistency of your underline styles.
Basic italic emphasis is done by enclosing a word or sentence in single * as “*emphasize this*” (rendered as emphasize this); bold emphasis is obtained by enclosing in double ** as “**strongly emphasize this**” (rendered as strongly emphasize this). Double back-quotes are used for fixed-width formatting, such as used when displaying inline code or as another way of emphasis (as used often in these notes): “``fixed-width code/emphasis``” (rendered as fixed-width code/emphasis).
Lists start with a new paragraph (i.e., two line breaks) and are then simply a numbered or asterisked set of paragraphs. For example, this is an unnumbered list
* First list item

* Second list item

* Third list item
which is rendered as
First list item
Second list item
Third list item
To get a numbered list, use numbers, e.g.,
1. First list item

2. Second list item

3. Third list item
which is rendered as
First list item
Second list item
Third list item
Instead of a simple number like this, you can use upper- and lowercase letters, upper- and lowercase roman numerals, and you can add a closing parenthesis “)” or enclose the entire number/letter in parentheses.
Block quotes are done with indentation, e.g. “
Lists start with a new paragraph (i.e., two line breaks) and are then simply a numbered or asterisked set of paragraphs. For example, this is an unnumbered list
(Python code packaging for scientific software, Jo Bovy).”
As already discussed above, code blocks can be written in two ways: (i) by ending the previous paragraph in a double colon “::” and having an indented code block, e.g.,
Using ``exampy``, we can compute the square of a number as::

    import exampy
    exampy.square(3.)
    # 9.
This uses the default syntax highlighting language, which can be specified in the conf.py file by setting the highlight_language parameter and by default is currently essentially Python. Alternatively, you can insert a code block using the code-block directive where you can also directly specify the language if you want it to be different from the default for a specific code block:
- .. code-block:: language
used as
Using ``exampy``, we can compute the square of a number as:

.. code-block:: python3

    import exampy
    exampy.square(3.)
    # 9.
Both of these will render as “Using exampy, we can compute the square of a number as:
import exampy
exampy.square(3.)
# 9.
“
Images can be included using the image directive that looks like
- .. image:: image_filename.ext
which includes the image file with name image_filename.ext; options are
- .. image:: image_filename.ext
- :alt: alternate text for the image (like in HTML)
- :height: height of the image (in length units or % of original)
- :width: width of the image (in length units or % of original
- :scale: integer percentage to scale height and width with
- :align: "top", "middle", "bottom", "left", "center", or "right"
- :target: if set, make the image a hyperlink to this URL.
Typically, you should keep images in a separate directory in your source/ directory; you do not need to tell sphinx about these in any way, sphinx will figure out that this directory exists and copy over its relevant content. As an example, the first webpage image on this page was include using
.. image:: images/first-doc-index.png
    :width: 66%
    :align: center
You can also include LaTeX math in your manual, LaTeX builds will display this correctly and, using the MathJax Javascript library, LaTeX math can also be rendered in webpages; to include MathJax support, you need to add the sphinx.ext.mathjax extension to your conf.py’s extensions list. Then you can include inline math using the :math: directive as
An example of an inline math equation is Euler's identity :math:`e^{i\pi}+1 = 0` for complex numbers.
which is rendered as “An example of an inline math equation is Euler’s identity \(e^{i\pi}+1 = 0\) for complex numbers.” We can also display equations on separate lines or an entire math block using the math directive:
Euler's identity is

.. math::

    e^{i\pi}+1 = 0
which is rendered as
“ Euler’s identity is
\[e^{i\pi}+1 = 0\]
“
While you should avoid too much complex LaTeX math in docstrings, because they are often read as pure text, the manual is typically read as a HTML page with properly typeset math, so you should feel free to use as much LaTeX math as is necessary.
Finally, you likely want to include links to external webpages and internal links to other sections. External links in reStructuredText have the format `link text <link-url>`__. Internal links are a little trickier. If you want to link internally to a section or other part of the manual, you first need to create a label, for example,
.. _install-dependencies:

Dependencies
------------

``exampy`` requires the use of `numpy <https://numpy.org/>`__.
which could be part of the installation.rst file. Then, you can internally link to this section as :ref:`install-dependencies`, that is, using the name without the initial underscore. If you link to anything that isn’t right before a section as in the example above, you need to give the link a title to be displayed as :ref:`Link title <label-name>, where label-name is again the name that you used to label without the leading underscore.
A full list of possible reStructuredText directives is available here.
4.5. Including docstrings into the sphinx documentation
So far, the manual consists solely as manually-written help pages with notes on installation, a quick-start guide, and any examples and tutorials. However, the manual should also include a full reference of the documentation of all functions, classes, and methods in the software package: the API. One could write this manually as well, going through the code and making an API entry for each function, class, or method, copying the docstring by hand, but sphinx has tools to automatically extract docstrings that can be used to (semi-)automatically create the API. Besides requiring significantly less work to set up, this has the advantage that the function signatures and docstrings are always up-to-date with what’s written in the code package’s documentation itself.
As an example, we add a reference.rst file to the documentation that will contain the short API for the exampy package. sphinx’s automation tools for documenting packages are contained in the autodoc extension, which you can access by adding “sphinx.ext.autodoc” to the extensions list in your conf.py file (this extension is part of sphinx, so does not need to be installed separately). The autodoc
extension contains various autoX directives that will automatically grab your package’s docstrings and display them in the documentation. Commonly used ones are
- .. autofunction:: func
Display the docstring for the function
func
- .. autoclass:: a_class
Display the docstring for the class
a_class- :members: a list of member methods (e.g., method1,method2) to also document, that is, display the docstring for; if the :members: option is set without any arguments, all public members (those whose name does not start with an underscore) are shown. Without the :members: option, only the class docstring is displayed.
- .. automethod:: a_method
Display the docstring for the method
a_method
These directives have additional options that are discussed on the autodoc page, but that are not commonly used.
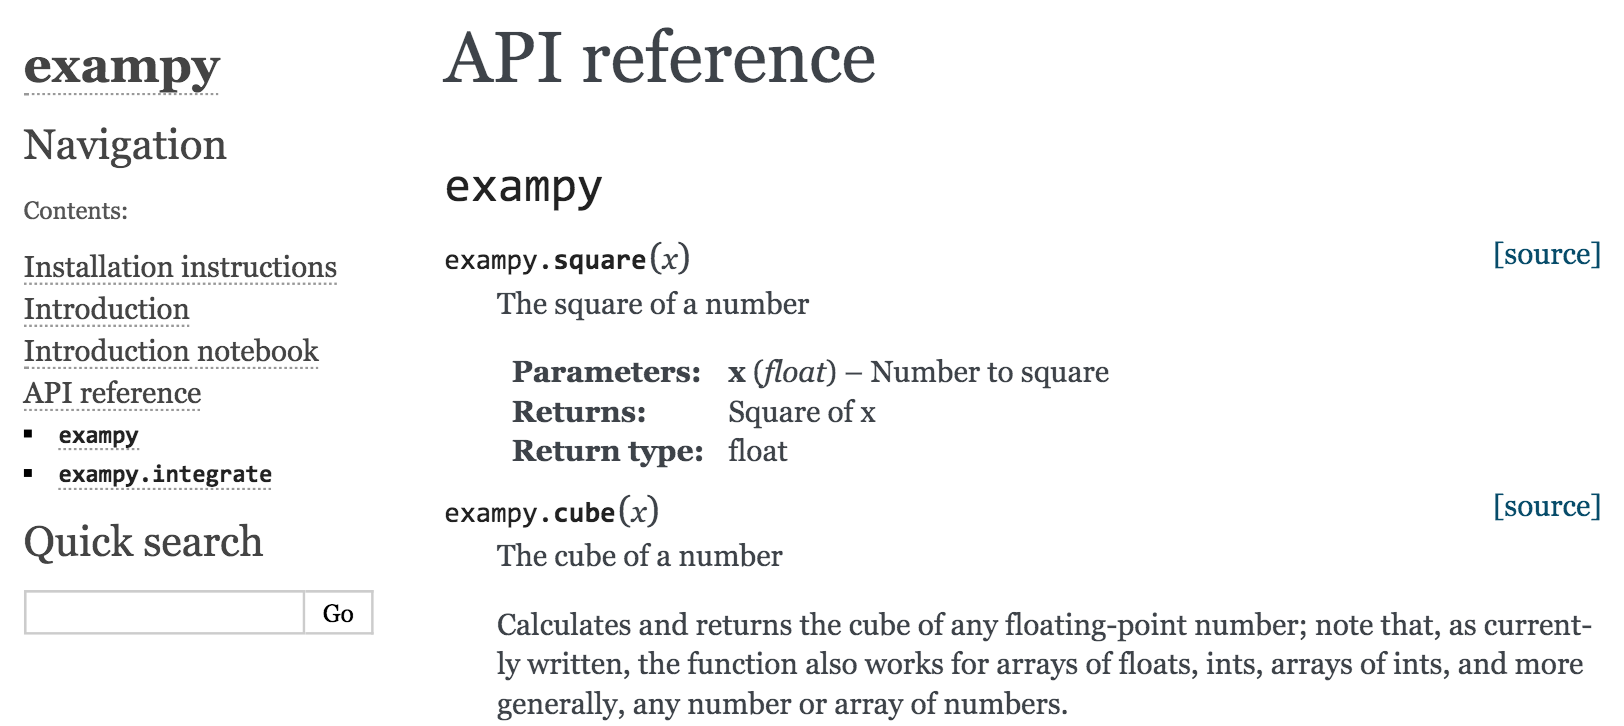
Let’s first create an API of just the functions in exampy with autofunction. A simple API is given by
API reference
=============

``exampy``
----------

.. autofunction:: exampy.square

.. autofunction:: exampy.cube

``exampy.integrate``
--------------------

.. autofunction:: exampy.integrate.riemann
Because we have used the numpy docstring style, we should add a further extension to create a nicely-formatted version of this docstring in the resulting documentation page, napoleon, an official sphinx extension that supports numpy docstrings (also part of sphinx itself and thus not requiring special installation). We add "sphinx.ext.napoleon" to the list of extensions in the conf.py file. After also
adding reference.rst in the toctree in the index.rst file and running make html, the following references.html page in the documentation is created:
As you can see, the docstrings have been correctly grabbed from the package itself and the napoleon extension creates a nicely-formatted listing of each. Also note how the functions in the “See Also” section are live links.
The autoclass directive works similar to the autofunction one. Without any further options, it simply displays the class’ docstring (that is, the docstring immediately following the class a_class(object): statement). You can document class members by listing them in the :members: option. For example, to document both a class and its initialization method, do
.. autoclass:: a_class
    :members: __init__
If you give the :members: option without specifying any members directly, all member methods will be included in the generated documentation. My recommendation is to always explicitly list the members that you want to document, such that you do not include members without knowing about it (similar to how one should never from package import *).
You can also document individual member methods of a class outside of an autoclass directive, essentially doing the same as with autofunction. For this, use automethod, which is the same as autofunction, except that you list the name of the as classname.methodname.
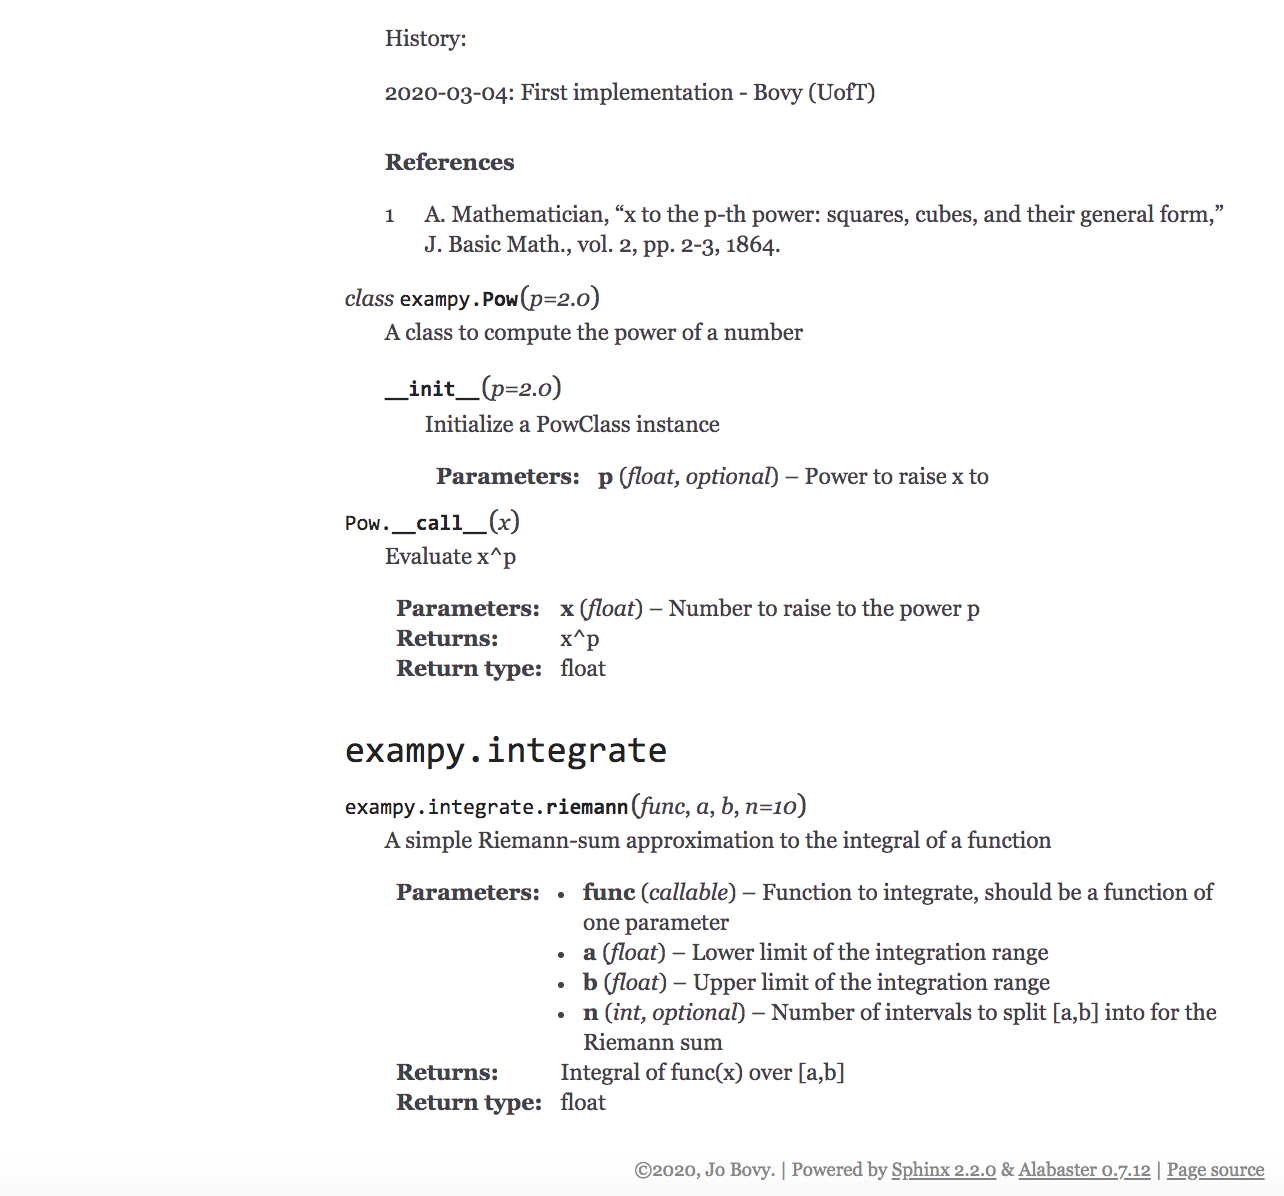
To illustrate autodoc’s handling of classes, we add documentation for the exampy.Pow class to the reference page, by updating it to
API reference
=============

``exampy``
----------

.. autofunction:: exampy.square

.. autofunction:: exampy.cube

.. autoclass:: exampy.Pow
   :members: __init__

.. automethod:: exampy.Pow.__call__

``exampy.integrate``
--------------------

.. autofunction:: exampy.integrate.riemann
which then creates
It is a matter of taste how exactly one lays out the API. Some packages, such as numpy and my own galpy package, use an individual page for each function, class, or method. That has the disadvantage of leading to a lot of files for a large package. Other options are to use a single page for everything (gets unwieldy) or a single page per submodule or class.
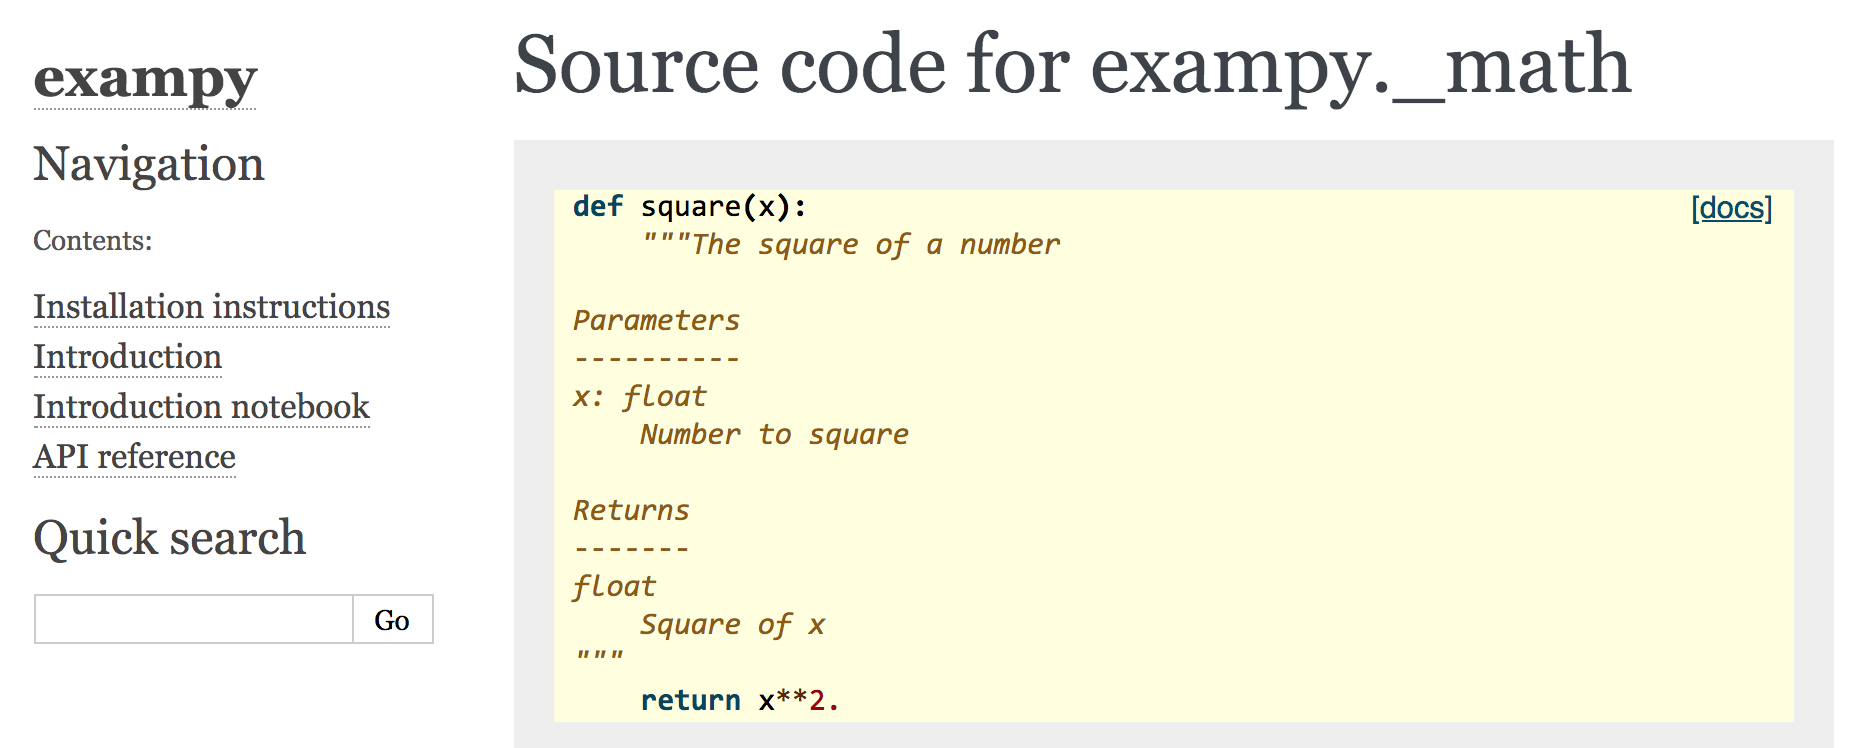
To encourage users of your code to look at the source code (e.g., when they run into issues), you can use the sphinx.ext.viewcode sphinx extension. When you add this built-in extension to the extensions list in your conf.py file, a link will be added to each documentation function, class, and method that leads to the source code for that function, class, and method. For example, for the API page that we created,
adding sphinx.ext.viewcode adds “[source]” links:
which when you click on them lead to, e.g.,
4.6. Including jupyter notebooks as part of your documentation
Up until now, the manual consists solely of a set of .rst files written in reStructuredText. However, it is also possible to generate documentation pages from jupyter notebooks. This has many advantages both from the standpoint of ease of writing the documentation and from making sure that the documentation is as accurate as possible. Writing (parts of) your documentation as a jupyter notebook allows you to run the code examples that you include directly, so you are sure that they
work without having to copy and paste code. You can also more easily include images, because jupyter notebooks can easily generate inline figures that are part of the notebook. Typesetting LaTeX math is also easier using jupyter notebooks, because you can directly see the result without having to compile the documentation using make. Using jupyter notebooks for your documentation’s pages is so convenient that even if you don’t include many code examples, they can still be a good
choice. Indeed, these notes themselves are written as a set of jupyter notebooks and you can see how they allow complex documentation to be written.
The easiest way to include jupyter notebooks in your documentation is by using the nbsphinx sphinx extension. After installing this extension with
python3 -m pip install nbsphinx
(using the additional --user option for a user-specific install), you can start including notebooks by simply adding “nbsphinx” to the extensions list in your conf.py file and then including .ipynb files in your documentation’s toctree(s) just as you would add .rst files. For example, the main toctree for these notes looks as follows:
.. toctree::
   :maxdepth: 2
   :caption: Contents:
   :numbered:

   01-Introduction.ipynb
   02-Package-Structure.ipynb
   03-git-and-GitHub.ipynb
   04-Documentation.ipynb
   05-Tests.ipynb
   06-Continuous-Integration.ipynb
   07-Package-Release.ipynb
The nbsphinx extension will automatically execute notebooks before rendering the documentation if no output cells are stored. Thus, if you clear the output of the notebook before saving it, nbsphinx will execute it and then render the documentation. This is a great feature to make sure that your documentation’s code examples exactly reflect what the current version of the code does (which with regular reStructuredText examples can be hard to keep up-to-date). However, if you store any
output, then automatic execution is turned off by default.
You can render almost anything in a standard jupyter notebook to sphinx-generated documentation: code cells and their output, Markdown cells, and raw cells in different formats. Note that when you are combining both notebooks and regular reStructuredText files, the fact that the standard text box in a notebook uses Markdown and not reStructuredText can get a little confusing (as it is in writing these notes where I have to use both Markdown and reStructuredText in the same notebook to
properly display all content!). But generally, any code, LaTeX, and images in the notebook will be seamlessly rendered as HTML, LaTeX, etc. pages.
The nbsphinx extension has many configuration values, which you typically can just leave at their defaults. These can be used to control how the notebooks are executed when they are automatically executed, and how to style notebook elements. One element that you may want to change is each code cell’s prompt, which shows up by default. To remove the prompt, set
nbsphinx_prompt_width = 0 # no prompts in nbsphinx
in the conf.py file. There is no easy way currently to remove the prompt from the generated LaTeX/PDF documentation.
When you are dealing with notebooks, you will also want to set
exclude_patterns = ['.ipynb_checkpoints/*']
in your conf.py file to tell sphinx to ignore the automatically-generated checkpoint files; without this, sphinx will process these files as well, which can lead to long build times, because these files often change. When you are dealing with notebooks in a git repository (which your documentation should be in), you will also want to install a git plugin to show nicely-formatted diffs of notebooks, because otherwise git diff will show you changes in the JSON file that is the
underlying representation of each notebook, which isn’t a particularly illuminating way to look at changes. Therefore, install nbdime for this purpose.
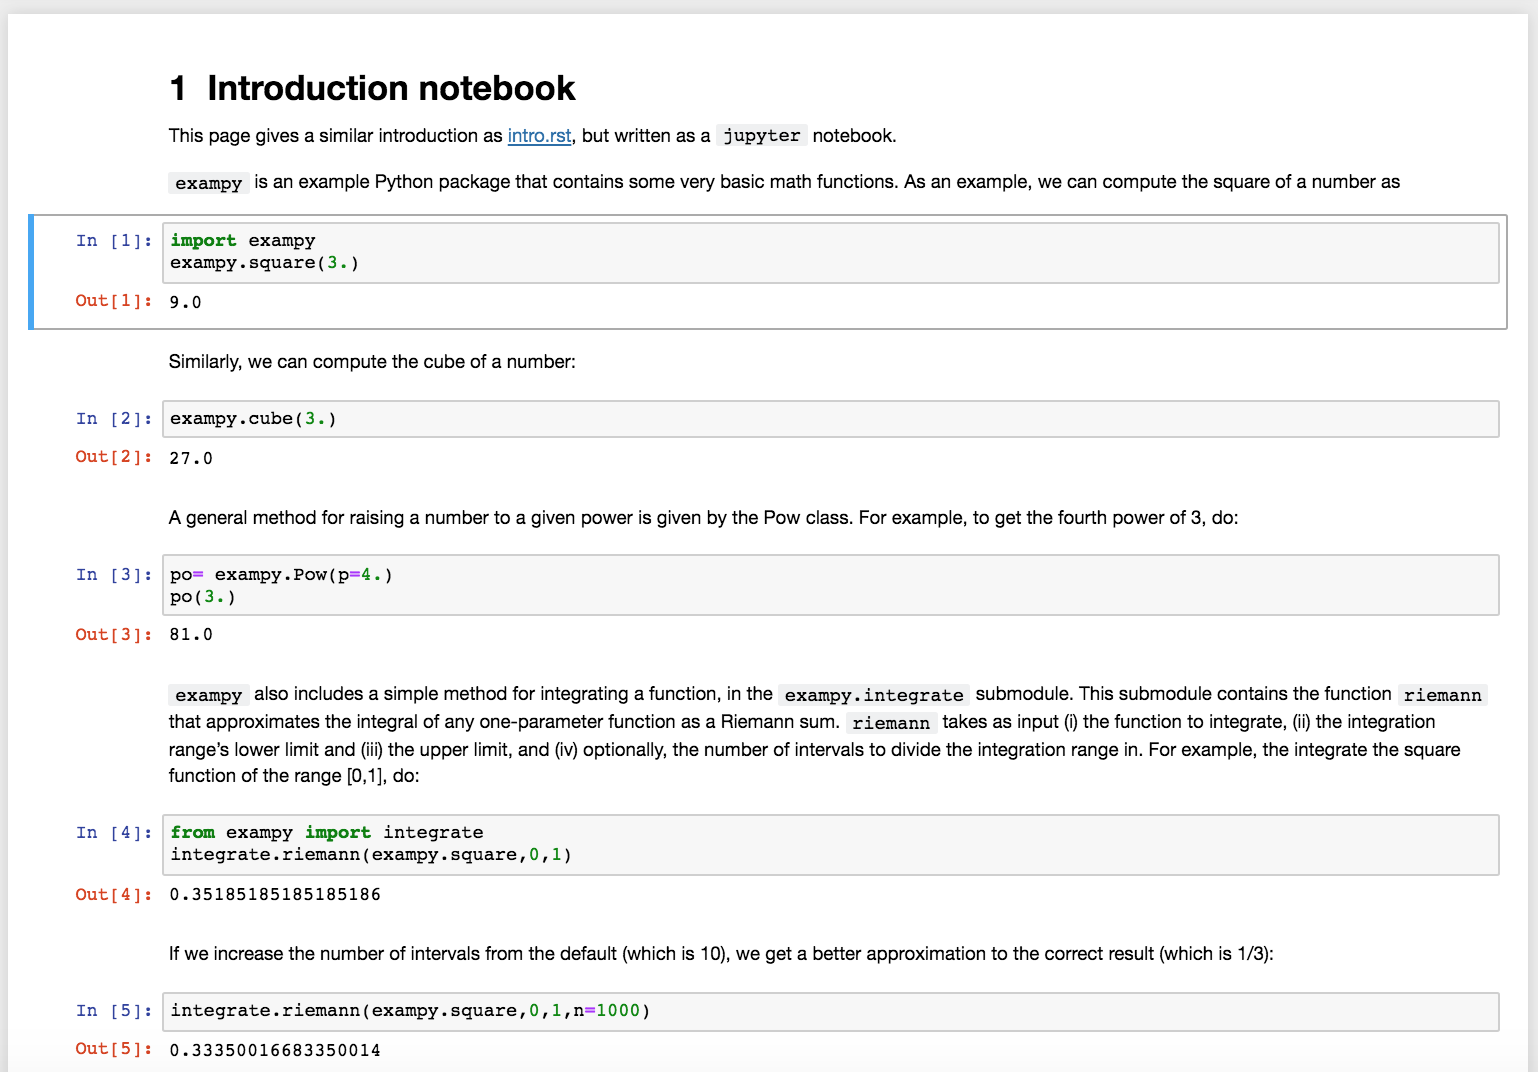
As an example, we write the intro.rst page that we created above as a jupyter notebook intro_notebook.ipynb that looks like
Adding this intro_notebook.ipynb file in the toctree in source/index.rst as
.. toctree::
   :maxdepth: 2
   :caption: Contents:

   installation.rst
   intro.rst
   intro_notebook.ipynb
   reference.rst
adding the nbsphinx extension in source/conf.py, and running make html then gives a documentation page that looks like
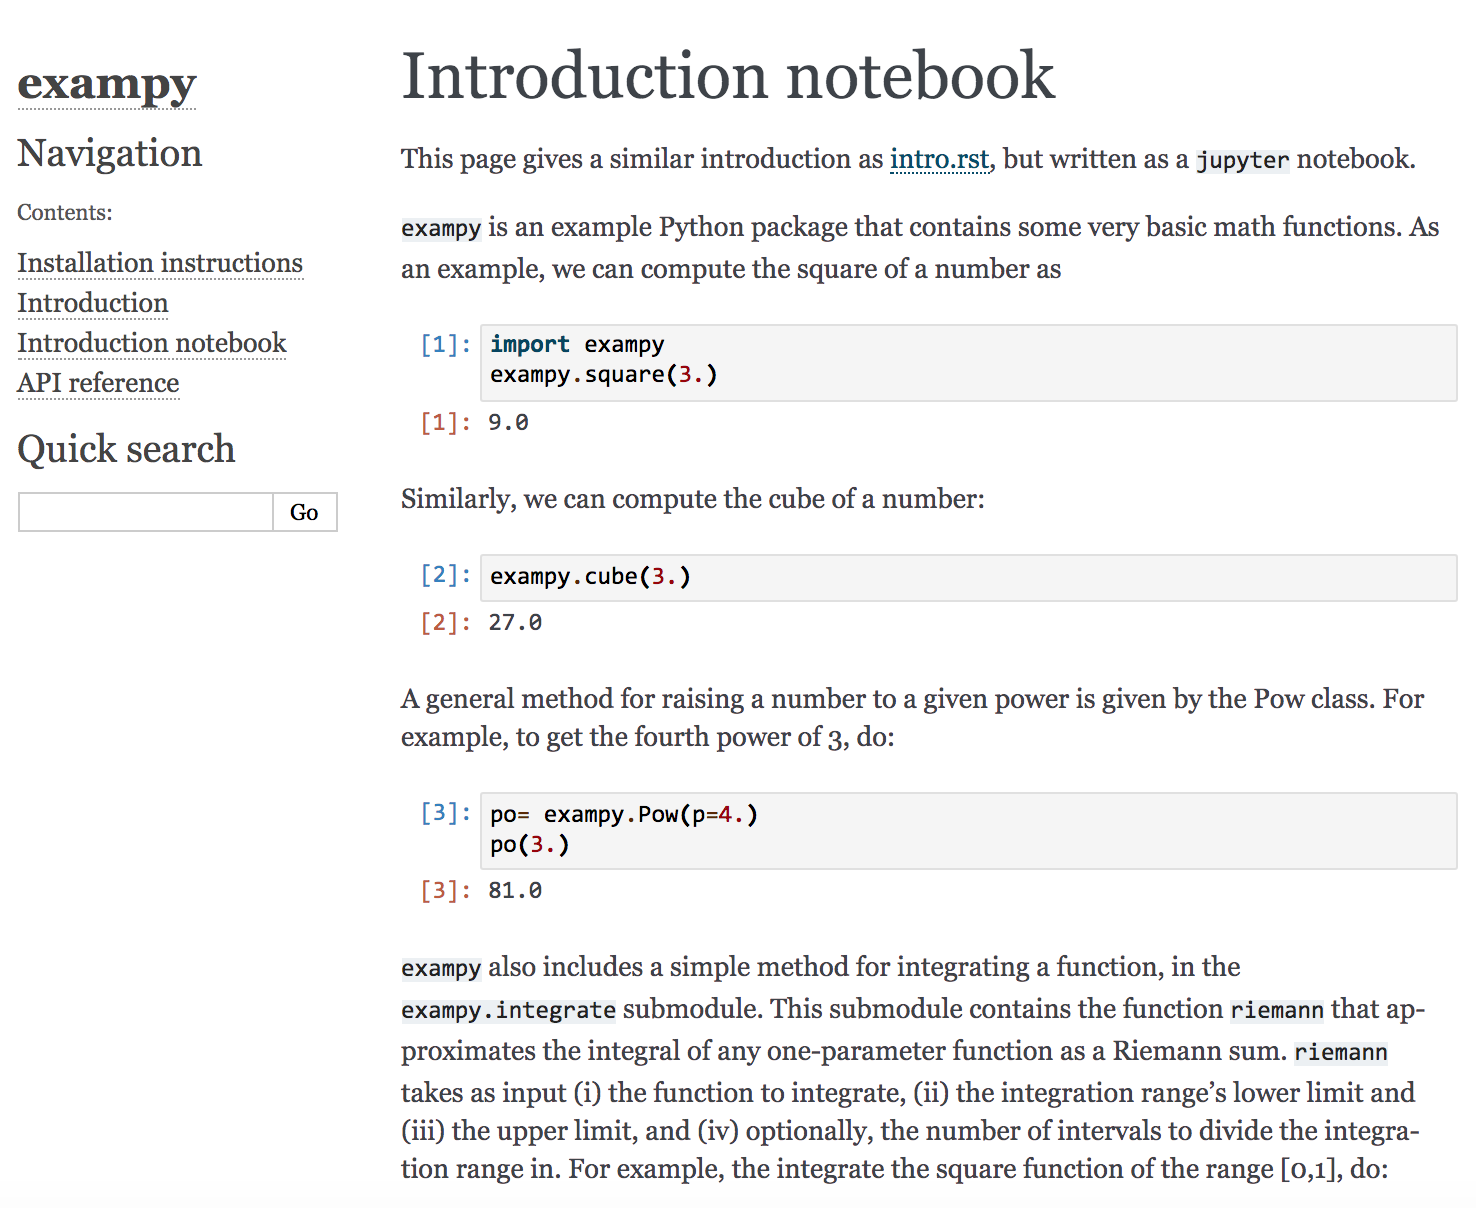
We see that the documentation page looks very similar to the one we created from intro.rst.
4.7. Automatically building and hosting your documentation on readthedocs.io
To host the documentation you generate using sphinx online, you could upload it to a dedicated website (e.g., a GitHub Pages site), but readthedocs.io is a free online service that has become the go-to destination for hosting code documentation online. readthedocs.io seamlessly integrates with GitHub and sphinx and automatically generates multiple, easily-accessible versions of your code’s documentation for different releases and for the
development version, the latter of which is updated upon every push of your code to GitHub. If you have working sphinx-based documentation for your package, it is easy to get started with readthedocs.io and have your documentation online quickly.
To get started, head to https://readthedocs.io, click on “Log in”, and sign in with your GitHub account (you could make an account as well, but signing up with your GitHub account makes syncing your readthedocs.io account with your GitHub repositories easier). You are brought to your dashboard where you have the option to import a project. Click on that button to obtain a list of projects that you could import (these are your GitHub repositories; you may have to hit refresh to get the list)
and click on the one you want to start building online documentation for. Once you confirm, you are brought to the readthedocs.io owner page for your project, which looks as follows at the start:
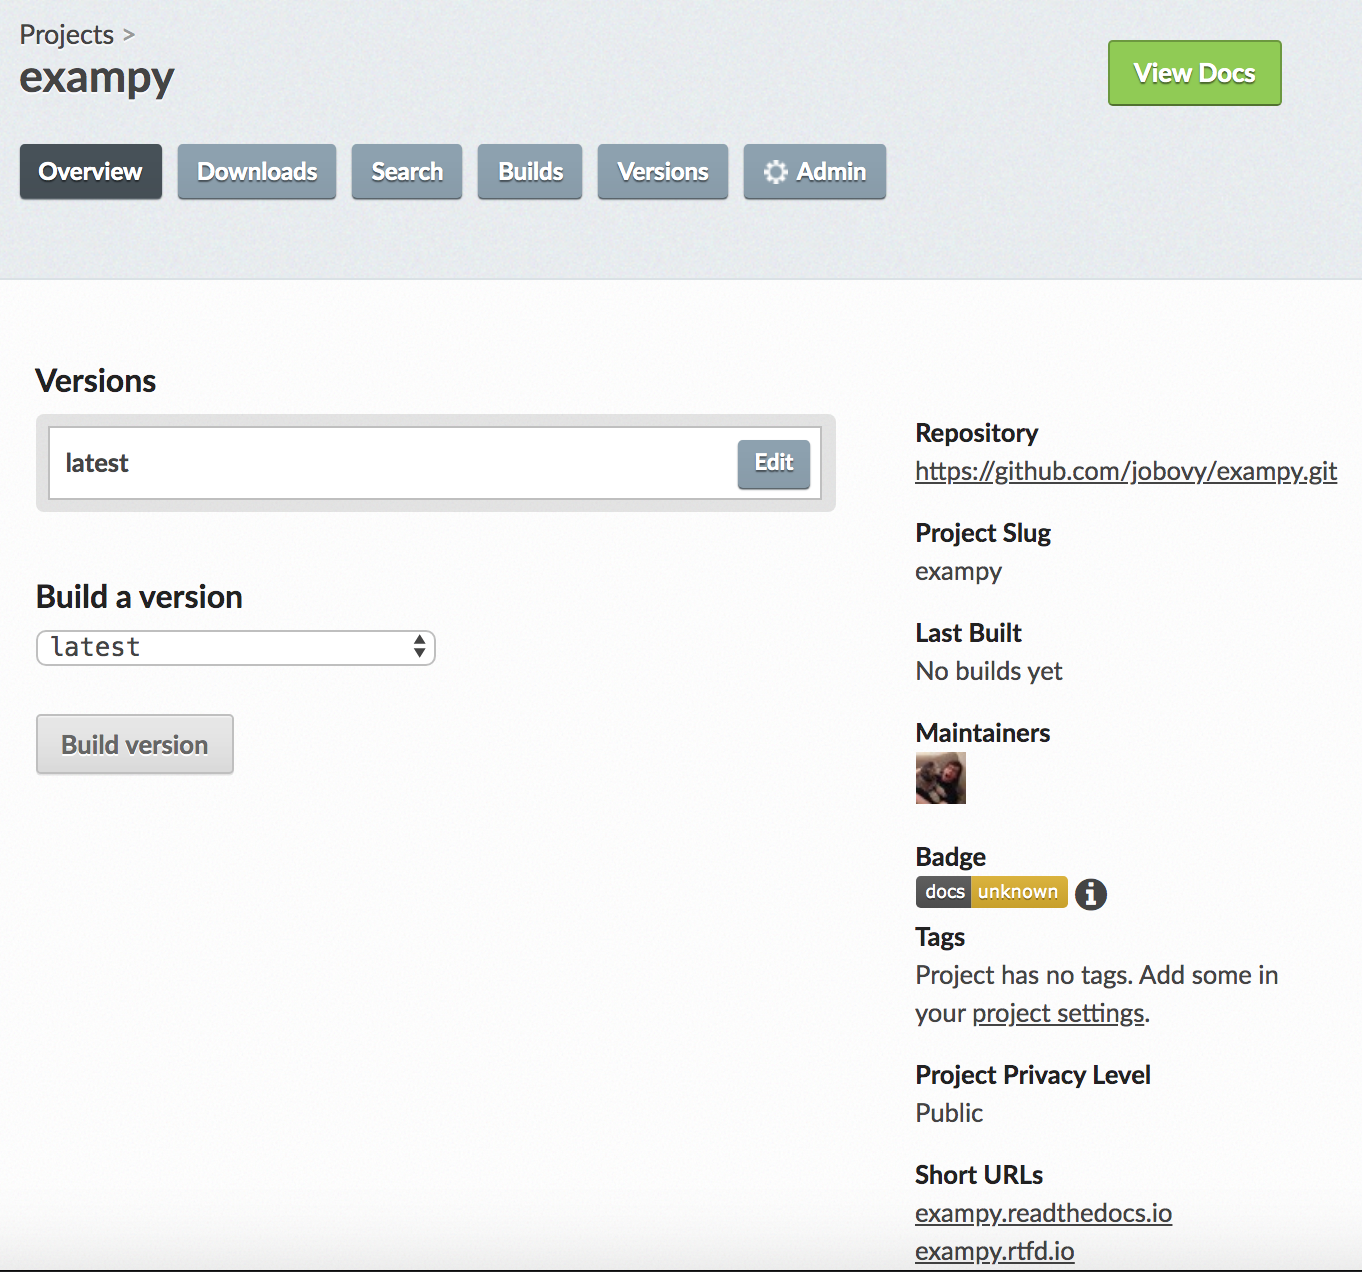
You can click on “Build a version” to get a first build of the documentation going; this build will likely fail, because it hasn’t been configured yet, but it will set up a webhook to automatically update the documentation when you push changes to GitHub, which is convenient.
To configure a project on readthedocs.io, add a .readthedocs.yml configuration file, which is documented here. A simple one to get started looks like
version: 2

sphinx:
  configuration: docs/source/conf.py

python:
  version: 3
  install:
    - method: pip
      path: .
Here, version: sets the version of the readthedocs.io configuration file format to use (version 2 is the latest, which I will use here, but version 1 is still the default); sphinx: tells readthedocs.io to use sphinx to build the documentation and states where the conf.py file is located (readthedocs.io can also find it automatically, but it’s always best to be explicit), and the python: section configures how to install the package and its dependencies (more on
that below).
Because readthedocs.io may be using an older version of sphinx that does not automatically find your documentation’s master file if you named it source/index.rst (older versions of sphinx assumed it was source/contents.rst), you also have to set master_doc = 'index' in the source/conf.py file to explicitly tell sphinx which document contains the main toctree. Adding this .readthedocs.yml file and this change to source/conf.py and pushing these changes
to GitHub, you will see that the nexxt build of your documentation commences automatically on readthedocs.io. When your documentation builds successfully, you can click on “View Docs” to see the online documentation (at https://exampy.readthedocs.io/en/latest/ for the example package). This documentation looks like (this is the version before we added the source/intro_notebook.ipynb jupyter notebook; see below)
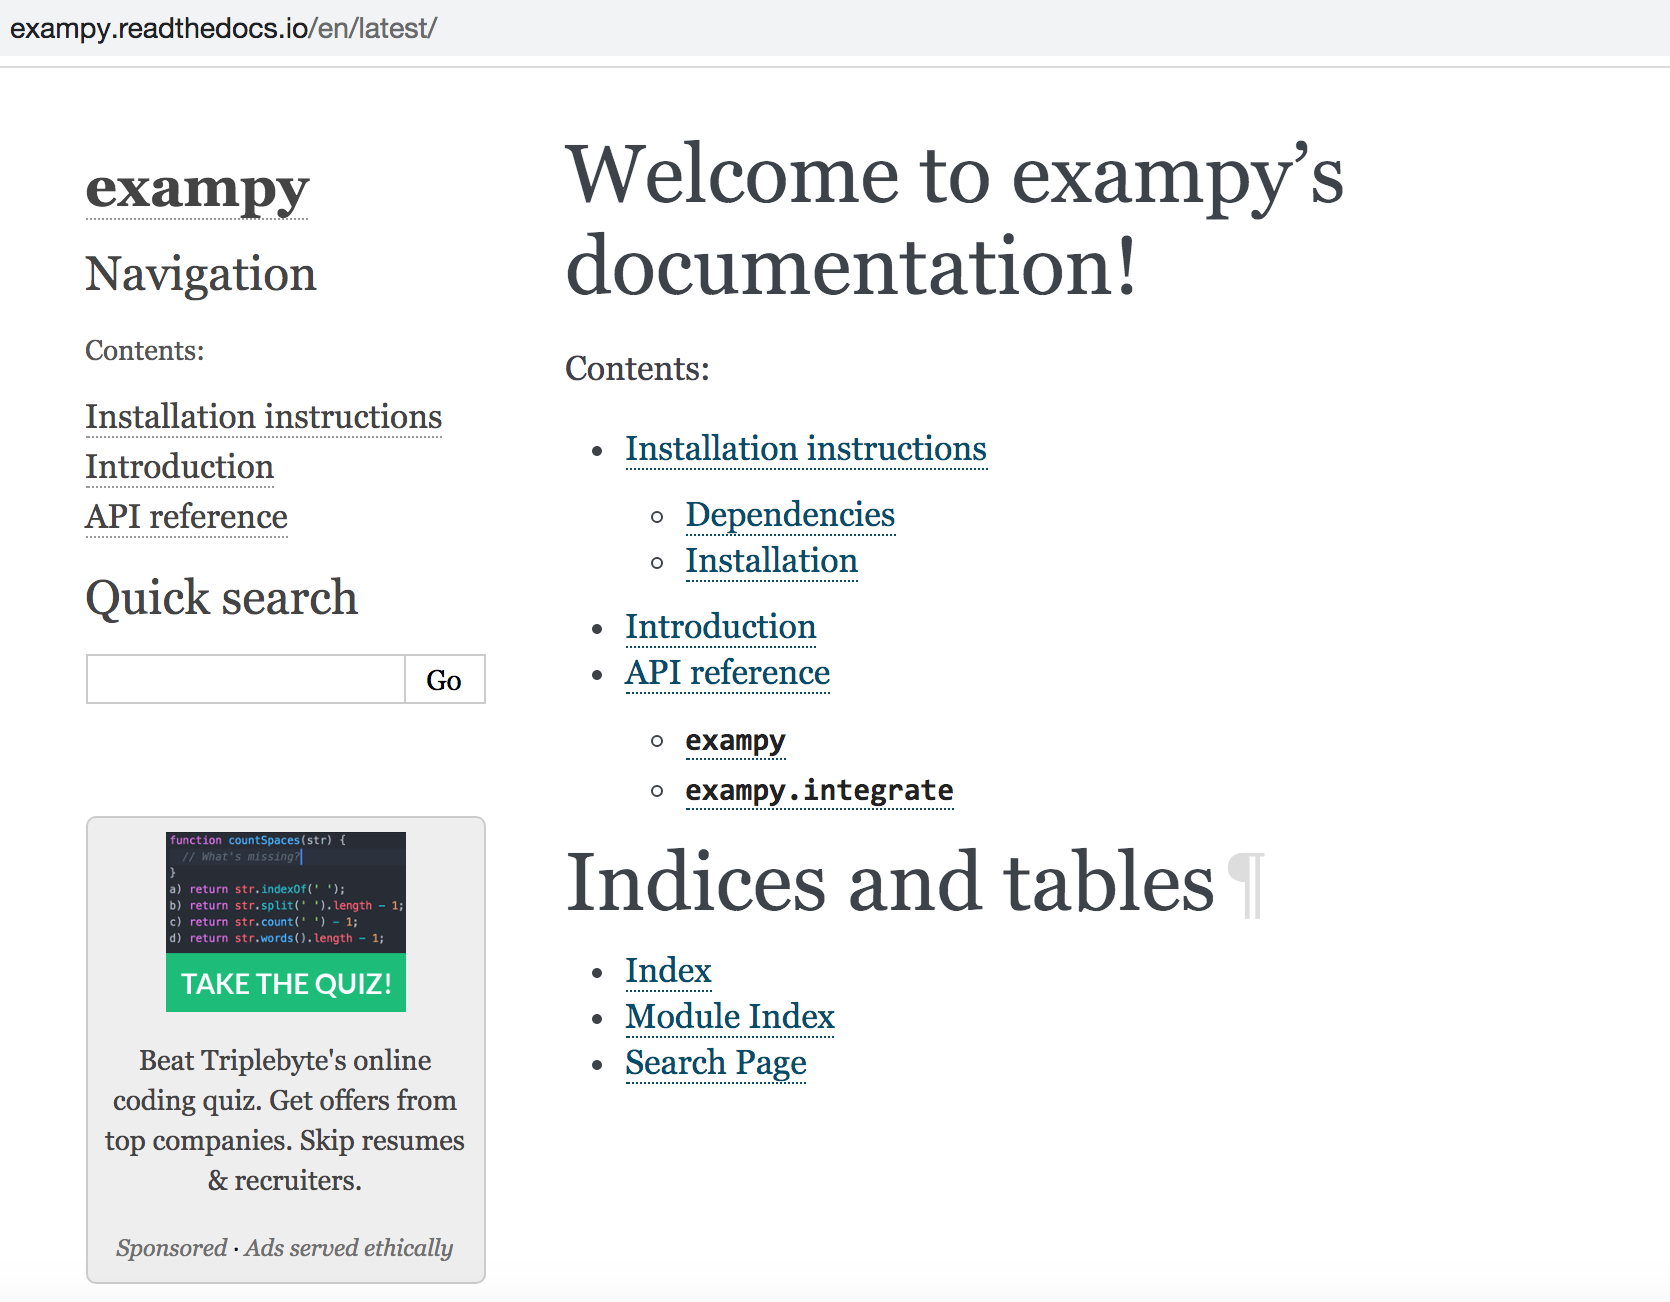
As you can see, it looks almost identical to the documentation that we rendered locally above, but now it is available online.
Including a jupyter notebook in the online documentation requires us to install nbsphinx on the readthedocs.io build server. What gets installed as part of the build process is controlled by the python: section of the configuration file. Above, we simply asked for the exampy package to be installed with pip install ., because I specified method: pip and path: . in the install: section. This is a standard Python install and it therefore also installed
exampy’s requirements listed in the install_requires section of its setup.py file, but this does not contain the nbsohinx requirement. We can add additional requirements using a requirements.txt file: such a file could live at the top level of the git repository, in which case it would be an alternative way of specifying the package’s dependencies (this is standard pip usage), but we can also include a requirements.txt file in the docs directory that is
specific to building the documentation. We will do that for nbxphinx, placing just that one line in docs/requirements.txt and updating the readthedocs.yml to
version: 2

sphinx:
  configuration: docs/source/conf.py

python:
  version: 3
  install:
    - method: pip
      path: .
    - requirements: docs/requirements.txt
Pushing these changes to GitHub, the documentation gets built automatically, and it now includes the jupyter notebook that we included.
Before you release a version, readthedocs.io will show only the latest version of your documentation, but when you create a release or a git tag, your readthedocs.io page will include those versions, which you should give names like “1.2.1” etc. On your project’s admin page, you have the option to edit the versions that are shown (for example, to remove old released versions, although unless you have released in error, it’s
best to keep old versions around for reference). You can also build the documentation for other branches, which you should use sparingly, but it is useful when you are developing a new feature with extensive documentation and you want to see what the documentation looks like before merging this branch into your main branch.
Typically, the automatic builds on readthedocs.io work fine and once set up, you will have to interact very little with the readthedocs.yml service, but you do have the option to trigger a build yourself on your project’s admin page. That can be useful when a build failed because of some issue installing a dependency (e.g., it briefly broke), and you want to re-build the documentation without pushing new changes to GitHub. There is extensive documentation
online (obviously …) that allows you to easily make even complex changes to the way readthedocs.io serves your documentation (like serving it from a custom domain).